Why We Don’t Have Phone Support

We limit our support to online communication because we can offer better supportmore innovation, and lower prices.

Better Support

We’ve found that providing support via online communication (email, chat, documentation, etc.) works best for an online application like Event Espresso. Our team is able to gather system details, website and event configuration information, and other facts so that they can troubleshoot effectively, and link to educational resources that help you get the most out of Event Espresso.

We are fast to reply too, our support team constantly monitors the forums throughout the day.

The support is outstanding. The support forum is a great resource for finding answers to many questions that are similar to others during the development process. Their responses are speedy and spot on.

KjGreen

Each request for information was answered rapidly – the fastest response I have ever received from a plugin developer! Thanks!

lumins

The team behind the plugin provides outstanding support and are clearly committed to improving the state of Event Management on WordPress.

ivycat

It works perfect and if you have any questions their support is great!

naredi

GREAT support both from official EE crew and also the community.

abmiller99

support has been very good and responsive.

amandaraoul

great product and support for so many years now!

mvincik

I’ve contacted their support a number of times and they’ve always been very responsive and helpful.

heathrunner

Getting started, support quickly answered all my questions and now I use the forums when I need help.

johnmacek

Amazing support. I can count on a response in very short order. I submitted a support ticket this morning and got a response within an hour. Of course, I have to pay for support and it isn’t cheap; but it isn’t expensive, either, given the level of response being provided.

rhj4

Their support people are awesome – as is their forum.

sock2me

More Innovation

It’s important for us to maintain an environment of constant innovation. Our support team works with the rest of our company, which makes it possible for our teams to collaborate and spur the innovation that we value so highly. Electronic communication can be documented, aggregated, and used as support for new features and development.

Lower Prices

It allows us to keep our overall pricing down while maintaining a feature-rich application and continuing to provide great support. We want Event Espresso to be accessible and affordable for all of our customers. Structuring things around these online channels makes it possible for us to scale our support using this philosophy.

We also provide access to a support token where, if necessary and effective, our support team can engage with you via a phone conversation. This makes it fair because those who need more expensive support are paying for it, while those who don’t need an expensive of support are not paying for it.

Posted in | Comments Off on Why We Don’t Have Phone Support

How to Add iCal Download Links to Messages

The iCal shortcode for messages in EE4 helps to keep your attendees synchronized with any upcoming events they’ve signed up to attend.


What is iCal?

Short for iCalendar, iCal is a computer file format which allows Internet users to send meeting requests and tasks to other Internet users by sharing or sending files in this format through various methods. The iCal file format (usually has an extension of .ics) is used and supported by a large number of products, including Google Calendar, Apple Calendar (formerly iCal), IBM Lotus Notes, Yahoo! Calendar, Evolution (software), eM Client, Lightning extension for Mozilla Thunderbird and SeaMonkey, and partially by Microsoft Outlook and Novell GroupWise.


How Does iCal Work?

Within Event Espresso 4, the iCal Download Link makes it easy for your registered attendees (customers) to quickly add the event they have registered for to their favorite, supported calendar application. You may have noticed the iCal icon/button link presented in your event listings; it looks something like this:

iCal Download Button Example

How to Add iCal to “Registration Approved” Messages

Adding an iCal download link/button to your email messages is a relatively easy task. All you have to do is add the “iCal” Message Shortcode to a supported Message Template, such as the “Registration Approved” template.


iCal Shortcode Examples:

Shortcode example using default link text (“Add to iCal Calendar”):

[ICAL_LINK_*]

Using custom link text example:

[ICAL_LINK_* link_text="Add to my Calendar"]


iCal Shortcode Tutorial:

Here’s a short tutorial that demonstrates how to add the iCal shortcode to your messages:

  1. Login to your WordPress dashboard, then navigate to Event Espresso > Management > Messages > Default Messages Templates tab.
  2. Find the “Registration Approved” message template, then click the “Registrant” link: registration approved message template link
  3. Scroll to the date times area ([DATETIME_LIST] *:) which appears towards the end of the message template editor page.
  4. Add this shortcode within the list item (<li>) HTML tags:
    [ICAL_LINK_*]

    Example: [DATETIME_LIST] shortcode example
    Note: you can use the shortcode selector menu to add the shortcode easily. Here’s an example:
    ical link shortcode example

  5. [Optional] Customize the link text. Using the “link_text” attribute, you can set a custom text string within the link. Here’s an example of the shortcode you would use:
    [ICAL_LINK_* link_text="Add to my Calendar"]
  6. Save the message template.
  7. Test to make sure the shortcode works. Once the shortcode is added to the message template, your registration confirmation emails will include a link to download the iCal file to the customer’s computer. You can test this by registering for an even on your site or by using the “Extra Actions” section in the message template editor to send yourself a test message. Here’s an example of how it should look in the email message: email message with ical link
  8. All done. Your registration confirmation emails will now include a link to download an iCal file so that your attendees can sync the events they’ve registered for to their personal calendar.


Troubleshooting

  • Dates are off by one hour
    When using the iCalendar Download (with Outlook) you may get a one hour offset (later) to the actual event time (e.g. 10 am – 12 pm will display 11 am – 1 pm). The time offset happens because the UTC option is applied in the WordPress > Settings > General Settings > Timezone setting. We recommend selecting a city/region near you instead of UTC. After updating this setting, please update your events, so they have the correct dates.

Posted in | Comments Off on How to Add iCal Download Links to Messages

Use the Event Espresso MailChimp Add-on to Automate Sending Messages to Attendees

MailChimp is a powerful email marketing tool used by millions (14+ million currently) of people and businesses around the world. MailChimp sends out more than a billion emails a day.

One of the features we love to use with Event Espresso is their campaign scheduling feature. We have received lots of questions regarding an automated messages feature in Event Espresso that will allow our customers to automatically send out email reminders x number of days before an event. Automated Messages from Event Espresso is on our road map, but until it is officially released MailChimp can help you automate communicating to your audience.

With MailChimp, you can set up automated messages to be sent out on specific dates to specific groups or lists of subscribers; in this case, your event attendees. One great feature in the Event Espresso MailChimp add-on is the ability to send subscribers of specific events to specific groups in MailChimp. For instance, if someone registers for Event A, their information can be sent to your MailChimp group that is set up for Event A. This will give you the ability to email only the attendees of Event A.

Here is how you do that:

We assume you have already purchased the Event Espresso MailChimp add-on and installed it in your WordPress dashboard. If you haven’t, then what are you waiting for? Purchase MailChimp for Event Espresso Today!

First, you will need to create a list and groups for your events in MailChimp to sort your email lists by event. If you do not need your subscribers to be grouped by specific events, you can skip this step.

Creating MailChimp Lists


Creating MailChimp Groups


Then, in your event editor, you will select the list and group where you want to send the subscribers. This will allow you to send communications specifically for that event.


Note: The Event Espresso MailChimp add-on settings allow you to choose which attendee registration status is sent to the MailChimp list. The options are: subscriber submits information, registration is completed (payment status does not matter), or registration is submitted with an approved status.

Now, back to the MailChimp dashboard. We are going to schedule a message to be sent one week before the event starts reminding the attendees about the event. Our event begins on July 11, 2017, so we want to send the reminder message on July 4th.

You will then need to create a campaign in MailChimp. Be sure to select the correct group for the particular event. MailChimp’s campaign builder will walk you through the campaign setup quite smoothly.


Campaign Design View
Once you have reached the Confirm step in the campaign builder, and all of the items in the list have been checked off, you want to select Schedule at the bottom.


Scheduling the campaign.
On the next page, you will configure the date and time you want to send the message to your event attendees.


The Campaign Scheduler


Once you have done that, click Schedule Campaign, and you are finished! Your message will now be sent out to your attendees at the set time. Pretty nifty huh?

Posted in | Comments Off on Use the Event Espresso MailChimp Add-on to Automate Sending Messages to Attendees

How to Fix Emails Sending from WordPress@

When emails send from your own server, do they look like they’re coming from WordPress? For example, the sender always says “WordPress”?

Email providers often reject email from email accounts that aren’t genuinely originated from the email provider’s servers. This helps secure their users’ email identities from being used by unauthorized senders. For example, sending email from your websites’ servers with a Yahoo email address such example@yahoo.com as the sender will likely be blocked from being delivered.

The reason you are seeing the emails being sent from wordpress@yourdomain.com is because your administrator email does not match your website domain that the form is being sent from. So, for example, if you have a @gmail.com address as your admin email, it will build a local wordpress@yourdomain.com email. This mirrors behavior from within WordPress itself to send certain emails. Again, because the email originates from your website’s server, this is an attempt to make sure your email is delivered by properly identifying it came from your server not your gmail or yahoo (etc.) email service.

To solve this, you can either:

  1. Set the admin email to one that matches your domain, e.g. info@yourdomain.com
  2. Use either the Send From or WP Mail SMTP plugin to override the internal wp_mail() settings.

We recommend using either Send From or WP Mail SMTP because it helps solve a lot of other issues in addition to you not having to change your admin email.

Event Espresso 3 Users:

In Event Espresso > General Settings, there is an option labeled: “Use fancy email headers?” under “Email Settings”. If you set this to yes, and your server supports the fancy email headers, it will use the Organization Name that’s entered in the “Contact Information” as the email from name.

Posted in | Comments Off on How to Fix Emails Sending from WordPress@

REST API

This page should redirect here: https://github.com/eventespresso/event-espresso-core/tree/master/docs/C–REST-API

The documents in this folder are all related to the REST API in EE4 core.

Table of Contents

GET Requests

RPC Style Endpoints

There are a few endpoints in the EE4 REST API that really don’t follow the REST way of doing things, and are more like RPC (Remote Procedure Calls). These endpoints aren’t just for simple reading, inserting, updating, or deleting. They have a bunch of other logic tied in there, which can sometimes be handy, so that your application doesn’t need to implement all this logic itself (of course if you don’t want all this extra logic, you’re welcome to use the more traditional RESTy read and writing endpoints instead).

Posted in | Comments Off on REST API

Simple Sold Out Event Notifications

At this time, Event Espresso does not automatically notify event managers of sold out events. To facilitate this feature until we have developed and released an “Automated Email Notifications” add-on, we have built in a series of filter hooks that can be used to trigger a simple email notification.

Basically, when the number of approved registrations equal the number of date time registration limits for a particular date time a simple email notification will be sent to the event manager.

Step 1 – Create a Site Specific Plugin

These changes will be applied using WordPress filters. Its best to add the sample code snippets below to a site specific plugin. You can view our guide on creating a site specific plugin for WordPress.

Step 2 – Add the Filter Hooks

Copy and paste the code from the bc_sold_out_event_email_notification.php Gist into the site specific plugin you just created.

Step 3 – Upload & Activate Site Specific Plugin

Once you’ve added the code from the Gist into your site specific plugin, activate the plugin on your website.

Going forward, whenever an event sells out, the event manager will receive an email about the sold out event. Here’s an example:

Event Espresso - sold out email example

Additional Information

Filter Hooks Used in this Example:

  • AHEE__EES_Espresso_Thank_You__check_for_sold_out_events
  • AFEE__EES_Espresso_Thank_You__check_for_sold_out_events__send_sold_out_event_email
  • AFEE__EES_Espresso_Thank_You__check_for_sold_out_events__sold_out_event_email_recipient
  • AFEE__EES_Espresso_Thank_You__check_for_sold_out_events__sold_out_event_email_subject
  • AFEE__EES_Espresso_Thank_You__check_for_sold_out_events__sold_out_event_email_message

Posted in | Comments Off on Simple Sold Out Event Notifications

Event App Customization Add-on

The Event App Customization add-on allows you to customize some aspects of our event app. Basically, once you’ve uploaded a logo to your site and login once, the app will be customized to show your company logo.

View quick links for this add-on –>


Need to Buy a Support License for the Event App Customization Add-on?
https://eventespresso.com/product/eea-event-app-customization/

Installation

This add-on requires Event Espresso 4.9.9 or newer. It cannot be used with old versions of Event Espresso 4.

This add-on is a plugin for WordPress and can be installed through your WP dashboard (WP-admin).

Download the latest version of the Event App Customization add-on from your Event Espresso account.

Then login to your WordPress dashboard (WP-admin) and go to Plugins. Next, click on Add New –> Upload and browse to the plugin on your computer. Then select the zip file and begin the upload process. Wait for the plugin to upload and then click on Activate.

Setup and Configuration

Login to your WP dashboard and go to Event Espresso –> App Customization.

You’ll now be viewing the overview screen for the Event App Customization add-on.

event app customization settings

Usage

Simply upload a logo and save the page. Next time you login to the EE4 event app, you will see your logo on the login screen.

Available Options

  • App Logo Image

    Use this field to upload your own logo for use in the event app. Defaults to the “Company Logo” that is set in the Event Espresso > General Settings page.

  • Image Recommendations

    File Type:
    .png or .gif (should have a clear background), dimensions: 1200×800 (keep in mind, the larger the image, the longer it takes to load initially)

    Image Dimensions:
    1200×800 (keep in mind, the larger the image, the longer it takes to load initially)

  • Powered By Text

    Optionally replace the “Powered by Event Espresso” text in the login screen footer.

Frequently Asked Questions

  • Will the customizations take effect the first time I login into the event app?
    Yes, after logging into the app the first time, you will notice that any events without a featured image will now show your logo, instead of the Event Espresso logo. When logging back into the app (after logging out) you will see your logo on the app login screen.

Troubleshooting

The plugin will not activate. Can you help?
Are you running a current version of Event Espresso 4? This add-on needs at least version 4.9.9 to activate.

Need to Buy a Support License for the Event App Customization Add-on?
https://eventespresso.com/product/eea-event-app-customization/

Posted in | Comments Off on Event App Customization Add-on

PayPal Express Payment Gateway

Accept payments through PayPal with Event Espresso’s event registration plugin so you can receive online payments from your attendees for their event registrations through credit cards, debit cards, and PayPal.com funds. Enable guest checkout in your PayPal.com account and your attendees can pay without needing a PayPal.com account.

View quick links for this payment gateway –> 


Need to Buy a Support License for Event Espresso 4 (includes PayPal Express)?
Accept event payments with the PayPal Express payment gateway for Event Espresso

Installation

No installation is required. The PayPal Express payment gateway is included with the Event Espresso 4 core plugin.

Locate your Credentials for PayPal Express

Your credentials for PayPal Express can be found in your PayPal.com account. A premier or business account will be needed and your account should already be approved for production (accepting live payments). Here are the steps to find your credentials for PayPal Express:

1) Log in to your PayPal.com account here.

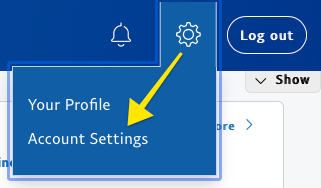
2) Look for the gear icon in the top right area of your screen and click on it.

3) Click on Account Settings.

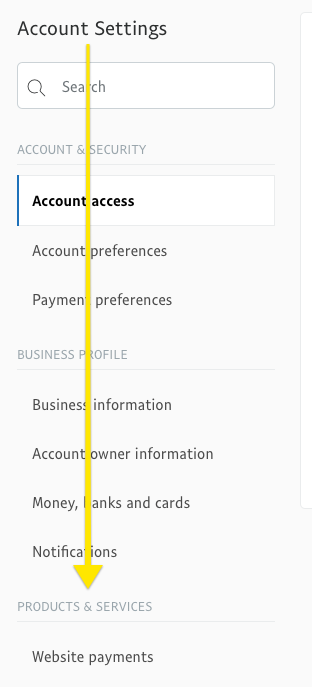
4) Look at the left area of your screen for Account Settings. Then scroll down and look under Products & Services and click on Website payments.

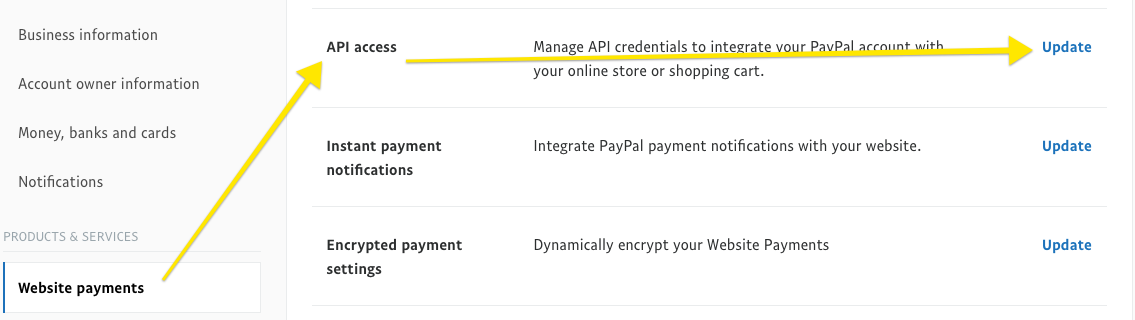
5) Look to the options listed on the right and find API access. Click on the Update link for API Access.

6) You’ll now see the Your payment API credentials page. Scroll to the end of the page and look for NVP/SOAP API integration (Classic). Click on the Manage API credentials link.

If you have used PayPal Express for other projects, then you’ll have existing API credentials that you can view by clicking the Show. You can then copy the API credentials into the payment methods page for Event Espresso within your WordPress dashboard and then click on the Update Settings button.


If this is your first time using PayPal Express, then you can request the API credentials by continuing with the steps below.

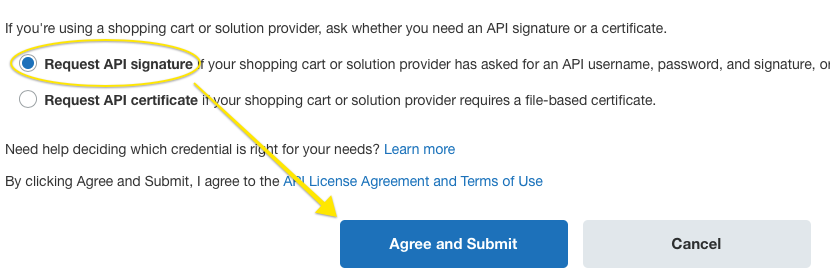
7) Choose the first option for Request API Signature for API username, password, and signature. Click on the Agree and Submit button.

8) Then click on the link to Show the credentials.

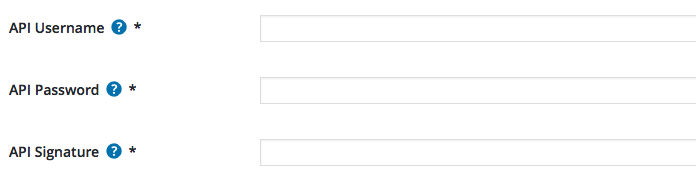
9) You can then copy and paste the API username, API password, and Signature into the payment methods page for Event Espresso within your WordPress dashboard and then click on the Update Settings button.

Need to test PayPal Express before using live (production) mode? You’ll need a separate set of credentials for the PayPal Sandbox which can be used for testing out PayPal Express.

Will PayPal Express be the only payment method enabled or the only one you offer? Click here to learn how to make it selected by default during the registration checkout.

Setup and Configuration

An account with PayPal is needed to accept payments via PayPal Express. Need an account? Call this number to get started: 1-855-456-1338.

A dedicated SSL certificate is recommended to make registration checkout and other areas of your website more secure.

Login to your WP-admin (WP Dashboard) and go to Event Espresso –> General Settings –> Payment Methods. Once on the Payment Methods screen, click on PayPal Express and click on the button to activate the payment method.


paypal-express-payment-gateway-event-espresso
Below are the available fields and explanations for each field.

Name – This is the name of the payment method.
Description – This description is shown during registration checkout.
Admin-Only Name – This is a name of the payment method that will only be shown in the WP Dashboard (WP-admin).
Admin-Only Description – This description is used only in the WP Dashboard (WP-admin).
Debug Mode On? – Enables debugging for this payment method. It should be off (set to no) on a live/production site.
Open by Default? – This sets this payment method to be pre-selected on the registration checkout page.

You can offer multiple payment options to your attendees. However, if you have a single payment gateway enabled, then set it to Open by Default for a faster checkout experience for your attendees.

API Username – This credential is needed to process payments and can be found in your PayPal.com account.
API Password – This credential is needed to process payments and can be found in your PayPal.com account.
API Signature – This credential is needed to process payments and can be found in your PayPal.com account.
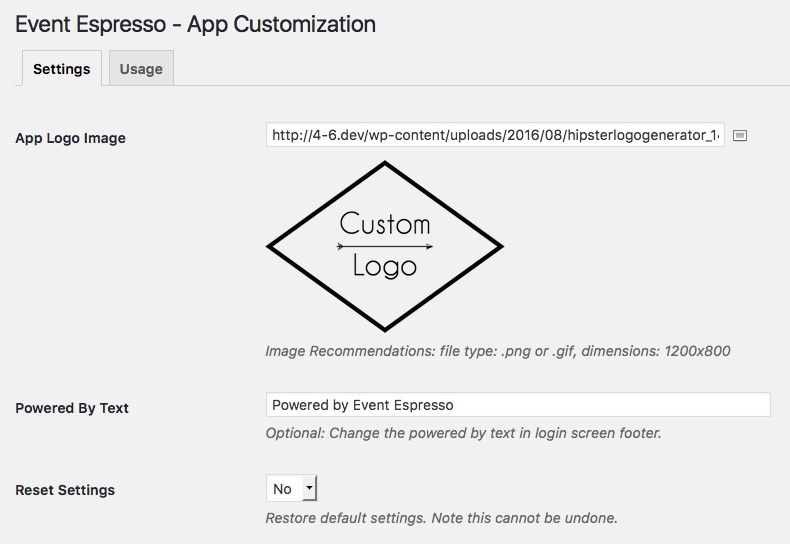
Image URL – This is the URL to the image that will be displayed when paying for a registration on PayPal.com. Create a logo image up to 90 pixels wide by 60 pixels high and save it in a valid graphics format, such as .gif, .jpg, or .png. Then upload to your WordPress media library and set the URL to this field.

Button URL – This is the URL to the image that will be displayed during the payment process of registration checkout.

Alternative Button URL: https://ee-screenshots.s3.amazonaws.com/2016/08/paypal-express-checkout-logo.png
Pay with PayPal
Alternative Button URL: https://ee-screenshots.s3.amazonaws.com/2017/03/paypal-logo-with-credit-cards.jpg
Image

Usable From? – Select where this payment method should be available for use. This payment method cannot process payments through the WP-admin (WP Dashboard).
Order – The value (number) can be used to sort or arrange this payment option. A lower value means that it should appear first during registration checkout.
Update Settings – Click this button after making any changes to your payment method.
Deactivate Payment Method – Click this button to deactivate this payment method.

Guest checkout

PayPal offers a guest checkout option which will let a registrant/attendee pay with a credit card without needing a PayPal.com account. Guest checkout is available in many countries. However, it is not available everywhere so check with PayPal.com support if you are having trouble following the steps below.

1) Login to your PayPal.com account

2) Look in the top right area of your screen for Profile (gear icon) and click on it and then click on Profile and Settings

3) On the left side of the screen, you’ll see some menu options. Look for My Selling Tools and click on it.

4) Look for Website Preferences which appears under the Selling Online sub-heading and then click on the Update link

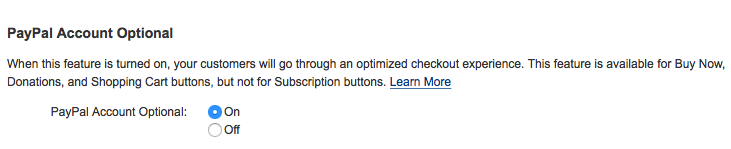
5) Scroll down the page and look for PayPal Account Optional. Then change the setting to On and then click on the Save button to save changes. Here is a screenshot of how the option appears:
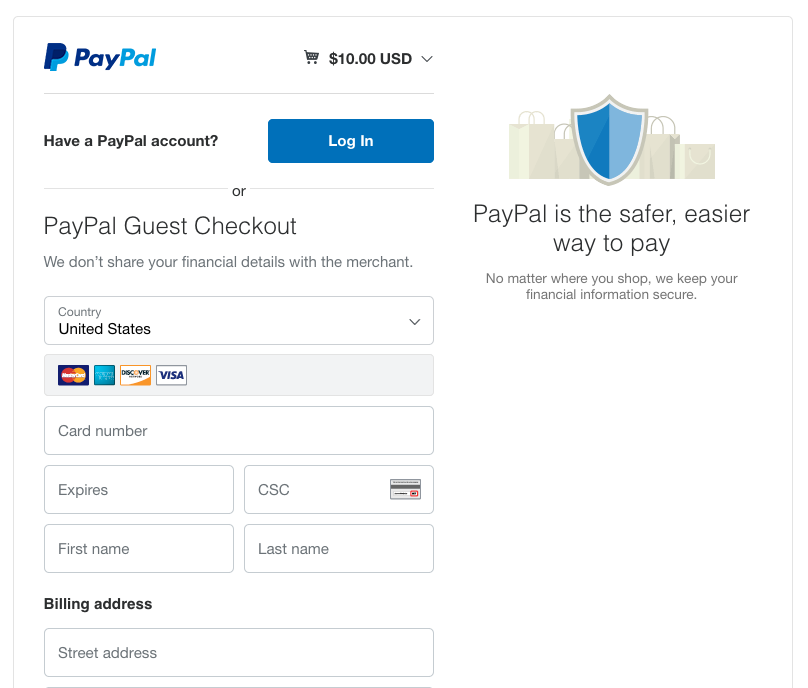
and the end result:

6) Now you can update the payment button for your PayPal Express payment method. You can download the alternative button image here. Then go to your WordPress dashboard (WP-admin) –> Event Espresso –> Payment Methods and click on PayPal Express. Go to the Button URL field and click on the icon to upload a new image. Select the new button from your computer and then upload it. Then save changes to the PayPal Express payment method.

Usage

The PayPal Express payment gateway will let you accept payments through PayPal funds.

This is an off-site payment gateway which means that attendees/registrants will process their payment a secure PayPal.com web page and then they will be returned to your website to view a confirmation of their registration(s).

An account with PayPal is needed to accept payments via PayPal Express and an SSL certificate is recommended for securing your website.

Troubleshooting

I configured PayPal Express and payments are not being processed. Can you help?
Double-check your credentials to make sure that you are using live credentials which are for production mode. Also, ensure that there is no extra spacing before or after the credentials in the payment methods page of Event Espresso.

I’m seeing a security header not valid error. What does this mean?
There is a problem with your credentials. Double-check that they are for a production/live account and if needed deactivate the existing credentials and create a new set. Then update these in the payment methods page of Event Espresso within your WP-admin (WP dashboard).

When I refund a payment, does it also refund through PayPal Express?
Refunds in Event Espresso 4 are currently a two-step process.
1) Apply the refund through the transactional details screen of Event Espresso in your WP-admin (WP dashboard).
2) Then login to your PayPal merchant account and process the refund.

How can I set up a recurring payment or subscription through PayPal Express?
Recurring or subscription payments are not currently supported in the PayPal Express payment gateway.

Is an SSL certificate needed for PayPal Express?
A dedicated SSL certificate is recommended if you are accepting payments on your website.

Do I need to be PCI compliant?
Compliance with the Payment Card Industry Data Security Standards (PCI DSS) is required if you are processing, storing, or transmitting credit card data. Event Espresso recommends using a dedicated SSL certificate on your website.

View more information on PCI compliance from PayPal.

Customizations

Our support team cannot write custom coding for you. Below are some examples on customizing this payment gateway.
  • None at this time — check back soon!


Need to Buy a Support License for Event Espresso 4 (includes PayPal Express)?
Accept event payments with the PayPal Express payment gateway for Event Espresso

Posted in | Comments Off on PayPal Express Payment Gateway

TransFirst Payment Gateway

Get online payments from your attendees for their event registrations using TransFirst Transaction Express with a credit or debit card, a checking bank account, or a savings bank account.

View quick links for this payment gateway –> 


Need to Buy a Support License for the TransFirst Payment Method for Event Espresso 4?
Accept event payments with the Transfirst payment gateway for Event Espresso

Installation

This payment gateway is a plugin for WordPress and can be installed through your WP dashboard (WP-admin).

Download the latest version of the TransFirst payment gateway for Event Espresso 4 from your Event Espresso account page.

Then login to your WordPress dashboard (WP-admin) and go to Plugins. Next, click on Add New –> Upload and browse to the plugin on your computer. Then select the zip file and begin the upload process. Wait for the plugin to upload and then click on Activate.

Locate your Credentials for TransFirst

Your Merchant Gateway ID and Reg Key were provided by TransFirst when your account was created. If you do not have your Gateway ID you can find it within your TransFirst account, log in and you will find the Gateway ID in the top right:

Image

If you do not have your Reg Key you will need to contact TransFirst.

Note: Debug mode should only be used with a TransFirst test account, it will not allow you to submit test transactions using your production (live) credentials. If you need to test TransFirst live, then we recommend creating a couple of ticket options (pricing options) with a low value and making a live payment. Then afterward, you can refund the funds.

Will Transfirst be the only payment method enabled or the only one you offer? Click here to learn how to make it selected by default during the registration checkout.

Setup and Configuration

An account with TransFirst is needed to accept payments via TransFirst.

A dedicated SSL certificate is recommended to make registration checkout and other areas of your website more secure.

Login to your WP-admin (WP Dashboard) and go to Event Espresso –> General Settings –> Payment Methods. Once on the Payment Methods screen, click on TransFirst and click on the button to activate the payment method.

Below are the available fields and explanations for each field.

Name – This is the name of the payment method.
Description – This description is shown during registration checkout.
Admin-Only Name – This is a name of the payment method that will only be shown in the WP Dashboard (WP-admin).
Admin-Only Description – This description is used only in the WP Dashboard (WP-admin).
Debug Mode On? – Enables debugging for this payment method. It should be off (set to no) on a live/production site.
Open by Default? – This sets this payment method to be pre-selected on the registration checkout page.

You can offer multiple payment options to your attendees. However, if you have a single payment gateway enabled, then set it to Open by Default for a faster checkout experience for your attendees.

Merchant Gateway ID – This credential is needed to process payments, it is provided by TransFirst when you create your account.
Merchant RegKey – This credential is needed to process payments, it is provided by TransFirst when you create your account.
Payment Types Accepted on your Merchant Account – TransFirst allows you to set up the types of payments you accept within your account. This option allows you to set which payment types are shown within the payment method.
Button URL – This is the URL to the image that will be used during the payment process of registration checkout.
Alternative Button URL: https://ee-screenshots.s3.amazonaws.com/2015/07/pay-by-credit-card.png
Pay by bank card
Usable From? – Select where this payment method should be available for use. This payment method cannot process payments through the WP-admin (WP Dashboard).
Update Settings – Click this button after making any changes to your payment method.
Deactivate Payment Method – Click this button to deactivate this payment method.

Usage

The TransFirst payment gateway will let you accept payments via credit/debit card or a checking/savings bank account.

This is an onsite payment gateway which means that attendees/registrants will process their payment on your site.

An account with TransFirst is needed to accept payments via TransFirst, and an SSL certificate is recommended for securing your website.

Troubleshooting

I configured TransFirst and payments are not being processed. Can you help?
Double-check your credentials and ensure that debug mode is off. Test mode (debugging mode) cannot be enabled with your production credentials from TransFirst. Also, ensure that there is no extra spacing before or after the credentials in the payment methods page of Event Espresso.

How can I set up a recurring payment or subscription through TransFirst?
Recurring or subscription payments are not currently supported in the TransFirst payment gateway.

When I refund a payment, does it also refund through TransFirst?
Refunds in Event Espresso 4 are currently a two-step process.
1) Apply the refund through the transactional details screen of Event Espresso in your WP-admin (WP dashboard).
2) Then login to your TransFirst merchant account and process the refund.

Is an SSL certificate needed for TransFirst?
A dedicated SSL certificate is recommended if you are accepting payments on your website.

Do I need to be PCI compliant?
Compliance with the Payment Card Industry Data Security Standards (PCI DSS) is required if you are processing, storing, or transmitting credit card data. Event Espresso recommends using a dedicated SSL certificate on your website.

View more information on PCI compliance from TransFirst.

Customizations

Our support team cannot write custom coding for you. Below are some examples on customizing this payment gateway.
  • None at this time.


Need to Buy a Support License for the TransFirst Payment Method for Event Espresso 4?
Accept event payments with the Transfirst payment gateway for Event Espresso

Posted in | Comments Off on TransFirst Payment Gateway

Attendee Mover Add-on

The Attendee Mover for Event Espresso 4 makes it easy as possible to move registrations between events.

View quick links for this add-on –> 


Need to Buy a Support License for the Attendee Mover add-on for Event Espresso 4?
https://eventespresso.com/product/eea-attendee-mover/

Overview

This add-on’s basic features include:

  • Ability to easily move attendees between events
  • Ability to easily reassign tickets to attendee
  • Keep a history of reassigned attendees

Installation

This add-on requires Event Espresso 4.9.13 or newer. It cannot be used with older versions of Event Espresso 4.

This add-on is a plugin for WordPress and can be installed through your WP dashboard (WP-admin).

You download the latest version of the Attendee Mover add-on from your Event Espresso account.

Then log in to your WordPress dashboard (WP-admin) and go to Plugins. Next, click on Add New –> Upload and browse to the plugin on your computer. Then select the zip file and begin the upload process. Wait for the plugin to upload and then click on Activate.

Setup and Configuration

A new admin menu will not appear for this add-on. It can be accessed by going to Event Espresso –> Registrations. Then look in the Actions column which appears in the far right area of the screen and look for the multiple arrow symbol (see image in the section for example).

Usage

Moving an attendee to a different event/ticket is easy and only takes four simple steps to move an attendee to a new event.

Step 1:
From the Registrations Overview page, click the “Attendee Mover” icon in the attendee row.

attendee mover registration overview

Attendee Mover Icon in Registration Overview

Step 2:
Choose the event that you would like to move the selected attendee to.

Attendee Mover - Registration Step 1

Attendee Mover – Registration Step 1

Step 3:
Select a ticket and click the “Next Step” button.

Attendee Mover - Registration Step 2

Attendee Mover – Registration Step 2

Step 4:
After the attendee is reassigned to the correct event/ticket, set the “Trigger Notifications” option to your desired setting. Then click “Next Step” button.

Attendee Mover - Registration Step 3

Attendee Mover – Registration Step 3

Now your attendee should be reassigned to the new event/ticket, where you can see a record of the reassignment.

attendee-mover-registration-step-4

Troubleshooting

  • The plugin will not activate. Can you help?
    Please first check that you have Event Espresso version 4.9.7 or greater installed.
  • The Select Event step returns “The results could not be loaded.”
    • If you have the iThemes Security plugin, you can go to
      Security > Settings > System Tweaks Configure Settings
      then uncheck the box next to Filter Long URL Strings, then click Save Settings.
    • The WordPress REST API must be enabled in order to use the Attendee Mover. Older versions of WordPress did not include the REST API. So if you have an older version of WordPress you can update to its latest version. Also, the REST API can be deactivated with plugins. If you’re unsure if the REST API is activated on your website, you can use the Health Check plugin to verify.

Customization

Our support team cannot write custom code for you.

Include Expired Events
To include expired events, add this filter (we recommend placing code snippets within a plugin):

add_filter(
    'FHEE__AttendeeMover_form_SelectEvent__generate__where_parameters',
    function() {
        return array();
    }
);
Need to Buy a Support License for the Attendee Mover add-on for Event Espresso 4?
https://eventespresso.com/product/eea-attendee-mover/

Posted in | Comments Off on Attendee Mover Add-on

Event Espresso