Connect MailChimp with Event Espresso, so your attendees are sent to a MailChimp list after a successful registration for your events. Afterward, you can keep attendees updated by sending information about future events or even invite attendees to register for upcoming events.
View quick links for this integration –>
The old documentation for Event Espresso 3 is available here.
Purchase a support license for the MailChimp integration for Event Espresso
Installation for the Event Espresso 4 MailChimp Integration
This add-on is a plugin for WordPress and can be installed through your WP dashboard (WP-admin).
Download the latest version of the MailChimp integration for Event Espresso 4 from your Event Espresso account.
Then login to your WordPress dashboard (WP-admin) and go to Plugins. Next, click on Add New –> Upload and browse to the plugin on your computer. Then select the zip file and begin the upload process. Wait for the plugin to upload and then click on Activate.
Setup and Configuration for the EE4 MailChimp Integration
From your WP dashboard, go to Event Espresso —> MailChimp Settings.
Adding your MailChimp API Key
1. If you do not already have an API Key for MailChimp, then one will need to be created. First, log in to your MailChimp.com account. Then go to your Account dashboard and locate Extras –> API Keys.
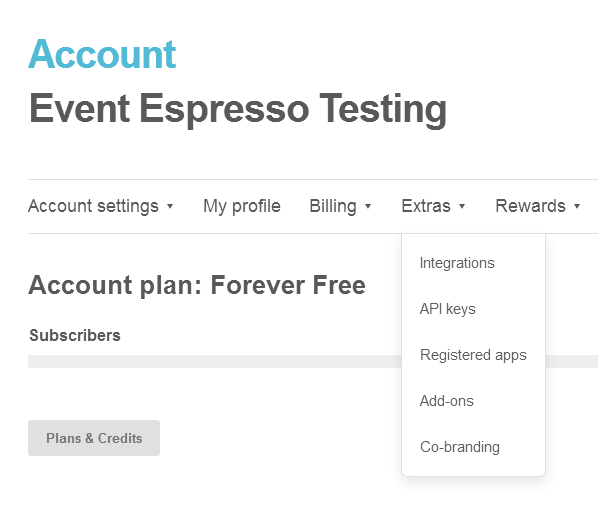
2. Click the Create a Key button and a MailChimp API Key will be created for you. Now copy the entire API Key.
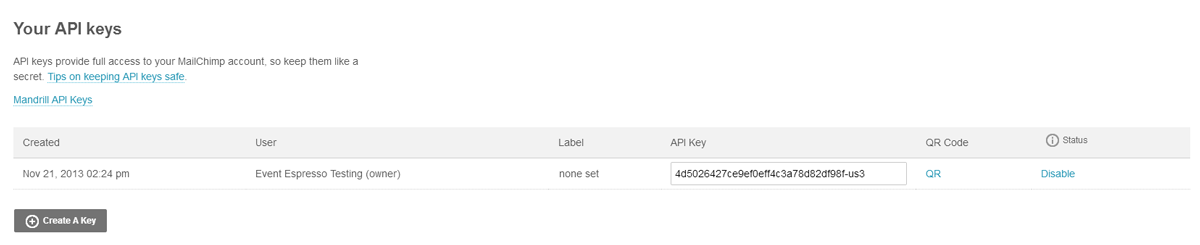
3. Then login to your WP dashboard and go to Event Espresso –> Add-ons –> MailChimp. Then paste the API Key into the field and click on Save.

4. MailChimp API Options – There is an option as shown in the screenshot above to skip the double opt-in emails. By default, the option is unchecked (disabled). If it is enabled, then Event Espresso will immediately add an attendee/registrant to a specific list in MailChimp, and they will not need to confirm via email.
5. Submit to MailChimp when – select your preferred option for when attendees/registrant should be added to a specific list on MailChimp. The default option to add when a registration is completed with an approved status. Other options include registration is completed (payment status does not matter) and subscribed submits information.
Usage for the Event Espresso 4 MailChimp Integration
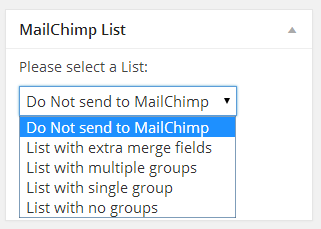
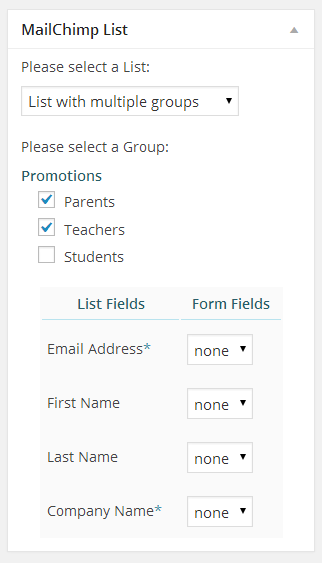
Now when you are creating or editing an event, you will have a MailChimp List box. This drop-down menu allows you to specify which MailChimp mailing list to add the attendees too. The list must already exist, so if you want to have each event have a separate list, you will first need to create the lists in MailChimp. Event Espresso 4 will pass the attendee’s first name, last name, and their email address to MailChimp.
Groups
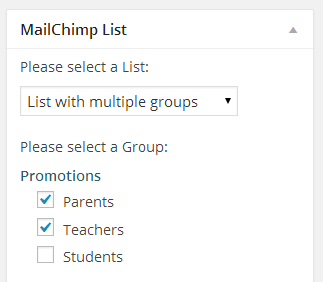
You can also set up the groups within the lists in your MailChimp account. Once groups are set up within a list, you select that list in the Event editor in the MailChimp List integration box. Once a list that has groups is selected a new select box will appear below that will let you select a group.
List merge fields (new feature in Event Espresso 4)
Event Espresso 4 allows you to use custom merge fields within your MailChimp lists and then select which question’s answer should be sent for which merge field. So for example within your MailChimp list you need to collect the company name, so you set this as an extra merge field within your list and set it to required:
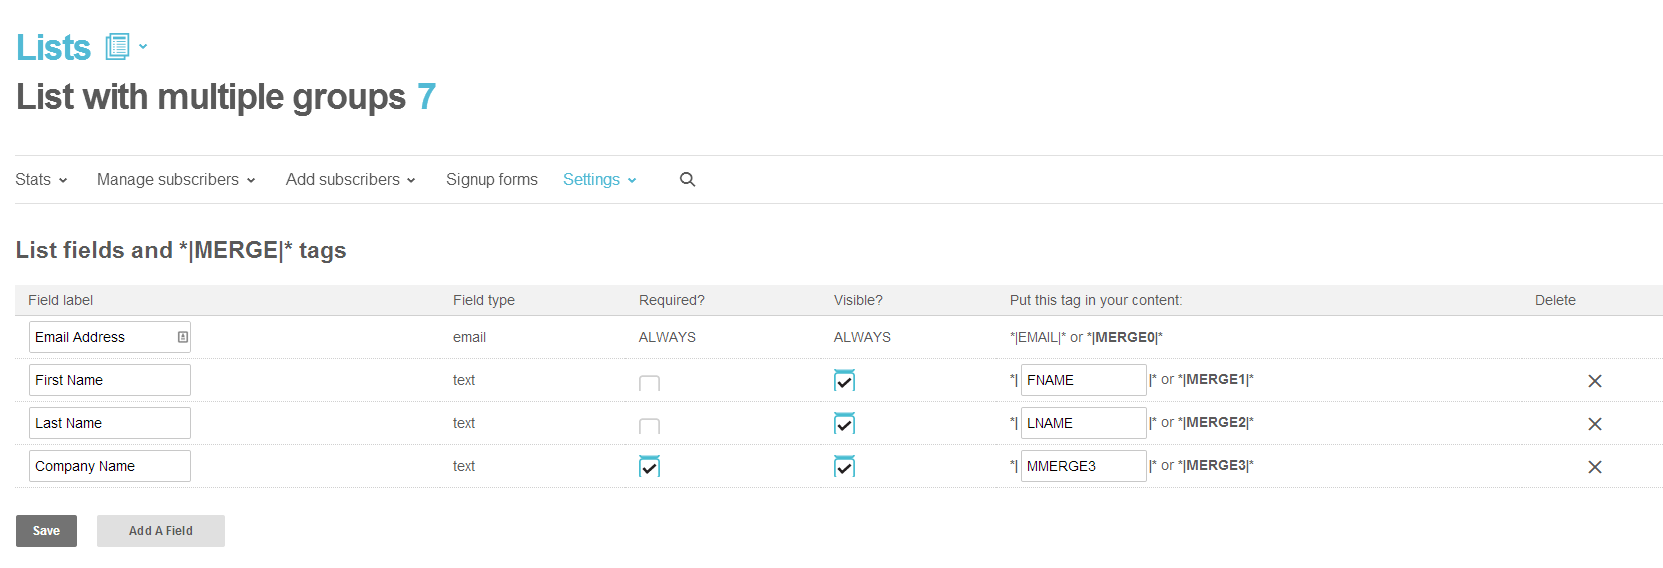
The EE4 MailChimp integration will display these merge fields within the MailChimp integration box, and allow you to select which question’s answer should be sent for which field:
When you initially create your event, all of the question dropdowns will display ‘none’, this is because no questions are assigned to your event until it has been created. Once you save the event (either publish or save as draft) all of the questions from within your assigned question groups will be available to select in the dropdowns.
Troubleshooting the Event Espresso 4 MailChimp Integration
The plugin does not work as expected. Can you help?
Please double-check your API Key that is entered into the MailChimp settings page within your WordPress dashboard. Ensure that no extra spacing appears before or after the API Key.
Customizations for the Event Espresso 4 MailChimp Integration
Raise list limit from 25 to 50 lists
function tw_limit_mailchimp_list_call( $params, $mailchimp_controler ) {
    $params['limit'] = 50;
    return $params;

}
add_filter( 'FHEE__EE_MCI_Controller__mci_get_users_lists__list_params', 'tw_limit_mailchimp_list_call', 10, 2 );
See more customizations in the code snippets library for Event Espresso.
Purchase a support license for the MailChimp integration for Event Espresso
https://eventespresso.com/product/espresso-mailchimp/
Installation for the Event Espresso 3 MailChimp Integration
This add-on is a plugin for WordPress and can be installed through your WP dashboard (WP-admin).
Download the latest version of the MailChimp integration for Event Espresso 3 from your Event Espresso account.
Then login to your WordPress dashboard (WP-admin) and go to Plugins. Next, click on Add New –> Upload and browse to the plugin on your computer. Then select the zip file and begin the upload process. Wait for the plugin to upload and then click on Activate.
Setup and Configuration for EE3 MailChimp Integration
Adding your MailChimp API Key
1. If you do not already have an API Key for MailChimp, then one will need to be created. First, login to your MailChimp.com account. Then go to your Account dashboard and locate Extras –> API Keys.
2. Click the Create a Key button and a MailChimp API Key will be created for you. Now copy the entire API Key.
3. Then login to your WP dashboard and go to Event Espresso –> MailChimp Integration. Then paste the API Key into the field and click on Save MailChimp API Key.

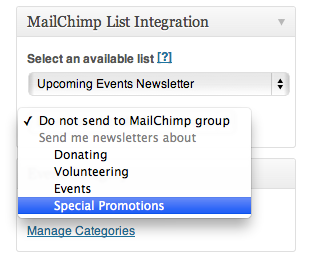
Now when you are creating or editing an event, you will have a MailChimp List integration box.
Usage for the Event Espresso 3 MailChimp Integration

This dropdown menu (example shown above) allows you to specify which MailChimp mailing list to add the attendees to. The list must already exist, so if you want to have each event have a separate list, you will first need to create the lists in MailChimp. Event Espresso 3 will pass the attendee’s first name, last name, and their email address to MailChimp.
Groups
You can also set up the groups within the lists in your MailChimp account. Once groups are set up within a list, you select that list in the Event editor in the MailChimp List Integration box. Once a list that has groups is selected a new select box will appear below that will let you select a group.
Troubleshooting the Event Espresso 3 MailChimp Integration
The plugin does not work as expected. Can you help?
Please double-check your API Key that is entered into the MailChimp settings page within your WordPress dashboard. Ensure that no extra spacing appears before or after the API Key.
Customizations for the Event Espresso 3 MailChimp Integration
- None at this time. Check back soon!
https://eventespresso.com/product/espresso-mailchimp/