Link Infusionsoft with Event Espresso, so your attendees are moved to Infusionsoft as their event registrations are completed. Your campaigns in Infusionsoft will then take over and work for you around the clock so you can send event -specific information to attendees or even invite attendees to register for future events.
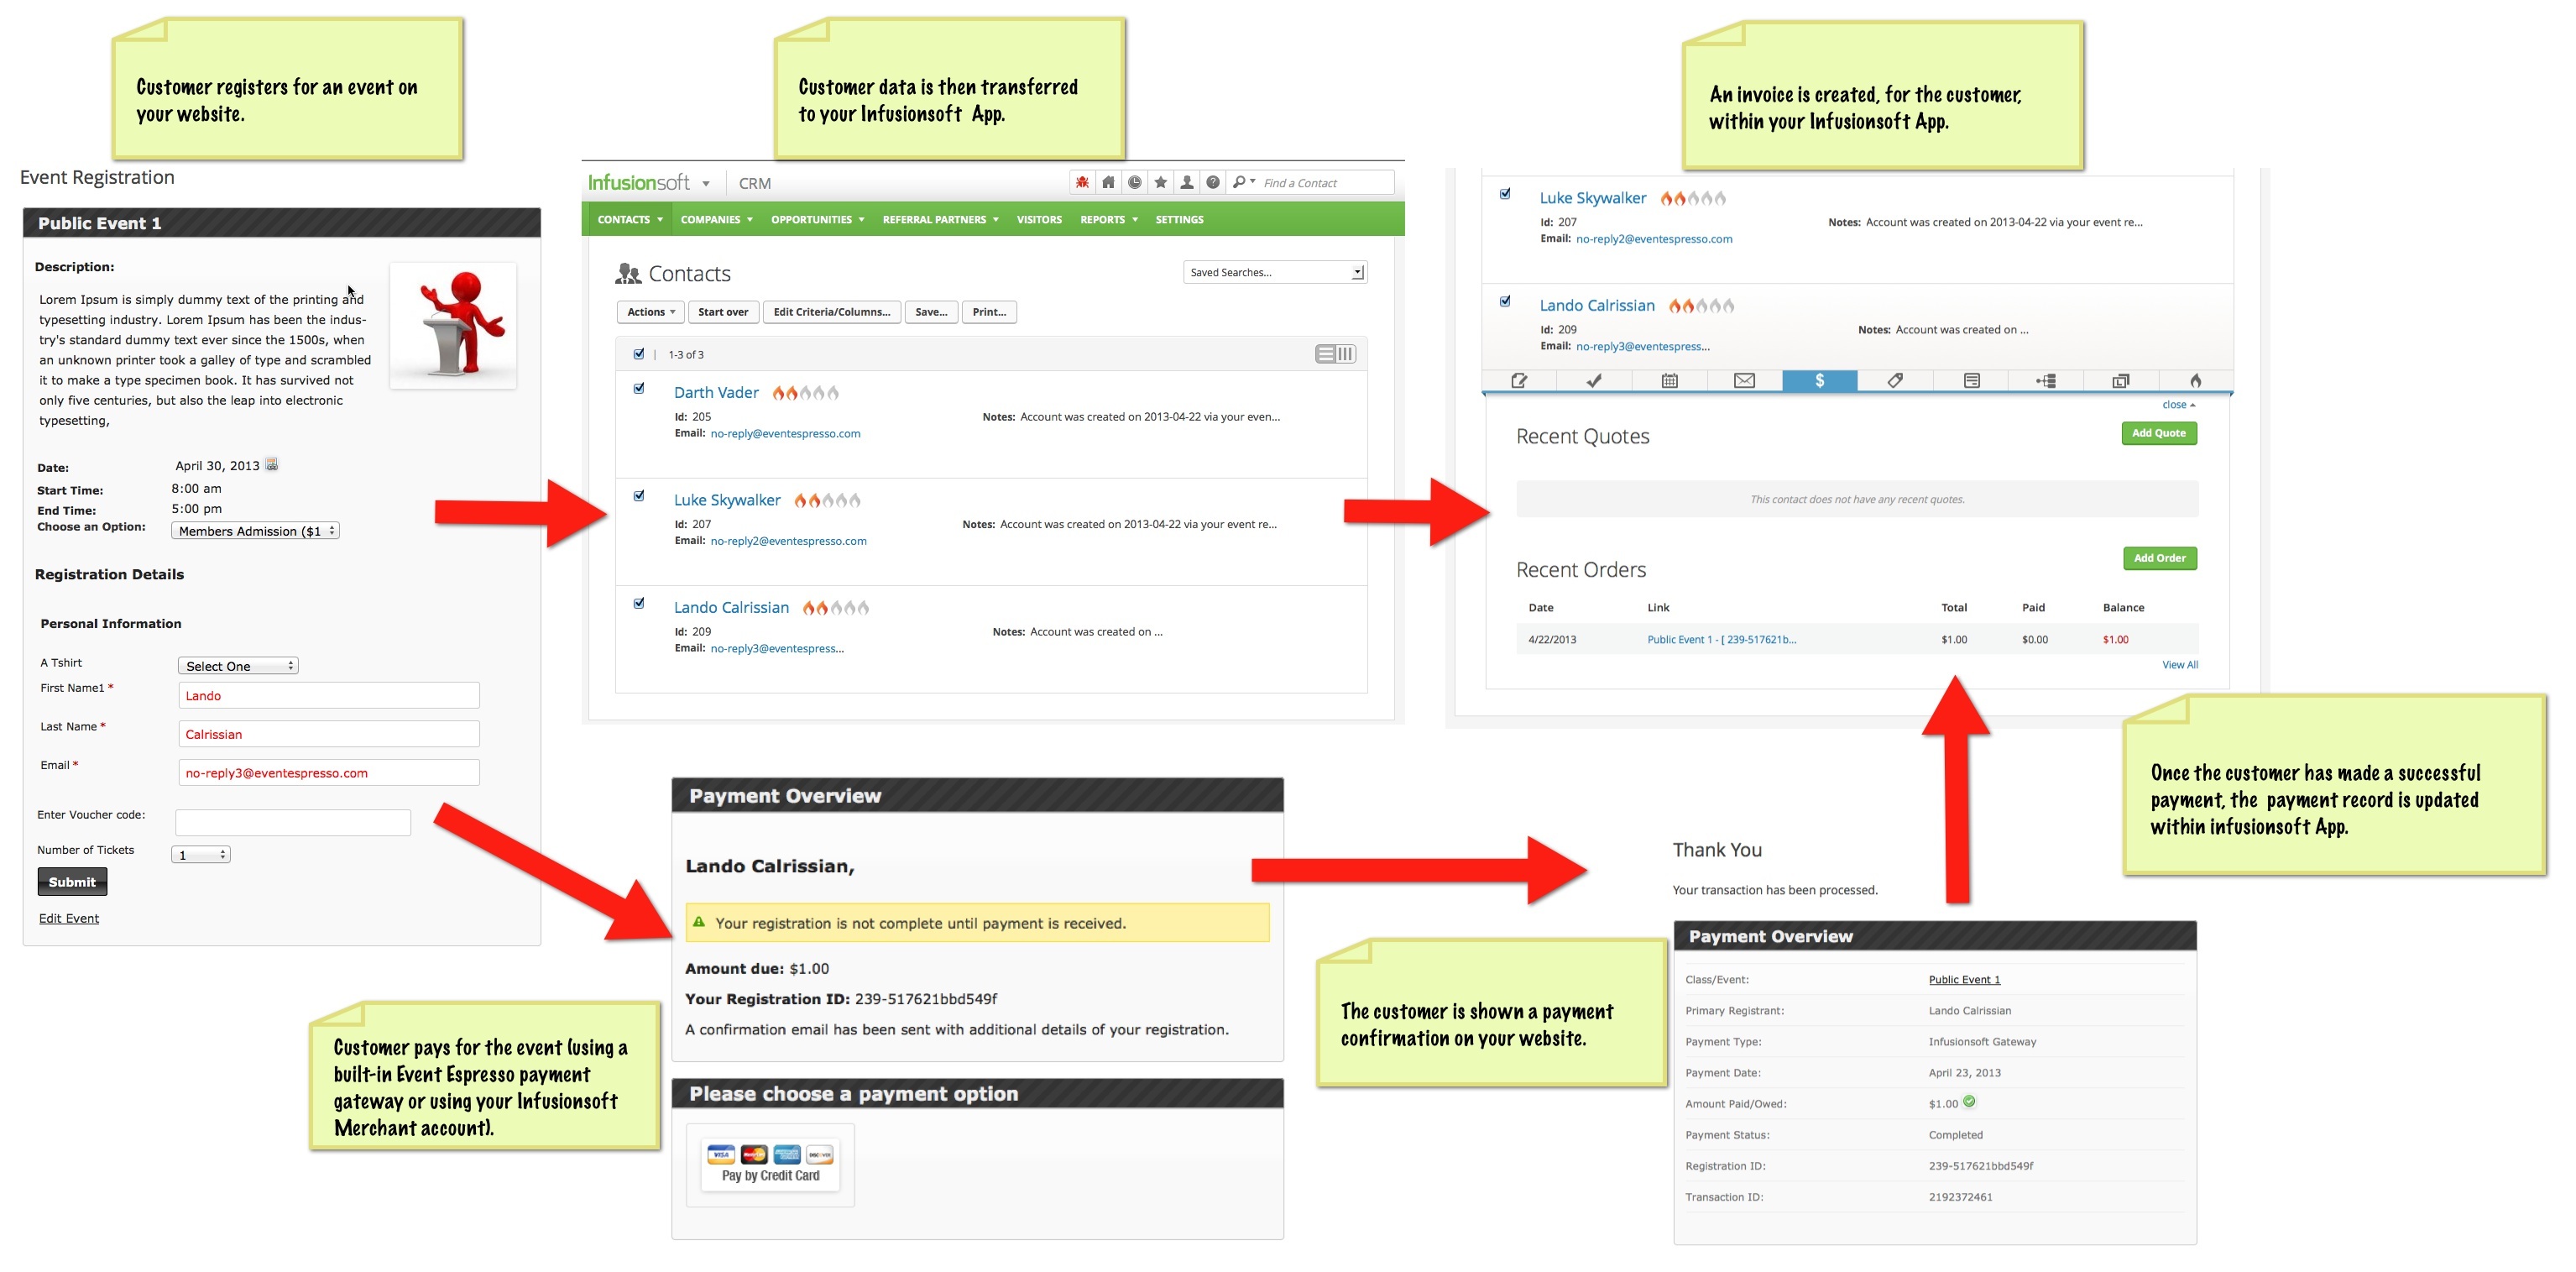
The basic contact information including a name and email address are sent along with their address. The information is stored in Infusionsoft –> Contacts –> General. The address for the registrant is copied to Contacts –> Address and a note is made in Contacts –> Person Notes. An invoice is also created which includes the event name and amount paid.
View quick links for this integration –>
Need documentation for Event Espresso 3?
Purchase a support license for the Infusionsoft integration for Event Espresso
Event Espresso 4 Infusionsoft Integration
This add-on is a plugin for WordPress and can be installed through your WP dashboard (WP-admin). Here are the steps on how to install the Infusionsoft add-on for Event Espresso 4.
Download the latest version of the Infusionsoft integration for Event Espresso 4 from your Event Espresso account.
Then login to your WordPress dashboard (WP-admin) and go to Plugins. Next, click on Add New –> Upload and browse to the plugin on your computer. Then select the zip file and begin the upload process. Wait for the plugin to upload and then click on Activate.
Locate your Credentials for Infusionsoft
Your credentials for Infusionsoft can be found in your Infusionsoft dashboard.
Infusionsoft uses a specific set of credentials (Application name, Encrypted Key) and here is how to find them.
1) Log in to your dashboard on Infusionsoft.com
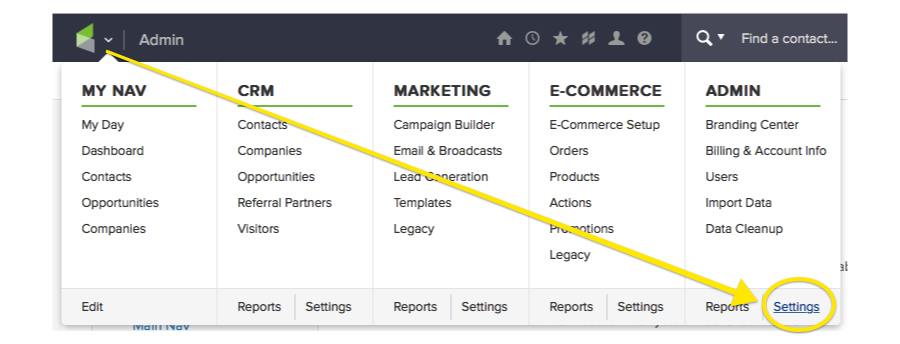
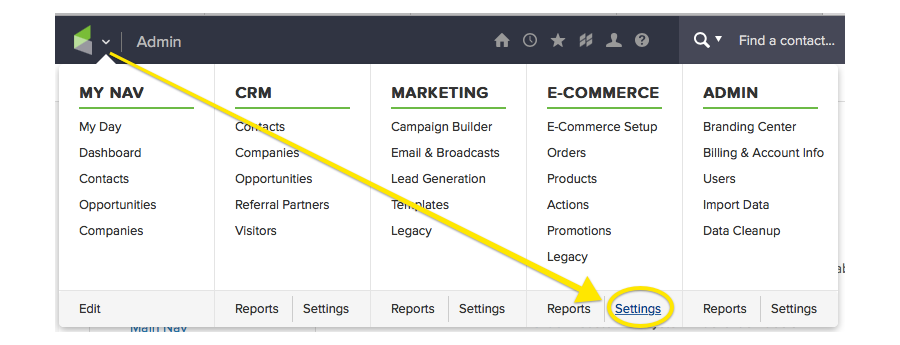
2) Look in the top left area of your screen and hover over the Infusionsoft logo and you’ll see a menu expand
3) In the lower right area of the expanded menu, under Admin you’ll see a Settings link. Go ahead and click on the Settings link under the Admin area
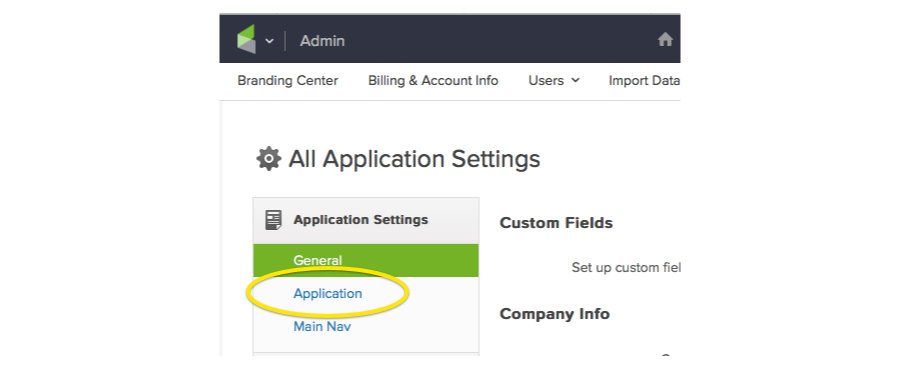
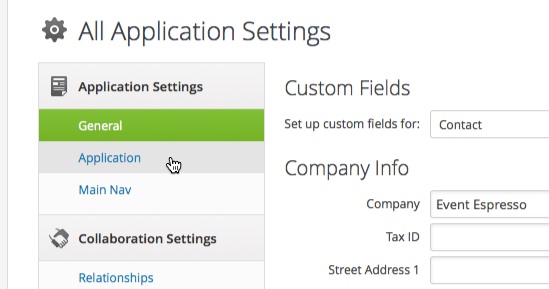
4) You’ll now see the All Application Settings screen. Look for Application in the left menu and click on it.
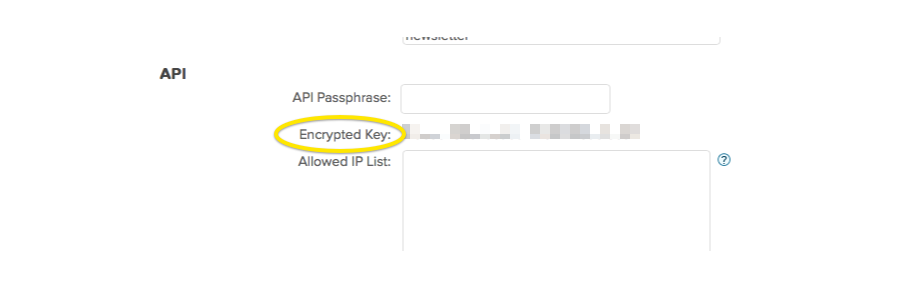
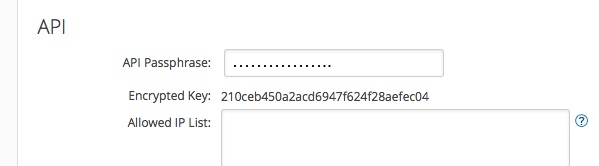
5) Scroll down towards the end of the page for the API section. Look for the Encrypted Key and copy it.
6) In a new browser tab, go to your WordPress dashboard and look in the left admin menus for Infusionsoft and click on it.
7) Paste in your Encrypted Key in the field for it.
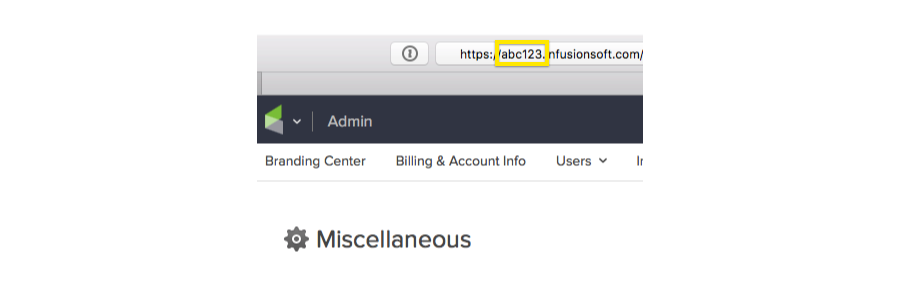
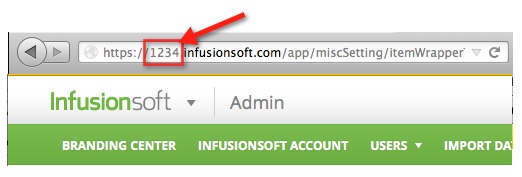
8) Switch back to your browser tab that has your Infusionsoft dashboard open and look at the web address or URL in your browser. It will appear something like this: abc123.infusionsoft.com. The information before the “.infusionsoft.com” is your Application Name. In this example, the Application Name is abc123. Copy your Application Name.
9) Switch to your other browser tab for your WordPress dashboard and add the Application Name and then save changes by clicking on the Save button.
If you are not accepting payments through Infusionsoft directly, then you are all set. You’ll now see attendee/registrant information flow into Infusionsoft as registrations take place on your WordPress site.
Accept payments through Infusionsoft
Accepting payments through Infusionsoft requires a Merchant ID.
1) Login to your Infusionsoft.com dashboard
2) Look in the top left area of your screen and hover over the Infusionsoft logo and you’ll see a menu expand
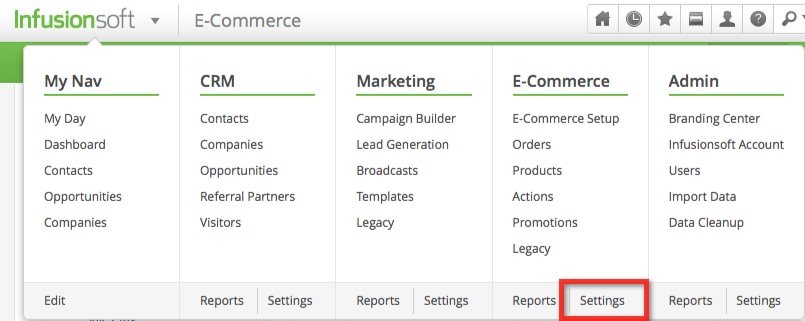
3) Look for the E-commerce menus area and then click on Settings.
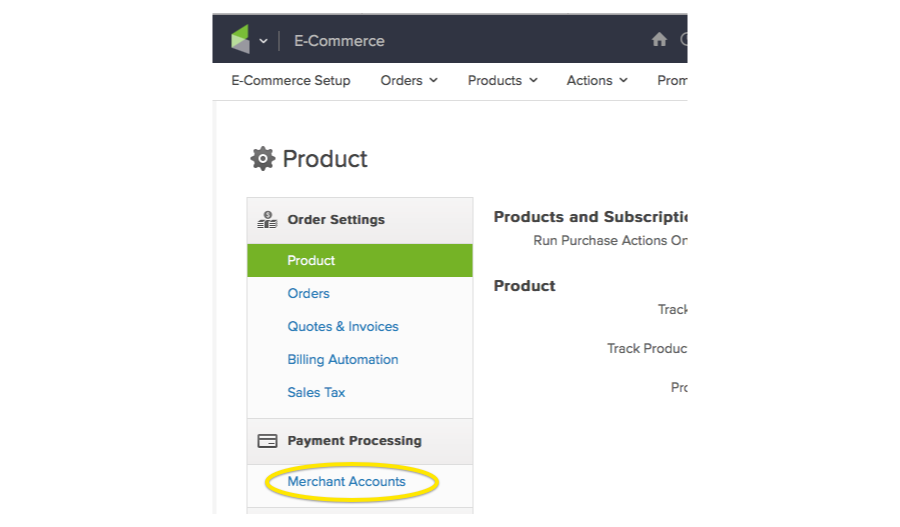
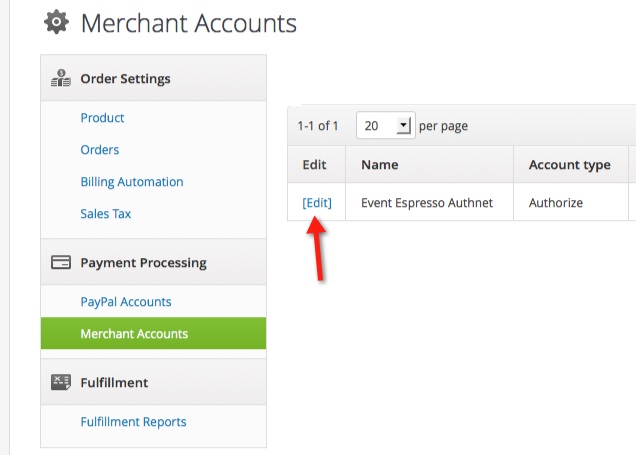
4) You’ll now see the Product screen. Look for Payment Processing and then click on Merchant Account.
5) Follow Infusionsoft’s guide to set up payments with Infusionsoft:
https://classic-infusionsoft.knowledgeowl.com/help/infusionsoft-payments-setup-guide
6) Contact Infusionsoft to get your Merchant ID, or if you prefer working through a scavenger hunt to find it, follow Infusionsoft’s guide to How to locate your Merchant Account ID
7) Make a note to remember that number and then go to your WordPress dashboard.
8) Look in the menus on the left side of the screen for Event Espresso and click on Payment Methods. Now look for Infusionsoft and click on it and then click the button to activate it.
9) Scroll down and look for the Merchant ID field and then add in your Merchant ID which is the number that you obtained in step 6.
10) Click the boxes for the types of cards that you want to accept (e.g., VISA, American Express, Discover, Mastercard) and then save changes by clicking on the Update button.
You are now ready to accept payments through Infusionsoft for Event Espresso on your WordPress site.
Setup and Configuration for the EE4 Infusionsoft Integration
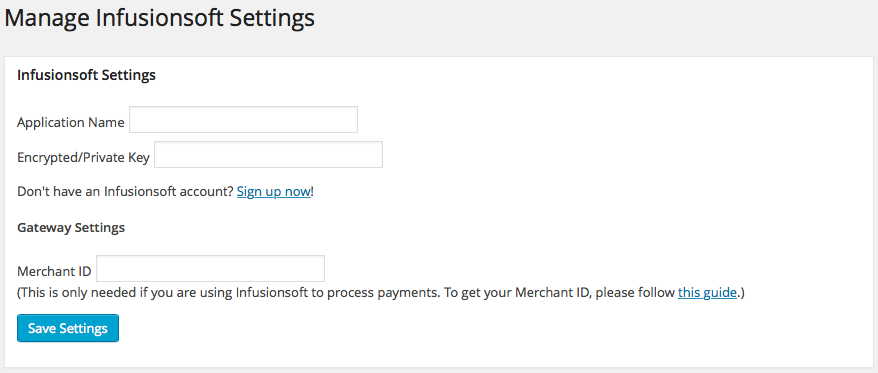
From your WP dashboard, go to Event Espresso —> Infusionsoft Settings.

Your credentials for Infusionsoft can be found by following the steps in the previous section.
Usage
Once the Infusionsoft integration is installed, all new registrations are automatically captured, as “Contacts” within your Infusionsoft account. If you accept payments using Event Espresso, then we only send the payment information to Infusionsoft, when the payment is first approved.
Then you can send the contact an Invoice, or payment reminder, from your Event Espresso powered website or your Infusionsoft app. If you update the payment status on your website, for that person, it will also update the payment status of the order that was created for the client.
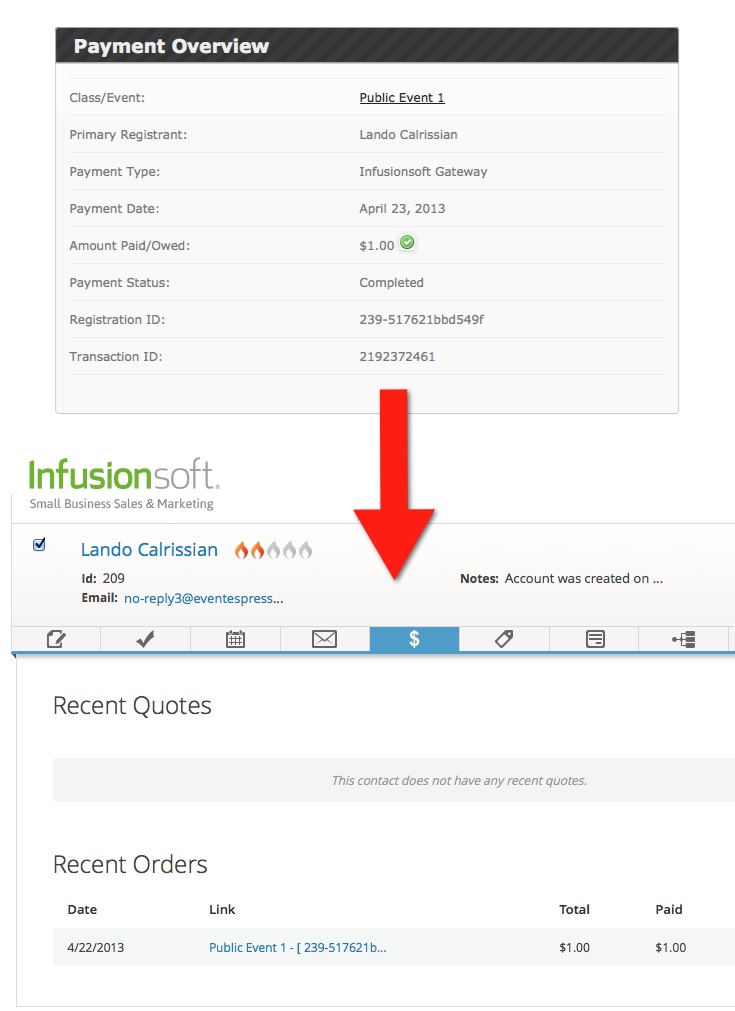
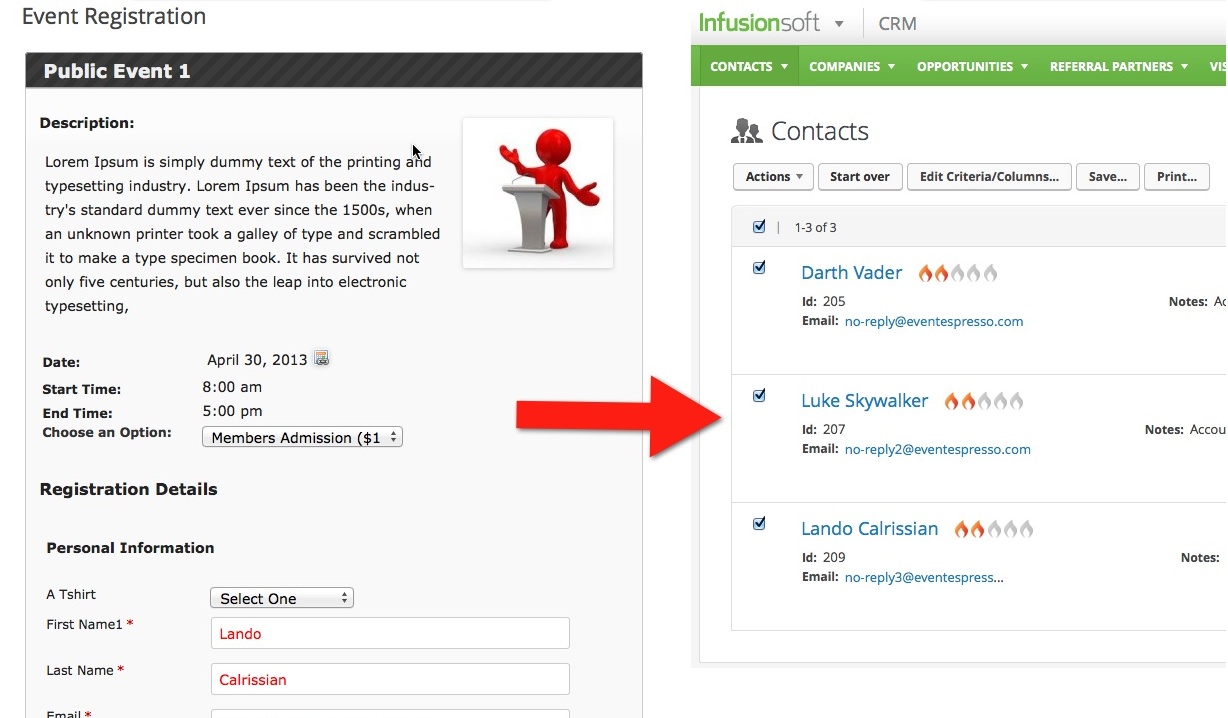
This image shows a high-level overview of how the Event Espresso Infusionsoft integration works:
Troubleshooting the Event Espresso 4 Infusionsoft Integration
The plugin does not work as expected. Can you help?
Please double-check your credentials that are entered into the Infusionsoft settings pages within your WordPress dashboard. Ensure that no extra spacing appears before or after the credentials. The gateway field requires a numeric value and not a full website address.
I’m seeing this error: InvalidConfig infusionsoft. What does it mean?
Please contact Infusionsoft support to have them review your account. See this page for more information: http://community.infusionsoft.com/showthread.php/17346-API-quot-Invalid-Configuration-quot?highlight=InvalidConfig
Frequently Asked Questions
Are partial or overpayments available?
If a customer makes a partial payment or overpays for their registrations, then the payment will not be recorded in Infusionsoft. This is a limitation of Infusionsoft, and more information is available here:
http://community.infusionsoft.com/showthread.php/20192-Payments-that-would-make-the-order-overpaid-are-ignored?p=51856#post51856
If an overpayment is made in Event Espresso, then manually apply the payment within your Infusionsoft dashboard and take note of the actual payment amount the Order Notes field.
When registering for an event, are Event Espresso using products set up in Infusionsoft for each registration?
Event Espresso dynamically creates a product record in Infusionsoft if the product is not already present, then each event registration record in Event Espresso will be assigned to an Infusionsoft product.
Does Event Espresso block the purchaser from entering the same email address for all of their attendees?
In our internal tests, it seems that a new Infusionsoft contact record was created for each different person:
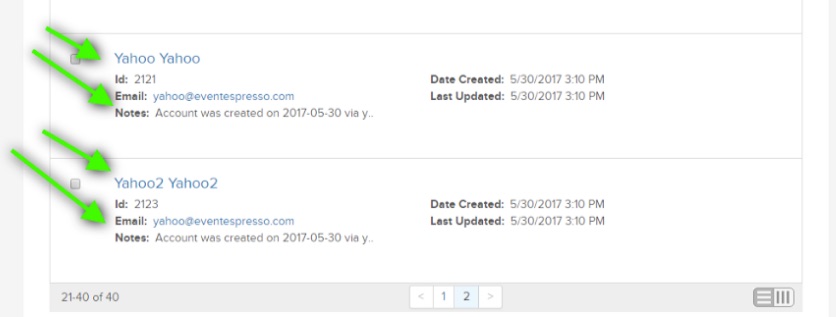
How will I be able to differentiate between several contacts with the same email address?
Event Espresso only considers two attendees/contacts duplicates if they have the same first name, last name, and email address. In both Event Espresso and Infusionsoft, you can differentiate between contacts with the same email by their names and IDs.
Can one person purchase multiple tickets, and supply the names of all the attendees at the time of checkout? If so, will all those names be integrated over into Infusionsoft, and new IS contact records created for any attendees who do not currently have one?
Yes, and yes. You can set this up when creating the event to include specific registration forms. At a minimum, the first name and email address are required for each attendee.
During checkout, do we have the ability to ask two custom questions that could then trigger tags in Infusionsoft?
Yes. However, this will require some custom coding. Here’s the documentation for that:
https://eventespresso.com/wiki/infusionsoft-integration/#ee4customizations
Can I add custom questions during checkout for all attendees and trigger MULTIPLE tags in Infusionsoft for each attendee?
Yes, this code sample shows that you can apply tags to multiple questions:
https://eventespresso.com/wiki/infusionsoft-integration/#conditional-tagging-multiples
Customizations for the Event Espresso 4 Infusionsoft Integration
Tagging Event Attendees
As of version 2.2 of the Infusionsoft add-on, you can easily tag contacts when registering for events, so that registrants that are added to Infusionsoft are tagged when signing up for an event. Since event managers might want to assign event attendees to more than one tag, we’ve added a way to select for each event from within the event editor (hold the “SHIFT” key on your keyboard to select multiple tags):
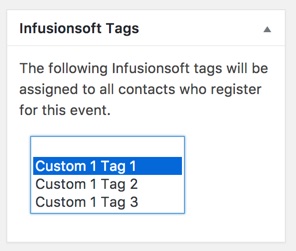
Each new attendee will be tagged with the selected tags for the event. If the contact already exists within your Infusionsoft account, then new tags will be added automatically.
Before using this feature, please make sure you have created custom tags within your Infusionsoft account. You can learn how to create tags in Infusionsoft by reviewing this guide:
https://classic-infusionsoft.knowledgeowl.com/help/create-a-tag
Conditional Tagging of New Contacts
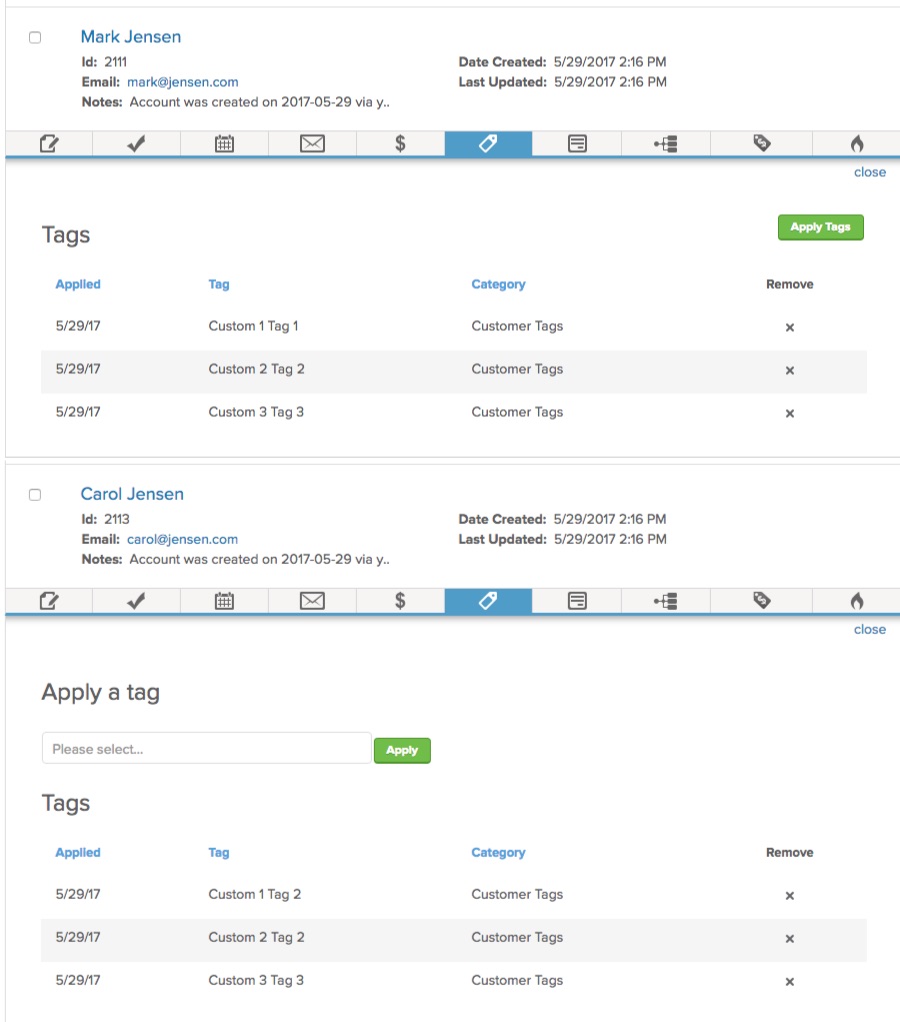
This is done by tagging new contacts with keywords based on selections chosen in your event registration forms. To get started, please make sure you have added at least one Custom Question, assigned it to a question group that is currently assigned to an event. Once you have added custom questions to Event Espresso, within your WordPress dashboard, visit the Event Espresso > Infusionsoft > Conditional Tagging Setup tab. From this tab, you can assign custom registration questions to Infusionsoft tags:

Once the custom questions are assigned to a tag, then someone registers and answers one of the assigned questions, the contact record within Infusionsoft will be updated with the selected tags. Here’s an example of what you would see in Infusionsoft when this feature is triggered:
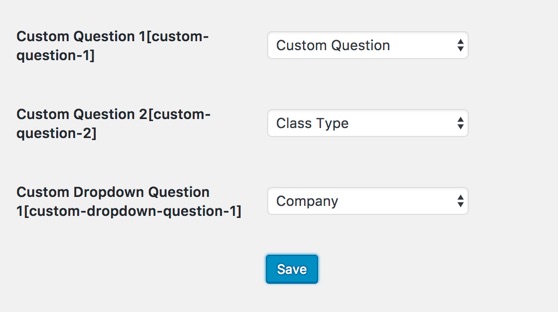
Saving Registration Form Answers as Standard or Custom Fields
Sometimes you need to save additional information for a contact in Infusionsoft. With the Event Espresso 4 Infusionsoft integration you can save additional information captured from your event registration form. The information can be saved as a standard or custom contact data field within a contact’s record.
First, you add your custom questions to Event Espresso > Questions. Then add the questions to a question group and assign the question group to the applicable event(s). Now, within your WordPress dashboard, visit the Event Espresso > Infusionsoft > Custom Fields Setup tab. There you can assign custom registration questions to Infusionsoft tags:
Affiliate Tracking
Tracking affiliate sales using the Event Espresso Infusionsoft is relatively simple. See information at Infusionsoft about Creating Referral Partners and Referral Tracking Links.
Simple method
The easiest way to track referrals is by appending the URL to your event registration page, with the “ref” URL parameter and the referral partner code or the “affiliate” parameter and the referral partner id.
Examples:
http://www.example.com?ref=johnDoe
http://www.example.com?affiliate=1234
If that process doesn’t work, look into the caching of your site. Anyone using Varnish (such as WP Engine) will have to add exceptions for Event Espresso pages on your site manually. The standard pages are:
/register/
/events/
/registration-checkout/
/transactions/
/thank-you/
/referral.html
Extra Hooks
Sending Custom Parameters Upon Creation of a New Product in Infusionsoft
Since the Infusionsoft API creates a new product each time an event is booked for the first time, you may need the API set up a few defaults when it creates the new product. For example, if you live in Germany, you may need to tell Infusionsoft to charge taxes for each registration and display the tax amount on the invoice that is generated by Infusionsoft.
/**
* Adds custom data to IS products
* @param array $original_info_to_send as documented on http://help.infusionsoft.com/developers/tables/product
* @param EE_Ticket $ticket the EE ticket which is used to create/update the IS product
* @return array
*/
function ee_is_new_product_details($original_info_to_send, $ticket ){
    //always mark all products as country taxable (equivalent to EE3 code snippet)
    //$original_info_to_send['CountryTaxable'] = 1;

    //mark product as country taxable only if its taxable normally, probably more useful
    if( $ticket instanceof EE_Ticket && $ticket->taxable() ){
        $original_info_to_send['CountryTaxable'] = 1;
    }
    return $original_info_to_send;
}
add_filter('FHEE__EEE_Infusionsoft_Ticket__sync_to_infusionsoft__product_data','ee_is_new_product_details',10,2);
See more customizations in the code snippet library for Event Espresso.
Purchase a support license for the Infusionsoft integration for Event Espresso
Installing the Event Espresso 3 Infusionsoft Integration
https://eventespresso.com/product/espresso-infusionsoft/
This add-on is a plugin for WordPress and can be installed through your WP dashboard (WP-admin).
Download the latest version of the Infusionsoft integration for Event Espresso 3 from your Event Espresso account.
Then login to your WordPress dashboard (WP-admin) and go to Plugins. Next, click on Add New –> Upload and browse to the plugin on your computer. Then select the zip file and begin the upload process. Wait for the plugin to upload and then click on Activate.
Setting up the EE3 Infusionsoft Integration
From your WP dashboard, go to Event Espresso —> Infusionsoft Settings.
Your Application Name
Check the URL of your Infusionsoft® App when you visit the login screen, the first part of the domain prior to “.infusionsoft.com/…” is your application name. For example “1234” is our application name.
Your Encrypted KeyYour Infusionsoft® API Key will be the most challenging code to find to connect Event Espresso with your Infusionsoft® application (It’s really not THAT hard! less than 1 minute).
Navigate over the “Infusionsoft” logo at the top left of your application and allow the menu to drop down. On the far right of the main menu, under the “Admin” section, go to “Settings”.

On the Left side of the “Settings” page, there’s a menu, click on “Application”.
Scroll down on that page to the header that says “API”. The top two options are what we need to connect Event Espresso with your Infusionsoft® application. If you or another administrator has setup your API settings before, then there should be an alphanumeric (letter and number) code to the right of the “Encrypted Key:” label. If there is no alphanumeric code next to the “ENCRYPTED KEY” LABEL we just need to generate it. This can be done by entering a random code or password (that you’ll remember) into the textbox labeled “API Passphrase” and scroll down to the bottom and click “Save”. If you scroll back down to the “API” section, there should be an alphanumeric code for your Encrypted Key.
KEEP IN MIND: This API key should only be shared internally and with contractors and should not be given to any other outside sources other than API Developers seeking to integrate your Infusionsoft® application with third-party applications and services that may require it for setup.
Infusionsoft Hosted Gateway Settings — (optional, EE3 only)
To start using the Infusionsoft payment system on your site. You will need to retrieve the “Merchant ID” from your Infusionsoft account and activate the “Infusionsoft Payment Settings” in your Event Espresso payment settings.
Activate the Infusionsoft payment option
Go to WP Admin > Event Espresso > Payment Settings > Infusionsoft Payment Settings, expand the meta box and click the green “Activate Infusionsoft Payment Gateway button”. Then go to the WP Admin > Event Espresso > Infusionsoft Settings page and enter the “Merchant ID” into the provided field (more info below).
Finding the Merchant ID within Infusionsoft
To get your Merchant ID, log into your Infusionsoft account. Navigate over the “Infusionsoft” logo at the top left of your application and allow the menu to drop down. On the far right of the main menu, under the “E-Commerce” section, go to “Settings”.
Click on the Merchant Accounts tab in the left pane. Click the edit link next to the desired merchant account name.
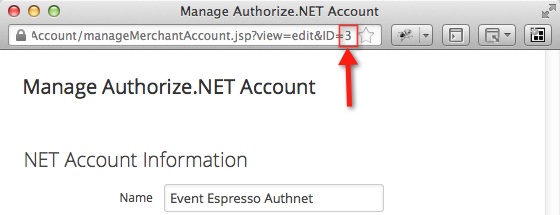
In the URL of the edit page, there will be an “ID” parameter. Copy the ID and enter it into the “Merchant ID” field within the Event Espresso Infusionsoft Settings (the WP Admin > Event Espresso > Infusionsoft Settings page).
Using the Event Espresso 3 Infusionsoft Integration
Once the Infusionsoft integration is installed, all new registrations are automatically captured, as “Contacts”, within your Infusionsoft account.
Then you can send the contact an Invoice, or payment reminder, from your Event Espresso powered website or your Infusionsoft app. If you update the payment status in your website, for that person, it will also update the payment status of the order that was created for the client.
This image shows a high-level overview of how the Event Espresso Infusionsoft integration works:
Troubleshooting the Event Espresso 3 Infusionsoft Integration
The plugin does not work as expected. Can you help?
Please double-check your credentials that are entered into the Infusionsoft settings pages within your WordPress dashboard. Ensure that no extra spacing appears before or after the credentials. The gateway field requires a numeric value and not a full website address.
I’m seeing this error: InvalidConfig infusionsoft. What does it mean?
Please contact Infusionsoft support to have them review your account. See this page for more information: http://community.infusionsoft.com/showthread.php/17346-API-quot-Invalid-Configuration-quot?highlight=InvalidConfig
Are partial or overpayments available?
If a customer makes a partial payment or overpays for their registrations, then the payment will not be recorded in Infusionsoft. This is a limitation of Infusionsoft and more information is available here:
http://community.infusionsoft.com/showthread.php/20192-Payments-that-would-make-the-order-overpaid-are-ignored?p=51856#post51856
If an overpayment is made in Event Espresso, then manually apply the payment within your Infusionsoft dashboard and take note of the actual payment amount the Order Notes field.
Customizations for the Event Espresso 3 Infusionsoft Integration
Tagging New Contacts
The Infusionsoft integration does not have the capability to pass custom questions to Infusionsoft at this time. It seems that Infusionsoft forces you to have a “groupId” (their API term for tags) in order to assign the contact to a tag.
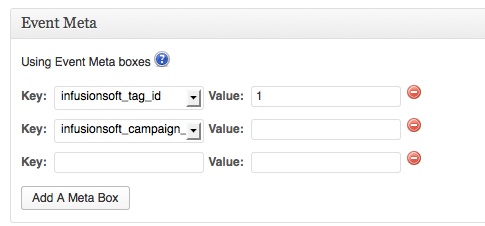
However, we did add way to tag contacts when registering for events, so that registrants that are added to Infusionsoft are tagged when signing up for an event. You can add “infusionsoft_tag_id” meta key and your Tag ID in the value field of the “Event Meta” section of the event editor.
More information about creating tags in Infusionsoft:
http://help.infusionsoft.com/userguides/contact-management/search-and-tag-contacts/create-edit-or-delete-a-tag
You can find your Tag IDs in your Infusionsoft account. The Tag IDs appear in the ID column.

Affiliate Tracking
Tracking affiliate sales using the Event Espresso Infusionsoft is fairly simple. Creating Referral Partners (affiliates) and Custom Tracking Links.
Simple method
The easiest way to track referrals is by appending the URL to your event registration page, with the “ref” URL parameter and the referral partner code or the “affiliate” parameter and the referral partner id.
Examples:
http://www.example.com?ref=johnDoe
http://www.example.com?affiliate=1234
If that process doesn’t work, look into the caching of your site. Anyone using Varnish (such as WP Engine) will have to manually add exceptions for Event Espresso pages on your site. The standard pages are:
/register/
/event-registration/
/transactions/
/thank-you/
/referral.html
Conditional Tagging of New Contacts
This is done by tagging new contacts with keywords based on selections chosen in your event registration forms. By placing a relatively small amount of code into your site specific plugin, you can start tagging new contacts!
How do I find the question field name in Event Espresso?
You will need to output the $_POST variables or your registration to the screen or view the source of the HTML document to make sure you have the correct field names and question id to implement the following code.
For example, in the code below, we use `SINGLE_26` (comprised of the question type and the question id), which can be retrieved from our registration form, to change the value of the $gender_tag_id variable based on the answer given in the registration form for this particular question. The value of the $gender_tag_id variable is the id of a tag created in Infusionsoft. For more information about creating tags in Infusionsoft, please refer to the Infusionsoft documentation.
The question field name can be found by viewing the source code of your Event Espresso registration form, then find the question that you would like to use, and copy the name of the question from the HTML source.

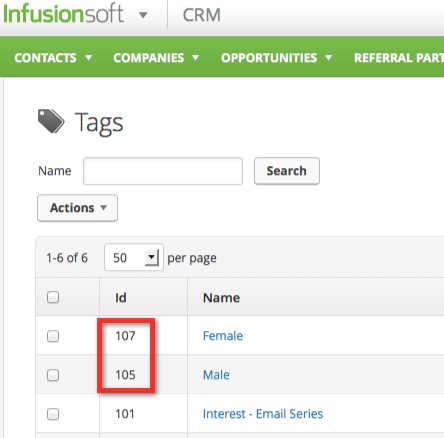
How do I find the tag ID?
To find the tag id in Infusionsoft. You will need to go to Infusionsoft > CRM > Settings > Tags in the Infusionsoft menu (screenshot: http://www.screencast.com/t/yP7vqZK1).
Sample code for conditional tagging
Use the following code to tag new contacts based on the questions selected in your event registration forms.
function espresso_infusionsoft_save_additional_tags($cust_id) {
	global $ee_infusionsoft;

	//Question types
	//DROPDOWN
	//MULTIPLE
	//SINGLE
	//TEXT
	//TEXTAREA

	//Substitute `SINGLE_26` for the question type and the question id

	//Example "Gender" question
	if ( isset($_REQUEST['SINGLE_26']) && !empty($_REQUEST['SINGLE_26']) ){
		switch (stripslashes_deep($_REQUEST['SINGLE_26'])){
			case "Male":
				$gender_tag_id = 105;
				break;
			case "Female":
				$gender_tag_id = 107;
				break;
		}
		$ee_infusionsoft->grpAssign($cust_id, $gender_tag_id);

		//Debugging tools
		//echo '<h4>$cust_id : ' . $cust_id . '  <br />' . __FILE__ . '<br />line no: ' . __LINE__ . '</h4>';
		//echo '<h4>$gender_tag_id : ' . $gender_tag_id . '  <br />' . __FILE__ . '<br />line no: ' . __LINE__ . '</h4>';
		//echo '<h4>$_REQUEST : <pre>' . print_r($_REQUEST,true) . '</pre> <span style="font-size:10px;font-weight:normal;">' . __FILE__ . '<br />line no: ' . __LINE__ . '</span></h4>';

	}
}
add_action('action_hook_espresso_infusionsoft_save_attendee_after', 'espresso_infusionsoft_save_additional_tags', 100, 1);
Saving Registration Questions as Standard or Custom Fields
Sometimes you need to save additional information for a contact in Infusionsoft. Using the following code, added using your site specific plugin, you can save any additional information, from your event registration form, as a standard or custom (video tutorial) contact data field, within a contact’s record.
How do I find the question field name in Event Espresso?
Please see this example above for more information about finding the registration form field names.
How do I find the standard field names in Infusionsoft?
This table on the Infusionsoft website holds contact record data as well as custom contact fields. However, you will not see the custom fields listed in the fields, as these are custom to each different Infusionsoft application.
In the example below I’ve used “Website” as the standard Infusionsoft field to be updated. You would replace this field with the name for the appropriate Infusionsoft field you wish to update using the table link provided.
How do I assign Event Espresso fields to the Custom Field names in Infusionsoft?
To assign Infusionsoft custom fields, to the custom questions you created in Event Espresso, you just need to add the Infusionsoft custom field name, without spaces and prepend with an underscore, to the code below. For example, if your Infusionsoft custom field name is “Custom Question”, then the filed name will be “CustomQuestion” in the Infusionsoft database. Since we are accessing this custom field name using the Infusionsoft API, you will need to prepend the custom field name with an underscore, like so: “_CustomQuestion”
The “SINGLE_48” field name, used in the example below, refers to the custom question created within Event Espresso.
function espresso_infusionsoft_save_extra_fields($attendee_data) {
	$clean_attendee_data = array(
					//Example of standard (pre-existing) contact data field field in Infusionsoft
					//List of standard fields: http://help.infusionsoft.com/developers/tables/contact
					'Website'			=> isset($_REQUEST['SINGLE_48']) ? $_REQUEST['SINGLE_48'] : '' ,

					//Example of a custom contact data field
					//NOTE: You must prepend custom field database names with an underscore when accessing them through the API
					'_CustomQuestion'	=> isset($_REQUEST['TEXT_52']) ? $_REQUEST['TEXT_52'] : '' ,
				);

	return array_merge($attendee_data, $clean_attendee_data);
}

add_filter( 'filter_hook_espresso_infusionsoft_extra_attendee_data', 'espresso_infusionsoft_save_extra_fields', 10, 1 );
Extra Hooks
Sending Custom Parameters Upon Creation of a New Product in Infusionsoft
Since the Infusionsoft API creates a new product each time an event is booked for the first time, you may need the API set up a few defaults when it creates the new product. For example, if you live in Germany, you may need to tell Infusionsoft to charge taxes for each registration and display the tax amount on the invoice that is generated by Infusionsoft.
/**
* Adds custom data to IS products
* @param array $original_info_to_send as documented on http://help.infusionsoft.com/developers/tables/product
* @param array $payment_details like columns on the event_details table
* @return array
*/
function ee_is_new_product_details($original_info_to_send,$payment_details){
$original_info_to_send['Taxable'] = 1;
$original_info_to_send['CountryTaxable'] = 1;
return $original_info_to_send;
}
add_filter('filter_hook_espresso_infusionsoft_event_product_data','ee_is_new_product_details',10,3);
Changing the Country Field to a Drop Down (EE3 only)
Since the country field is a textfield, sometimes people might type in any version of their country, which may cause problems with some payment gateway providers. This problem can be easily overcome by changing the textfield to a dropdown, so you can specify a list accepted countries.
/**
* Changes the original, regular country input used in infusionsoft to a dropdown
* @param string $original_html
* @param string $country
* @return string
*/
function ee_is_swap_country($original_html,$country){
$values = array(
array('id'=>'germany','text'=> __("Germany", 'event_espresso')),
array('id'=>'france','text'=> __("France", 'event_espresso')),
//add any other cuontries you want to accept
);
return select_input('country', $values, $country);
}
add_filter('filter_hook_espresso_infusionsoft_billing_country_input','ee_is_swap_country',10,3);
https://eventespresso.com/product/espresso-infusionsoft/