Questions (ver 3) & Registration Form (ver 4)

Jump to Version 3.x documentation

Event Espresso version 4 Documentation for the Registration Form

This three minute video shows how to create a new question, add the question to a question group, and assign the group to an event.

Important: please make sure that a question is only assigned to one question group. This will help avoid having the question duplicated on the registration form and causing validation errors that may stop registrations.

How to set questions for registrants

Within the event you set which question groups are required for the “Primary Registrant”, or the first attendee in the transaction, and also which question groups are required for the “Additional Registrants”. You can set the questions for the Primary Attendee by checking the boxes next to the applicable question groups in the section labeled “Questions for Primary Registrant”. You can set the questions for Additional Attendees by checking the boxes next to the applicable question groups in the section labeled “Questions for Additional Registrants”.

Maximum Character Length for Answers

You can set a maximum character length for all text-type questions, to limit the amount of data that is entered for each question. Just enter a number for the maximum number of characters in the Maximum Allowed Response Size field of the question editor.

Character Limit


Event Espresso version 3 Documentation for the Questions

Questions are used when you want to capture some more information from registrants. By default Event Espresso comes with two sets of questions, all of which are locked, though they can be edited in a limited fashion.

Event Espresso will always capture the users First name, Last name and Email address. The plugin also provides address questions built in.

If you want to add additional questions specific to your needs, then you need to add them here and then add those questions to a Question Group (see Question Groups).


Manage Questions

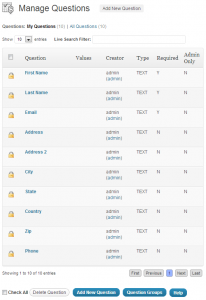
This page has an overview of all the questions, including the question name, values of the questions (for dropdown boxes etc) the creator, the type of field used, if its required and whether only the admin can see it or not.

questions - manage questions

Add Question

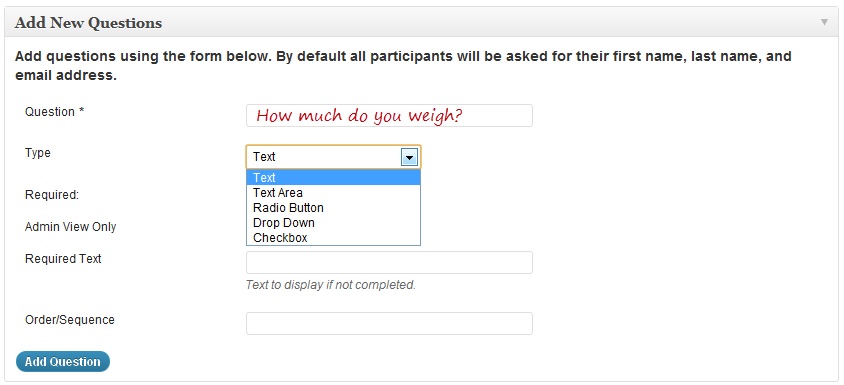
This page is where you can add a new question
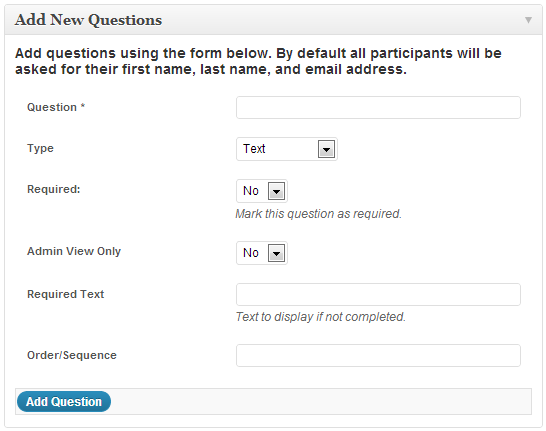
questions - add new question

Question: Type the question here i.e. How old are you?

Type: The questions can be given a specific field to help get the right answer

Text: A single line of text field, useful for short answers with an unknown answer (e.g. Name)

Text Area: A larger area for paragraphs of text, useful if you need a registrants opinion, thoughts or information in detail.

Radio Button: Allows the user to select one choice from a list of many.

Drop Down: allows the user to select one choice form a list of many, takes up less space than radio buttons.

Checkbox: Allows uses to select one or more options.

Values: If you use a Radio Button, Drop Down or Checkbox type, then you will need to supply values for them to work. These are supplied as a comma separated list (for example: one, two, three).

Required: Is the user forced to answer this question? Yes or No.

Admin View Only: If this is selected to Yes, only the administrator can see this field. Useful for adding extra information regarding attendees without them being able to see or change it.

Required Text: If the question is required, and the user fails to answer it, whatever is typed here will show up when they attempt to register. By default it says “This field is required.

Order/sequence: If you need to change the order of the questions in a group, adding a number here gives it “weight”. The larger the number the heavier it becomes and thus will sink down the list (i.e. a question with 0 in the order will be above one with 10, and the one with 10 will be above a question with an order number of 99).

Note: Since 3.0.19, you can reorder questions and question groups using the drag and drop interface on the Questions/Question Groups pages.

It is important that after you create a question that you go to Question Groups and add the question to a group, otherwise it will not show on your event.


Posted in | Comments Off on Questions (ver 3) & Registration Form (ver 4)

Installing Event Espresso

Event Espresso can be installed via the WordPress Dashboard or through FTP or SFTP.

This tutorial will guide you through the process of installing the core Event Espresso plugin (all the add ons follow the same procedure) using both WordPress and FTP or SFTP.

Important Note:

The Custom Files (NOT the Custom Templates Add-on) and Espresso Services API (currently used for the Android app only) add-ons must be manually installed via SFTP or FTP. Please see the readme.txt files in the add on zip files and this documentation: Custom Files Add-on and Espresso Services API.


Install Event Espresso via the WordPress Dashboard

Step 1 – Download Event Espresso and Add-ons

You can download Event Espresso and available add-ons through your Event Espresso Account page.

Safari may automatically unzip the file after downloading. If the file does unzip automatically, you can right click it and click “Compress…”. To prevent Safari from automatically unzipping files, go to Safari->Preferences->General and Uncheck “Open Safe Files After Downloading”.

Step 2 – Login to WordPress and Upload

Start by logging into your WordPress dashboard (WordPress admin) and then navigate to Plugins > Add New

Image


Click Upload

Image


Click Browse

Image


Find the plugin files and click “Install Now”

Please Note:

If you receive this error after trying to upload the plugin file: “The uploaded file exceeds the upload_max_filesize directive in php.ini” you will need to increase the upload file size settings in your WordPress wp-config.php file or the php.ini file on the server. Your web host can also assist you in raising this restriction.


Click “Activate Plugin”

Image

Event Espresso is now installed! Repeat the steps above for your Event Espresso add-ons.


Installing via FTP or SFTP software

What is FTP?

FTP stands for File Transfer Protocol which simply means a system for transferring files from your computer to the server that hosts your website. FTP software acts in a similar way to file explorers such as Windows Explorer.

There are several free SFTP or SFTP programs available. FileZilla and Cyberduck are available for multiple platforms.


Step 1 – Download Event Espresso

You can download Event Espresso and all the add ons available to your license via your Event Espresso Account page.


Step 2 – Extract the Files

In order to extract (unzip) the zip files you may need to obtain a third-party program such as WinRar or 7Zip. Windows 7 and Vista users can right-click and “Extract All” via Windows Explorer.

Either way, choose where you want them to be extracted to.

In this example they will be saved to a folder on the desktop called eventespresso.

Image


Step 3 – Log on to your Server using your SFTP or FTP client

Open up your FTP program and log in. You will need your FTP details: hostname, username and password. These can be obtained from your hosting provider.

Image

Press Quickconnect

The FTP program will log into your server. Your screen is split into two. The left hand side is your computer, the right hand side is your websites server.


Step 4 – Navigate to the correct folders

In the left hand side, make sure you are in the correct folder where you extracted the plugin to on your computer.

In the right side, navigate to the plugin folder:

yoursite/wp-content/plugins

Image

ImageImage


Step 5 – Upload the Plugin

Drag and drop the plugin folder from the left hand side to the right hand side, or right-click the folder on the left hand side and select upload.

You should make sure that the folder you upload does not have any spaces as part of its name.

The upload process will begin and may take a few minutes. Be sure that all files and folders are uploaded. If there are any errors, please try the upload again.


Step 6 – Activate!

Log in to your WordPress admin and navigate to Plugins > Installed Plugins. Find the Event Espresso (or add ons) and click Activate.

Image

Event Espresso is now ready to use.

Next in the Getting Started section: The Basic Settings.

Posted in | Comments Off on Installing Event Espresso

Create Registration Forms

When you create your events there may be specific information that you need to capture from your registrants. Event Espresso lets you capture information with Questions and Question Groups.

What are Questions and Question Groups?

  • Questions –an individual question such as “How much do you weigh?”.
  • Question Groups – groups of questions that are related, for example “Diet Class Questions”


How do I create Questions and Question Groups?

By default Event Espresso has a number of Questions already set up, and two default Question Groups. These are the Personal Information (name and email), which cannot be removed and is required; and the Address Information, which cannot be removed, but it’s use is optional. Both of these are suitable for basic events.

You can create/edit Questions in your WP Admin > Event Espresso > Questions and Question Groups at WP Admin > Event Espresso > Question Groups.

the two preset question groups in the WordPress dashboard

If that info is all you need, move on to the next step, Creating a New Event. Otherwise you may need to add some questions and a new group.

Steps to create new Questions and Question Groups

  1. In the navigation WP Admin > Event Espresso > Menu click Questions and then click Add New Question.
  2. Fill out the question details and hit Add Question. Do this for as many questions as you need.
    Add new questions
  3. Once done, head over to Question Groups, and click Add New Group.
  4. Give the group a title and from the list on the right, tick the questions you want included. For now this will just be the questions you just made.
  5. Then click the Add Group button.
    Select which questions you want to add to the question groups


Awesome. Now onto the main event, how to Create a New Event.

Posted in | Comments Off on Create Registration Forms

How to Sell Tickets with Volume Discounts

University of Utah Hockey

University of Utah Hockey

The Volume Discounts add-on allows event managers to apply a bulk discount to events when registrations match a specific number of tickets or a certain total dollar value for the registration. In this article, we will look at how to use Volume Discounts to allow people to sign up for season tickets. You can take a look at how we used this plugin to power the University of Utah Hockey’s Season Tickets for more information.

Setting up Volume Discounts and Multi Event Registration for Season Tickets

Step 1 – Multi Event Registration
Download and install the Multi Event Registration add-on like any other plugin. This will automatically create the “Add to Cart” links. No set up is required for this add-on. However, you will need to add a shortcode to your season tickets page that will add all the events to the shopping cart.

The shortcode to add a series of events to the cart in one step looks like this:

[ESPRESSO_CART_LINK event_id="6-7-8-9-10-11-12-13-14-15-16-17-18-19" direct_to_cart=1 moving_to_cart="Redirecting to cart..."]

Each number in the event_id parameter is the event id for that event (not to be confused with the “Unique Event Identifier”). The event id can be found on the Event Overview page in your dashboard. More information on how to set up the shortcode for the Multi Event Registration can be found here.

Volume Discount Settings

Volume Discount Settings


Step 2 – Volume Discounts
This is where we offer a discount off the total amount of the tickets purchased. For example, if you would like to offer a 50% discount once the shopping cart total reaches $70.

Set up:
Download and install the Event Espresso Volume Discount (free for a limited time!) add-on from your account page. You will need to sign up to the Pre Release channel first.

It is recommended to create categories for your events. Then you can set it up so that categories of events get the discount. However, if you are not using categories, then you have to set the volume discount settings to “All Categories”.


volume discount categories


In this example, the discount threshold starts at $70. Then the system applies a 50% discount the total price of the combined registrations.

volume discounts


Step 3 – Default Number of Tickets (optional)
If you plan on having lots of recurring events with single prices. You may want the default number of tickets to start at 1 (or any number greater than 0). Otherwise the registrant will have to click each ticket selection field at least once.

Set up:
Download and install the Custom Files add-on (does not install like a standard plugin, read the manual).

To force the ticket selection field to start at 1. Add the following piece of PHP code to the ‘wp-content/uploads/custom_functions.php’ file.

if (!function_exists('event_espresso_multi_qty_dd')) {
	function event_espresso_multi_qty_dd($event_id, $price_id, $qty, $value = '') {
		$counter = 0;
		do_action('action_hook_espresso_log', __FILE__, __FUNCTION__, '');
		?&gt;<select id="price_id-&lt;?php echo $event_id; ?&gt;" class="price_id" name="price_id[&lt;?php echo $event_id; ?&gt;][&lt;?php echo $price_id; ?&gt;]"> <!--?php 
			for ($i = 0; $i <= $qty; $i++):
				$selected = ($i == $value) ? ' selected="selected" ' : '';
				$i = $i == 0 ? 1:$i;
				?--><option selected="selected"> value="<!--?php echo $i; ?-->"&gt;<!--?php echo $i; ?--></option> <!--?php endfor; ?--> </select>
<!--?php 
	}
}
</pre-->
Note:

The above custom function will not work if your event has multiple prices since it will not know which one to use. You can only use the above code if your event(s) have a single price option.

Do you have other ideas or uses for the Volume Discounts add-on? Let us know in the Volume Discounts thread in the Pre-Releases forum and we can add more use cases or documentation based on how you are using it.

Posted in | Comments Off on How to Sell Tickets with Volume Discounts

Seating Chart Add-on

The Espresso Seating Chart plugin is a powerful tool that allows you to define a layout for your venue and sell individual seats to patrons. This guide will walk you through setting up your seating charts and adding them to your events. It assumes you have already downloaded and installed the Seating Chart add-on from the Event Espresso website. It is available with all Developer license purchases or as an a la carte add-on for $299.95. This document also assumes you have a physical theatre and that is the terminology that will be used throughout the guide. This does not mean that this is the only way you can use the Seating Chart; there are many ways you can use the Seating Chart plugin, if you think you’ve found a unique way to use the Seating Chart plugin, be sure to let us know in the forums!

Need to Buy a Support License for the Seating Chart add-on?
https://eventespresso.com/product/espresso-seating/

Getting started

After you install and activate the Seating Chart plugin, the Seating Chart page in the Event Espresso dashboard will look pretty empty. The first thing to do is add your first seating chart.

Add a seating chart by manually adding seats

If you have a small venue, you may want to create a seating chart manually. You may also want to experiment with this method just to get a hang of how the seating chart plugin builds the layouts. To do this, click the Add a Seating Chart tab, enter a name for your seating chart and give it a short description that’s easy to remember. Click Save to create the seating chart and start adding seats.

You will see a notification that says “Seating chart created”. Click the My Seating Charts tab to see your new seating chart and view the options available.

Click the Seats link to view or edit the seats for your venue’s seating chart. This will create a new tab for Add Seats. Since you have not added any seats yet, this screen will be empty. Click on the Add Seats tab to start adding seats.

You will be taken to a new screen to add a seat with all the information that the plugin needs to add the seat to the seating chart. While a seat will be added whether the fields are filled out or not, it’s important to include as much information as applicable to ensure that the seating chart layout generated by the plugin is an accurate representation of your venue’s floorplan. Make sure for Price and Member Price you set the numeric value only. Do not enter the price like $20. Decimal values can be used (or not). Click Save to add your seat and add another one.

An explanation of some of the terms

Custom Tag – This is used for the ‘Seat’ value on the front-end seating chart. Certain values will also give added functionality such as reserved seating (explained below)

Level – If you have several floors to your venue, level allows you to split up the chart into several levels.

Section – Separate your floor or plan into different sections.

Row – Within a section the rows determine where the seats are (or aren’t, placeholders can have their own rows)

Placeholder – Used in the custom tag area. Inserts an invisible block (seat) to help you structure the charts and bring gaps into the plan.

Reserved – Used in the custom tag area. Similar to the Placeholder, but these are visible, allowing you to demarcate seats that exist but are reserved for VIP’s or another reason.

Tip:
It is worth noting is that the levels, sections, rows, and seats are ordered alphanumerically. This means that a level named “Balcony” will display below (closer to the stage) than a level named “Lower” or “General”. For this reason, we recommend venues with two levels to name them “Lower” and “Upper” or “Level 1” and “Level 2” to make sure they display accurately.

Repeat this process until you have all your seats entered. Once you’re ready to move on, click the Back to seat list link to go back to the list of seats. You now have seats! If you see a problem in multiple seats in the seat list, you can bulk edit them and resolve the problem by selecting the Seats option for the seating chart and in the next screen, select the appropriate seats and then the Edit option from the dropdown menu and click Apply. This will open the Bulk Seat Editor which will apply your updates to all the selected seats. This way you can move entire rows or sections or change the prices for all the seats in a section or row at once!

Add a seating chart by uploading a spreadsheet

If you don’t want to add each seat manually, you can upload a CSV file for your venue. On the New Seating Chart page there are sample layout files in XLS or CSV format. It doesn’t matter which you use, but CSV files seem to work most consistently in uploading. If you save the Excel XLS file, be sure to save it as a CSV before uploading.

To get started, download one of the example files on the New Seating Chart page and open it in your spreadsheet application. You can edit all the same fields as you can in the Add Seat screen. However using a spreadsheet application may be preferable because you can create many similar fields at the same time by pasting a value into multiple cells.

When you save, be sure to save as a Text CSV file.

If prompted, set the character set to UTF-8, field delimited to , and text delimiter to ". You may receive a prompt when saving as a CSV from an XLS.

Section Alignment

You’ll notice that my seating chart has three sections: Left, Right and Center. But, as mentioned above, since the seating chart displays alphanumerically by default, the sections would display like this: Center, Left, Right. That’s not going to work, so we need to edit the section alignment.

Go back to My Seating Charts. From there, click on the Section Alignment link under your seating chart name.

Here you will see two  list of all your sections with two important columns: Alignment and Sort Order.

By changing the sections Alignment you can reorder the sections into the correct position.

By changing the Sort Order you will change the direction the seat numbers go (example: default is seats 1-3, by swapping the sort order to right to left, the seat order becomes 3-1). This can be very useful in venues that have reversed seating numbers.

Please note:
You cannot import a CSV/XLS file into a currently existing seating chart, only as a new seating plan. Existing seating charts can only be edited manually.
Need to Buy a Support License for the Seating Chart add-on?
https://eventespresso.com/product/espresso-seating/

Posted in | Comments Off on Seating Chart Add-on

Roles and Permissions Pro Add-on

The Roles and Permissions Pro add-on for Event Espresso expands upon the features included with the Roles and Permissions Basic add-on.

View quick links for this add-on –> 


Need to Buy a Support License for the Roles and Permissions Pro Add-on?
https://eventespresso.com/product/espresso-permissions-pro/

Installation

This add-on requires Event Espresso 3.1.33 or newer. It cannot be used with old versions of Event Espresso 3.

This add-on is a plugin for WordPress and can be installed through your WP dashboard (WP-admin).

Download the latest version of the Roles and Permissions Pro add-on for Event Espresso 3 from your Event Espresso account.

Then login to your WordPress dashboard (WP-admin) and go to Plugins. Next, click on Add New –> Upload and browse to the plugin on your computer. Then select the zip file and begin the upload process. Wait for the plugin to upload and then click on Activate.

Setup and Configuration

This add-on requires the Roles and Permissions Basic add-on to be installed and activated.

Have you already read through the documentation for the Roles and Permissions Basic add-on? If not, you can view the documentation for the Roles and Permissions Basic add-on. Then continue to the sections below to learn about the new options in the Roles and Permissions Pro add-on.

User Permissions

In addition to the standard Minimum Page Permissions, there are now two new boxes in the User Permissions page: Current Roles/Capabilities and the Advanced Options section.

Current Roles/Capabilities

This section lists what the different roles can do and the number of users with that particular role. Clicking the links takes you to the Users page which will show only those users with that role.

Advanced Options

Image

Events created by “Event Managers” require approval?: Selecting yes will mean the Admin will need to authorise an event created by Event Managers, before it will be published and go live. If set to No, the events will be published as normal.

event options

Setting a pending event to published in the event editor

Regional managers can edit venues assigned to them?: Gives Regional Managers the ability to edit and delete venues assigned to their locale. Note that the permission for Venue Manager must be set at Regional Manager level.

Regional managers are in charge only of their staff?: If set to yes, staff added by other users will not be visible to the Regional Manager in question.

Anyone can create a post when publishing an event?: Setting to yes will remove the Post section in the edit Event page.

Enable sharing of categories between users?: Allows categories to be shared with all staff. If set to no, categories will be on a per staff member basis.

Locales/Regions

Create and manage multiple regions and areas where your events occur, for example USA, UK, Finland or right down to a local level like Salt Lake City, Bountiful, Ogden.

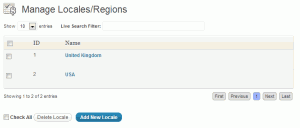
Roles and Permissions Pro - Locale overview

Roles and Permissions Pro – Locale overview

Adding a new locale is simple. Start by clicking the Add New Locale button.

In the box that appears, add the locale name and click the Save Locale button.

Roles and Permissions Pro - add new locale

Roles and Permissions Pro – add new locale

Regional Managers

This new menu will list all of your Regional Managers, and you can obtain important contact information and edit which regions they deal with.

Regional managers overview

Regional managers overview

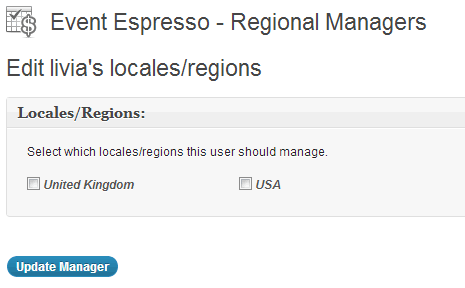
Hovering your mouse over the Regional Managers name will reveal the edit link. Click that to edit which regions that manager covers, if any.

Regional managers edit screen

Usage

The Roles and Permissions Pro adds additional features to Event Espresso 3 by expanding on the options introduced by the Roles and Permissions Basic add-on.

Troubleshooting

The plugin will not activate. Can you help?
Are you running a current version of Event Espresso 3? Is the Roles and Permissions Basic add-on installed and activated?

Some options mentioned here are not appearing. Can you help?
This add-on requires the Roles and Permissions add-on to be installed and activated. It cannot run alone. Please ensure that both add-ons are up to date.

Missing Admin Bar or blocked Admin access when also using Woocommerce?
Woocommerce blocks users without the edit_posts cabailbility from seeing the admin bar or accessing the admin.
The following code snippet can resolve this:

function ee_do_not_prevent_admin_access_with_woocommerce() {
return false;
}
add_action( 'admin_init', 'ee_allow_master_admin_admin_access_with_woocommerce');
function ee_allow_master_admin_admin_access_with_woocommerce() {
if ( current_user_can( 'espresso_event_admin' ) ) {
add_filter( 'woocommerce_prevent_admin_access', 'ee_do_not_prevent_admin_access_with_woocommerce' );
add_filter( 'woocommerce_disable_admin_bar', 'ee_do_not_prevent_admin_access_with_woocommerce' );
}
}

Customizations

Our support team cannot write custom coding for you. Below are some examples on customizing this add-on.
  • None at this time — check back soon!
Need to Buy a Support License for the Roles and Permissions Pro Add-on?
https://eventespresso.com/product/espresso-permissions-pro/

Posted in | Comments Off on Roles and Permissions Pro Add-on

Roles and Permissions Basic Add-on

The Roles and Permissions Basic add-on for Event Espresso allows admins you to create manage and customize the WordPress user roles and give them different permissions with different capabilities so your staff can help you manage your events or the events that other people create.

View quick links for this add-on –> 


Need to Buy a Support License for the Roles and Permissions Basic Add-on?
https://eventespresso.com/product/espresso-permissions-basic/

Installation

This add-on requires Event Espresso 3.1.33 or newer. It cannot be used with old versions of Event Espresso 3.

This add-on is a plugin for WordPress and can be installed through your WP dashboard (WP-admin).

Download the latest version of the Roles and Permissions Basic add-on for Event Espresso 3 from your Event Espresso account.

Then login to your WordPress dashboard (WP-admin) and go to Plugins. Next, click on Add New –> Upload and browse to the plugin on your computer. Then select the zip file and begin the upload process. Wait for the plugin to upload and then click on Activate.

Setup and Configuration

Login to your WP dashboard and go to Users –> Add New. Then create a new user and assign them a role of ‘Espresso Master Admin.’

Image

Tip:
Install the User-Switching plugin for WordPress to quickly switch between user accounts while setting up permissions.

Set up the User Roles

Go to the Event Espresso –> User Roles screen and edit the Administrator role. This role should have all the capabilities checked.

Then edit the Espresso Master Admin role. This role should at the very least have the following capabilities active:

  • espresso_event_admin
  • espresso_event_manager
  • espresso_group_admin

Other capabilities such as unfiltered_html, upload_files might be useful if they will be creating event content.


Capabilities
If there are capabilities that are not in the list that you’d like to add, they can be entered into the text boxes below the list. A list of standard WordPress Capabilities can be referenced in the WordPress codex.


Image

Then assign this new user role the permissions, or access to Event Espresso features, that this role should have. As an example, if the events that the event admin will be publishing will offer discount codes, set the ‘Discounts Page’ permission to be available for the event admin. Be sure to save when finished.


Image

Tip:
While there are no further settings to configure the Roles and Permissions add-on than what’s been covered here, it’s important to note one of the features of the Roles and Permission add-on:

The Roles and Permissions add-on “separates” registration form questions and question groups into groups for each user account. What this means is one user will not have access to another user’s custom registration form questions when creating or editing events.

Usage

The Roles and Permissions Basic add-on is helpful for creating users that have access to certain parts of Event Espresso within your WordPress dashboard. You can assign users certain permissions as shown in the screenshot above.

Troubleshooting

The plugin will not activate. Can you help?
Are you running a current version of Event Espresso 3?
Missing Admin Bar or blocked Admin access when also using Woocommerce?
Woocommerce blocks users without the edit_posts cabailbility from seeing the admin bar or accessing the admin.
The following code snippet can resolve this:

function ee_do_not_prevent_admin_access_with_woocommerce() {
return false;
}
add_action( 'admin_init', 'ee_allow_master_admin_admin_access_with_woocommerce');
function ee_allow_master_admin_admin_access_with_woocommerce() {
if ( current_user_can( 'espresso_event_admin' ) ) {
add_filter( 'woocommerce_prevent_admin_access', 'ee_do_not_prevent_admin_access_with_woocommerce' );
add_filter( 'woocommerce_disable_admin_bar', 'ee_do_not_prevent_admin_access_with_woocommerce' );
}
}

Customizations

Our support team cannot write custom coding for you. Below are some examples on customizing this add-on.
  • None at this time — check back soon!
Need to Buy a Support License for the Roles and Permissions Basic Add-on?
https://eventespresso.com/product/espresso-permissions-basic/

Posted in | Comments Off on Roles and Permissions Basic Add-on

How to integrate Event Espresso with 2Checkout

Event Espresso is the premiere event registration and ticketing management plugin for WordPress. This premium plugin for WordPress allows even basic users to turn your existing blog or website into a fully featured event management website. With features like printable tickets with QR codes and mobile apps that let you check attendees in at the door; along with custom registration forms and integration with more than 20 gateways, Event Espresso can help any small company be more successful with each event. Event Espresso is also fully-supported with dedicated support staff and developers and they’re launching a new website soon to provide the best customer service offered by commercial WordPress plugins.

This is a placeholder that will redirect to 2checkout’s documentation here: https://www.2checkout.com/shopping-cart/event-espresso/

Posted in | Comments Off on How to integrate Event Espresso with 2Checkout

Selectively Hide the Add to Cart Link

Overview

Here’s a simple tweak that makes a lot of sense. You have an event that either isn’t taking registration or you want people to email you for inquiries instead of registering on the site. With the Multi Event Registration add-on active, you will see an Add to Cart link regardless of whether you are displaying a registration form. As discussed in another document, this is handy if you want to use the Multi Event checkout instead of the regular registration form. However, by default, you’ll still get the Add to Cart link in your Event List. In this tutorial, I’ll show you two ways to hide the Add to Cart link for different uses.

In both methods, we’ll be editing the event_list_display.php. You’ll want to refer to Customizing Your Upcoming Events Widget Using CSS and Template Files and the Template Glossary if you have any questions about how to edit the template files or what to do with them once you’ve modified them.

Method 1: Hiding the registration form also hides the Add to Cart link

The first method hides the Add to Cart link when the registration form is hidden. This is actually pretty easy. Scroll down to the bottom of event_list_display.php to this block of code:

       if ($display_reg_form == 'Y') {
            ?>

           <p id="register_link-<?php echo $event_id ?>" class="register-link-footer">
                <a class="a_register_link" id="a_register_link-<?php echo $event_id ?>" href="<?php echo $registration_url; ?>" title="<?php echo stripslashes_deep($event_name) ?>"><?php _e('Register', 'event_espresso'); ?></a>
                <?php echo isset($cart_link) && $externalURL == '' ? $cart_link : ''; ?>
            </p>
        <?php } else { ?>
            <p id="register_link-<?php echo $event_id ?>" class="register-link-footer">
                <a class="a_register_link" id="a_register_link-<?php echo $event_id ?>" href="<?php echo $registration_url; ?>" title="<?php echo stripslashes_deep($event_name) ?>"><?php _e('View Details', 'event_espresso'); ?></a> <?php echo isset($cart_link) && $externalURL == '' ? $cart_link : ''; ?>
            </p>
        }

This is checking if Display Registration Form is set to Yes, and if so, it displays one type of Register link. If not, it changes the ‘Register’ to ‘View Details’. In either case, it displays the cart link. We’re going to fix that last part by focusing on the second half:

        <?php } else { ?>
            <p id="register_link-<?php echo $event_id ?>" class="register-link-footer">
                <a class="a_register_link" id="a_register_link-<?php echo $event_id ?>" href="<?php echo $registration_url; ?>" title="<?php echo stripslashes_deep($event_name) ?>"><?php _e('View Details', 'event_espresso'); ?></a> <?php echo isset($cart_link) && $externalURL == '' ? $cart_link : ''; ?>
            </p>
        <?php
        }

All we need to do here is remove the part that displays the cart link, which is this:

<?php echo isset($cart_link) && $externalURL == '' ? $cart_link : ''; ?>

With that part pulled out the whole block looks like this:

       if ($display_reg_form == 'Y') {
            ?>

           <p id="register_link-<?php echo $event_id ?>" class="register-link-footer">
                <a class="a_register_link" id="a_register_link-<?php echo $event_id ?>" href="<?php echo $registration_url; ?>" title="<?php echo stripslashes_deep($event_name) ?>"><?php _e('Register', 'event_espresso'); ?></a>
                <?php echo isset($cart_link) && $externalURL == '' ? $cart_link : ''; ?>
            </p>
        <?php } else { ?>
            <p id="register_link-<?php echo $event_id ?>" class="register-link-footer">
                <a class="a_register_link" id="a_register_link-<?php echo $event_id ?>" href="<?php echo $registration_url; ?>" title="<?php echo stripslashes_deep($event_name) ?>"><?php _e('View Details', 'event_espresso'); ?></a>
            </p>
        }

…which says “If Display Registration Form is set to Yes, display a ‘Register’ link along with an ‘Add to Cart’ link. Otherwise, display a ‘View Details’ link and don’t display an ‘Add to Cart’ link.”

Method 2: Hide the Add to Cart link using EE_META

That’s all fine and dandy, but what if you want to hide the registration form but you do want to display the ‘Add to Cart’ link, just not on this event (or this series of events). In this case we’re going to create a meta key, store that in a variable, then check to see if the variable matches our criteria and use that to determine whether or not to display the ‘Add to Cart’ link. Ready? Here we go:

First we need to create our meta key and value pair. This is done in the event. We can call the meta key whatever we want, so I’ll do something obvious like ‘display_cart_link’. Now we have our meta key and we can use this on any event. For this event, I don’t want to display the cart link, so my value is going to be ‘N’.

display_cart_link

Easy enough. Now let’s add that to the event_list_display.php.

First let’s declare a variable that pulls in the value of our new meta key. Above this line:

if ($display_reg_form == 'Y') {

add this:

$display_cart_link = do_shortcode('[EE_META type="event_meta" name="display_cart_link"]');

We’ve just created a variable called $display_cart_link that will pull in the EE_META value for ‘display_cart_link’ (if it exists). Now we need to check whether we want to display the cart link. Again, we’re doing this in the second half of this if/else statement:

       if ($display_reg_form == 'Y') {
            ?>

           <p id="register_link-<?php echo $event_id ?>" class="register-link-footer">
                <a class="a_register_link" id="a_register_link-<?php echo $event_id ?>" href="<?php echo $registration_url; ?>" title="<?php echo stripslashes_deep($event_name) ?>"><?php _e('Register', 'event_espresso'); ?></a>
                <?php echo isset($cart_link) && $externalURL == '' ? $cart_link : ''; ?>
            </p>
        <?php } else { ?>
            <p id="register_link-<?php echo $event_id ?>" class="register-link-footer">
                <a class="a_register_link" id="a_register_link-<?php echo $event_id ?>" href="<?php echo $registration_url; ?>" title="<?php echo stripslashes_deep($event_name) ?>"><?php _e('View Details', 'event_espresso'); ?></a> <?php echo isset($cart_link) && $externalURL == '' ? $cart_link : ''; ?>
            </p>
        }

In the else we’ll add this:

<?php if ($display_cart_link != 'N') { echo isset($cart_link) && $externalURL == '' ? $cart_link : ''; } ?>

So the whole thing looks like this:

       $display_cart_link = do_shortcode('[EE_META type="event_meta" name="display_cart_link"]');
       if ($display_reg_form == 'Y') {
            ?>

           <p id="register_link-<?php echo $event_id ?>" class="register-link-footer">
                <a class="a_register_link" id="a_register_link-<?php echo $event_id ?>" href="<?php echo $registration_url; ?>" title="<?php echo stripslashes_deep($event_name) ?>"><?php _e('Register', 'event_espresso'); ?></a>
                <?php echo isset($cart_link) && $externalURL == '' ? $cart_link : ''; ?>
            </p>
        <?php } else { ?>
            <p id="register_link-<?php echo $event_id ?>" class="register-link-footer">
                <a class="a_register_link" id="a_register_link-<?php echo $event_id ?>" href="<?php echo $registration_url; ?>" title="<?php echo stripslashes_deep($event_name) ?>"><?php _e('View Details', 'event_espresso'); ?></a> <?php if ($display_cart_link != 'N') { echo isset($cart_link) && $externalURL == '' ? $cart_link : ''; } ?>
            </p>
        }

This time we’re saying “If Display Registration Form is set to Yes, display a ‘Register’ link and the ‘Add to Cart’ link. Otherwise, display the ‘View Details’ link and check if the ‘display_cart_link meta value is set to ‘N’. If it’s not set to ‘N’, we are displaying the cart link, so do that. If not, hide the cart link.” Here’s what my event list looks like:

Event List

Posted in | Comments Off on Selectively Hide the Add to Cart Link

Using Event Espresso to Run a Class

If you’re running a class then it’s hard to find a better registration service than Event Espresso. It’s simple to set up and once you’re going it takes care of all of the work for you. That means less time on boring admin, and more time spent doing the things that you love!

There are loads of different types of classes that you can use Event Espresso for. For example,

  • Dance classes
  • Writing classes
  • Yoga classes
  • Singing classes
  • Scrapbooking classes
  • Cooking Classes
  • IT classes

This tutorial will show you how to set up a one-off class. I’m going set up Event Espresso to run a class called “Cookery for Beginners.” However, you can follow the steps and replace with your own class’ details.

What Your Will Need:

  • Event Espresso
  • Course dates
  • Venue information
  • Course Cost
  • Paypal information

You can read the installation and setup instructions to help you get started with Event Espresso.

Once you’re set up we’re ready to go.

1) Create a Venue

Before we actually create the event, we need to set up some options to make everything run smoothly. Navigate to Event Espresso > Venue Manager.

Image

Add your venue’s details.

Image

Click Save Venue.

2) Add PayPal information

I’m going to set this up to take payments via PayPal but you can use any gateway that you wish.

Navigate to Event Espresso > Payment Settings

click payment settings on the WordPress Admin menu

Click on “Activate PayPal IPN”.

click activate payment menu

Now you can fill in your PayPal details. You should also choose the correct currency for your account.

paypal details

If you want to test your setup you can check the PayPal sandbox settings. This will let you run through your signup process without having to actually pay for anything.

3) Create Questions

Every class is going to have different questions that need to be answered. For example, for my cookery class I have some specific information that I need to capture:

  • Does the attendee have any food allergies or dietary requirements?
  • Does the attendee require any assistance or special access?
  • We need to create these questions. Then we can group them together and attach a whole group to an event.

Navigate to Event Espresso > Questions

Questions is a sub menu of Event Espresso on the WordPress menu

Click “Add New Question”.

click add new question

Complete the form. You can choose different types of form fields for your attendees to fill in. You could use a dropdown for a multiple choice question, or a check box for a question that just requires a yes/no answer.

add new questions settings

You can also make  a question required so that the attendee is forced to answer it.

Here are my questions

my two questions on the main questions page

4) Create Question Group

Question groups are groups of questions that you can assign to different events. This grouping method means that you can assign a whole group of questions to an event. Event Espresso comes with two preset question groups:

  • Personal information
  • Address Information

These groups will capture the essential information that you need but you can create specialised groups of questions that are tailored to your course.

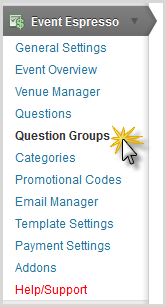
Navigate to Event Espresso > Question Groups

question groups is a sub menu of Event Espresso on the WordPress admin menu

Click on “Add New Group.”

click add new question group

Give your group a name and select the questions that you want to add. You can also decide whether you want the group name and description to appear on the homepage.

add your questions to the question group

When you’re happy with the settings click “Add Group.”

5) Create Your Event

Now you’re ready to create your event! Navigate to Event Espresso > Event Overview.

Click “Add New Event.”

click add new event

You’ll see what looks likes the WordPress post and page editing screen, but with lots of extra bits. This is the main event creation page for Event Espresso. It’s where you’ll come back to again and again for all of the amazing events you’ll be creating!

To start with add a name and a description for your event. This will appear on the event page on the front end.

add your title and description

Now let’s take a look at the event options. You’ll find this box on the right hand side under the Publish button.

There are a number of different settings that you can adjust here:

  • Decide how many attendees to have at your event
  • Allow group registrations and decide how big that group can be
  • Require additional information for events

And then you have some advanced settings which you can use to further tweak your event. For example, you can:

  • Choose whether to display your event description
  • Choose whether to display the registration form
  • Use an alternate registration page
  • Use an alternate email address

Because my cookery class requires a kitchen classroom I need to limit the numbers to 15 so that everyone gets a workspace. Also, I do not want to allow group registrations.

Here are my settings:

the attendee limit is set to 15 with no group bookings

Event Date / Times

Scroll down to Event Date / Times

Here you can add the practical details of your event. Obviously the most important thing that you need to enter is the date and time. However, you can also set the date and time that registration opens. This helps you control when people can sign up. For my cookery class, for example, I want registration to close a week before the class. This gives me time to buy all of the ingredients!

add your event's dates and times

Event Pricing

You can add as many different prices to your event as you want. This means you can have special rates for students, retirees, children, just about anyone you want. For my event I want a flat rate of $60, but I’ll also add a rate of $40 for the over 60s.

add your pricing

Event Question for Primary Attendee

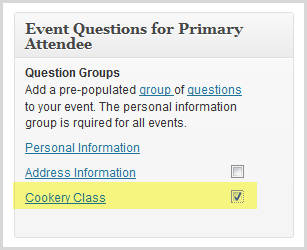
Here’s where you can attach your question groups. Everyone has to fill in their personal information – first name, last name, email address. You can add to those groups or create your own groups. I’m going to attach the group we just created.

check the cookery class question group

Additional Event / Venue Information

Now you get to select the venue that you’ve already created. Choose it from the dropdown menu.

select your venue from the dropdown menu

That’s everything that we need to add for this class. However, for your class you can also change the following settings:

  • Add a custom email confirmation
  • Create a post for the event
  • Add discount codes
  • Put your event in a category

When you’re happy with your settings click “Submit New Event”.

Your course is now ready to go!

It will appear on your registration page but if you want you can insert a shortcode into a specific page. To find the shortcode navigate to Event Espresso > Event Overview.

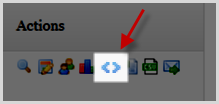
You’ll see some action icons beside your event. The shortcode one looks like two blue point brackets:

click on the shortcode icon to get the shortcode

You can copy this shortcode onto any page except your main event registration page.

Check out my sign-up form for my cookery class in action:

signup form on website

Posted in | Comments Off on Using Event Espresso to Run a Class

Event Espresso