If you are an event organizer then your goal is to get on the calendar of anyone who is interested in your type of event. To help with that goal, you can make your online event[s] accessible for people to add your event to their own digital planners, their calendars! This will help you stand out among other events and stay top of mind as your potential guests make their plans.
Adding iCal download links to your event registration confirmation emails or making them available as .ics file downloads makes it easy for attendees to save the event’s details directly to their personal calendar applications. And, if attendees put your upcoming event on their calendar they’re more likely to attend.
In this article we will show you how to use iCal Downloads along with Event Registration and Ticketing with WordPress. We’ll start off by explaining what iCal is and why you’d want to use it on your WordPress event registration website. We’ll also show you how to use iCal download links in Event Espresso.
Let’s begin.
Article Outline
What Is iCal and How Do You Use It?
iCalendar (iCal for short) is a cross-platform file format that’s used to store calendar information. iCal is compatible with many of today’s most widely used platforms such as, macOS Calendar, iOS Calendar, Facebook Events, Google Calendar, Windows Calendar, and more. It’s used in scheduling software, email clients, and tools that provide calendar functionality (such as the ability to send meeting requests).
In the context of your WordPress event registration and ticketing websites, iCal is used to store details about upcoming events to calendars. What this means is that attendees can use the iCal download links on your event listings page to add the events they’ve registered for directly to their personal calendars.

iCal download links contain various details of the event including event date and time, venue name, venue location, etc…. Whenever a user click on an event’s corresponding iCal download link, the events details will automatically be added to the user’s supported calendar application.
For example, if an event organizer schedules three events in a month, their attendees will be able to view the event’s venue, date, and time directly from their own calendars. This way, they won’t have to visit the event site to get the details, and they will be able to see your events within the context of their own schedules
Now that we have an understanding of what iCal is and how it’s used in connection to event websites, let’s take a look at some of the different things you can do with iCal download links in Event Espresso.
How to Use iCal Download Links in Event Espresso
With Event Espresso, you can integrate your event registration website(s) with iCal-compatible calendars. These include Google Calendar, Apple iCal, and Microsoft Outlook. As a standard feature, iCal download links appear in Event Espresso’s event listings page, event details page, and registration confirmation messages.

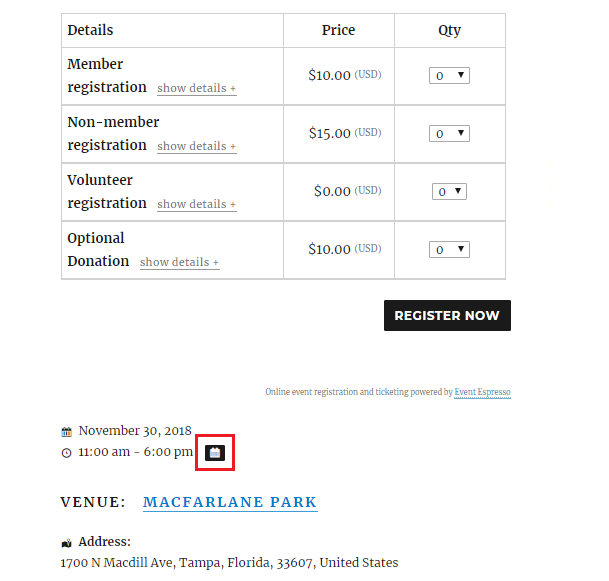
Image caption: As seen in the above image of the event registration page, a user can click on the iCal icon to download the event information to add to their own calendars.
Here are some of the things you can do with iCal download links in Event Espresso.
Adding iCal Download Links to Messages and Emails in Event Espresso
With iCal shortcodes for messages and emails, your event attendees will be able to synchronize their devices with any upcoming events they’ve registered for.
You can add iCal download links directly to your Registration Approved messages simply by adding the iCal shortcode [ICAL_LINK_*] to the registrant or email template. Alternatively, you can use the shortcode selector menu to add the shortcode to your message template.
Additionally, you can customize the iCal download link to display a helpful message using the shortcode [ICAL_LINK_* link_text=”Add Event to my Calendar”]. You can replace the text Add Event to my Calendar with a custom message.
Here’s how you can add iCal download links to message and email templates:
Log in to your event website and navigate to Event Espresso > Management > Messages > Default Messages Templates.
Scroll down till you see Registration Approved message templates. Click the Email or Registrant link depending on whether you want to add the iCal download link to email or message templates.

Next, scroll down till you see the datetimes area towards the end of the text editor and add the shortcode ICAL_LINK_* within the <li></li> tags. Save the message (or email) template to proceed.
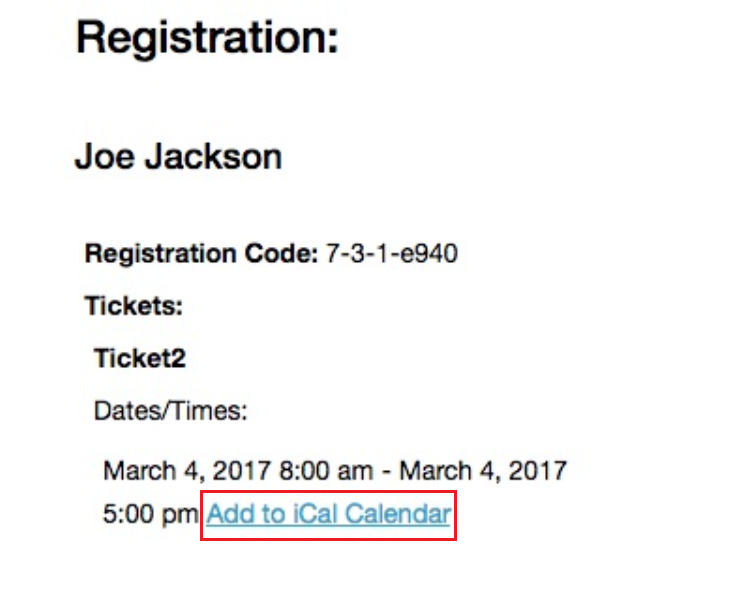
Check out the complete tutorial for step-by-step instructions and troubleshooting tips. Once you’re done, it should look something like this:

Adding iCal ICS Files in Calendar
Once attendees register for an event, they can use the event’s iCal links to download a .ics file to their device. They can use this calendar file to import the event directly into their personal calendar application – such as Google Calendar.
Here’s how:
Log in to your Event Espresso website and navigate to the Template settings. Make sure the Display an “Add to Calendar” icon/link in the event templates? is set to Yes.
Whenever a user click on the iCal icon (or link) from your event website’s front-end, a .ics file will download to their device. They can use this file to add the event to t your Google Calendar [or other compatible calendar].
From the Google Calendar, your attendees would simply click the (+) icon and select the Import option.

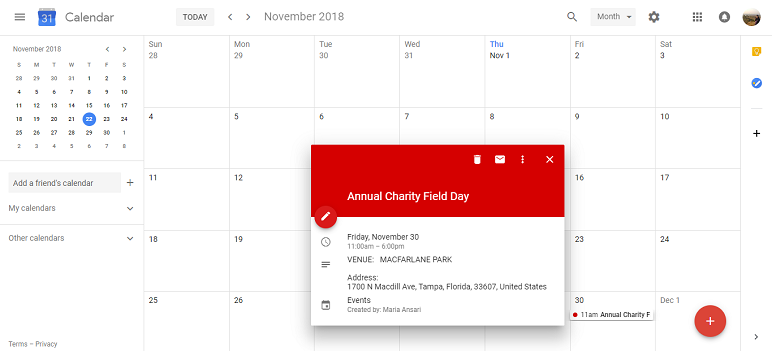
Browse for the downloaded .ics file from your device and open it. Click the Import button to import the event’s details into your Google Calendar. The event should appear on the calendar based on its start and end dates. It might look something like this:

Be sure to check out the step-by-step tutorial for instructions on how to set this up and helpful troubleshooting tips.
Removing the iCal Icon
iCal download links appear in event listings pages and event details pages by default. However, if you’d prefer to hide iCal downloads links, you can do so by adding some code to your active theme’s file.
Here’s what you need to do if you want to remove the iCal link from your event website:
Add the following code to your child theme’s functions.php file:
https://gist.github.com/joshfeck/1bc3731cd1c468916c7f#file-functions-php
Remember to save the file after adding in the code. The iCal download link should be removed from your event listings page and event details page.
Conclusion
iCal downloads make it incredibly easy for attendees to save event details to their personal calendars, smartphones, or tablets. With Event Espresso, you’re able to add iCal download links directly to your Registration Approved messages and emails or make the [italics].ics[/italics] file available to attendees.
What are some of the ways your attendees can benefit from event calendar functionality? Do you have any questions about what you can do with iCal download links in Event Espresso? Let us know in the comments section below.