Event Espresso version 4 Documentation for Registrations(In Progress)
The registrations section of Event Espresso provides all the attendee information you need. It is separated into tabbed areas: Overview, Event Check-in, Contact List, and Reports.
Whilst in 3.1.X attendees were created individually in some cases and not at all in other cases.
4.X creates a unique attendee only once, and attaches the event and transaction details to that attendee. So whilst the overview may show an attendee multiple times, it is smart enough to recognize the attendee name and email address and attach events to that contact.
Note: If the attendee/registrant name and emails do not match exactly, a new attendee with a new attendee id will be created.
Overview
Here you will find the details of all attendees registered to events.
Filters
Above the list you will find various filters to help narrow down your attendee list. These include Today’s registrations, This Month’s registrations, a selector for a specific month, a selector for a specific event category, and a selector for a specific registration status.
Bulk Actions
The Bulk Actions selector that appears above the registrations list table allows you to perform the following actions to selected registrations:
- Approve
- Approve and Notify
- Decline
- Decline and Notify
- Set Registrations to Pending Payment
- Set Registrations to Pending Payment and Notify
- Set Registrations to Not Approved
- Set Registrations to Not Approved and Notify
- Cancel Registrations
- Cancel Registrations and Notify
- Trash Registrations
How to Use Bulk Actions
Here’s a video that shows an example of how to select a registration to cancel it. When a registration is cancelled, the number of sold tickets for the event is decreased by one.
If your browser doesn’t support HTML5 video, here’s a link to a Flash video instead.
Columns
The registrations list table’s columns include the following information:
Reg Status – the current status of the registration. This is show as a thin colored bar to the left of the ID (Registration ID).
- Green – Approved
- Blue – Pending Payment
- Orange – Not Approved
- Pink – Declined
- Gray – Cancelled
ID – this is the registration ID, and is different to the Attendee and Event ID.
Name – the name of the attendee. If the person bought more than one ticket and the additional attendee data was either not required or the primary attendee copied all their data to the other forms, then the attendee name may be the same.
TXN Date – The date and time when the customer signed up to the event.
Event – The name of the event that the user signed up to.
Event Date – The event start date and time.
Att # – This denotes if the registration is part of a group booking or not. If it says 1 of 1, then it is a single booking, if it says 1 of X where X is a number higher than 1, it is a group booking.
Reg code – a unique ID for that registration. If it is a group booking the id will still be unique for each ticket.
Price – The ticket price.
Actions – 4 icons to provide more functionality:
- View Registration Details
- Edit Attendee Details
- Resend registration details to attendee
- View Transaction details
This star icon indicates that the Attendee is the Primary Attendee ![]()
If you hover your mouse over the Event, a submenu will appear with the following options:
- View Attendee Check In List – this will display a complete list of attendees for that event, including any cancelled or incomplete attendees.
- View Registrations – this will display a list of all pending and complete registrations.
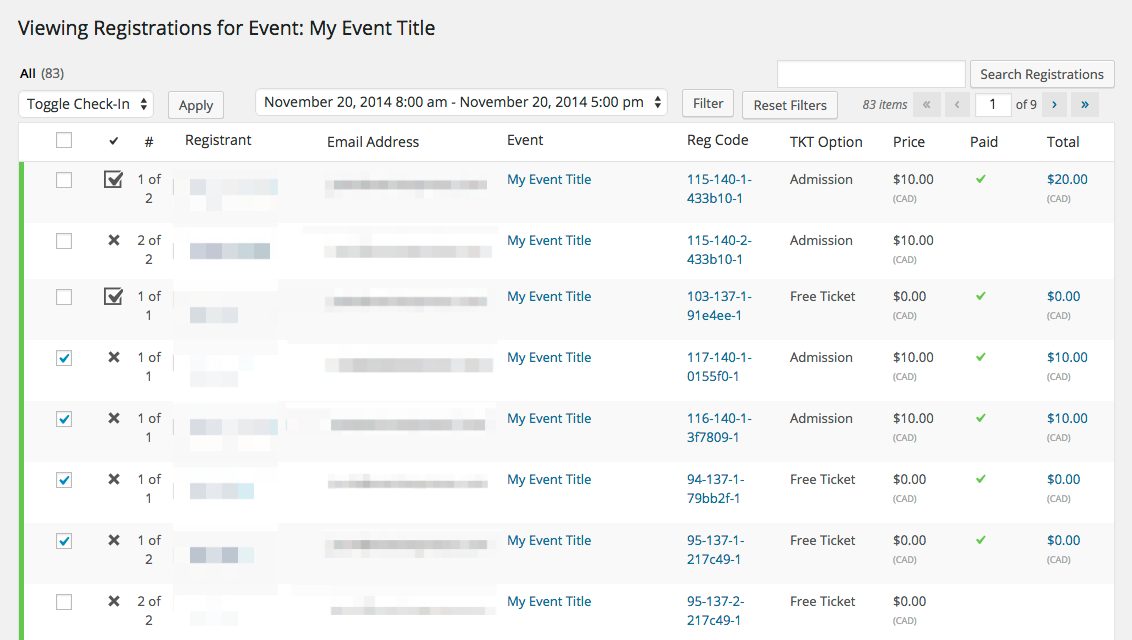
Event Check-in
This screen is used to check attendees into events from the WordPress admin.
Step 1: You select an event from the drop-down select, then click the Filter button. Now you are viewing a list of registrations for an event.
Step 2: To check in one attendee at a time, you click on the X under the “✓” column. To check in attendees in bulk you click on the checkboxes in the box column to the left, then select Toggle Check-in and click “Apply”.
Contact List
The contact list tab provides a simplified overview of the attendees, showing their contact details. You can edit contact details, export a Contact List to a CSV file, and Send a Batch Message (or newsletter) from the Contact List view.
Reports
This screen shows reports for registrations by day and by each event.
How to…
How to export the registrations as tabular data
You can output the registration list for a single event by using Event Espresso’s CSV Report feature. Here’s how:
1) You select the event you want exported from the event overview by hovering over the event’s row, then click the Registrations link that appears.
2) At the bottom of the event’s registration list, you will see a “Registrations CSV Report” button. You click this and a save dialog will appear to allow you to save the generated export.
3) You can open the CSV report file in applications that handle CSV files. Some examples include Excel, Numbers, CSVFileView, and Open Office.
How to add a registration in the WordPress dashboard
You can add registrations for specific events via the WP dashboard by following this step by step guide.
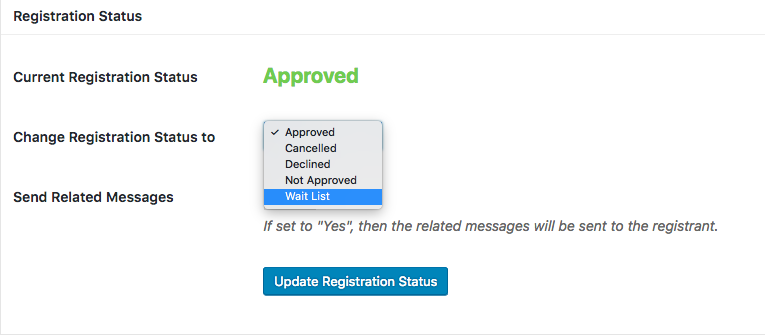
How to manually change a registration status
The registration status can be changed from the list table, or also within the Registration details page. There you can cancel a registration, or change its status from Wait List to Pending Payment.
How to create new contacts from a group registration
A registration made with a group can share the contact details for the primary registration. You can create a new contact for the registration, where the registration will have its own contact information, by clicking the Create Contact button.
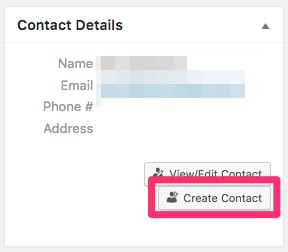
The Create Contact button is visible on the single registration view when there are multiple registrations within one transaction, where the original registrant input the same contact info for each registration.