If your events are popular, or if you are restricted on the number of people you can have, you may find that you need to have a waiting list. This means that if your event is full, people can add themselves to a waiting list. If someone drops out of your event then the person on the waiting list can be added to the list of attendees.
To create a waiting list you need to create another event. This will be marked as a waiting list and then assigned to the primary event. It’s a bit like a bucket for collecting all of the people who couldn’t make it in the the main event.
Let’s look at an example of a waiting list for an event called “Intense Yoga.” The class is restricted to 5 people and it’s very popular so I want to create a waiting list so I can capture the details of any potential attendees.
1. Create Your Event
To start off, you’ll need to create your main event. If you’re unfamiliar with how to create an event, you should check out this tutorial on setting up an event with Event Espresso or read through the full Getting Started guide.
Make sure that your event has an attendee limit in place. This is set in the Event Options widget of the event editor.
2. Create a Waiting List Event
Now it’s time to create a waiting list event. Anyone who wants to sign up for your event but is unable to will be able to add their name to your list. This lets them register their interest so that you can email them if a place becomes available.
Create an event as you normally would by navigating to Event Espresso > Events > Add New.

Give your event a name – “Intense Yoga Waiting List”, for example.
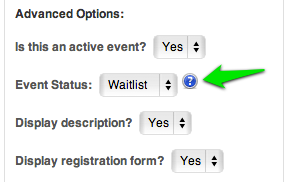
The most important thing that you must do here is set the Event Status to “Waitlist”. This will let you set it up as a waiting list for another event. You can find the Event Status dropdown under Event Options.
It’s worth adding a custom email to this waiting list, to thank the person for signing up and assuring them that you’ll let them know if a space becomes available. For help creating a custom email check out this tutorial.
When you’re ready click “Submit New Event.”
3. Assign Waiting List to Your Original Event
Now you can assign this waiting list to an event. Navigate to Event Espresso > Events and click the Edit button underneath the event you wish to add a waitlist to.

Under the Event Options on the right hand side, make sure that the Assign a Waitlist Event? option is set to Yes.

Then set the Overflow event so it has the correct overflow event set from the dropdown list.

Click Update Event.
4. Exclude the Waiting List Event From Your Main Listings
To show a list of events without their waiting lists, you need to use the [EVENT_LIST] shortcode. There is no parameter for excluding events from the [ESPRESSO_EVENTS] shortcode. Therefore, the best way to approach this is to create a front-facing page for your events using the [EVENT_LIST] shortcode and then hide the main registration page (in step 4).
Create a new page and give it a name. You need to include the following shortcode in it:
[EVENT_LIST show_secondary=false]
This will create a list of your events without any waiting lists showing.

Publish the page.
5. Hide the Main Registration Page from Your Navigation Menu
Now that you are using EVENT_LIST to display your list of events, you should hide the main registration page.
If you are using a WordPress 3+ Theme you will be able to do this using the built-in menu functionality.
Navigate to Appearance > Menu
Make sure your page with the [EVENT_LIST] shortcode is on the navigation. And make sure that the page with the [ESPRESSO_EVENTS] shortcode is excluded.

Now when your event is full the link for the waiting list will be displayed.

Potential attendees can sign up for the waiting list, and if someone drops out of the original class you can send them an email asking them if they wish to sign up.