In this article, we will learn how to inspect elements on various Event Espresso pages so that we can hide them using CSS. Firebug and Chrome Developer Tools are two free tools that can be used for inspecting elements on a page. The examples in this tutorial will use Chrome Developer Tools.
Inspect Elements using Chrome Developer Tools
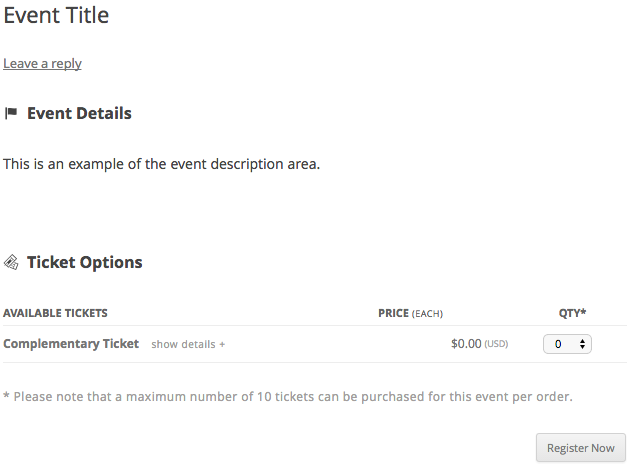
Lets begin by taking a look at a test event.

In the image above we can see several types of information such at the event title, the event description, and the ticket options. Each of these is an “element” on the page. This means that there is either a CSS id and/or a CSS class associated with each of these elements. Some elements such as the ticket options area has as handful of different elements since the ticket options is made up of different parts (eg. heading, name of ticket, price, quantity, and so forth).
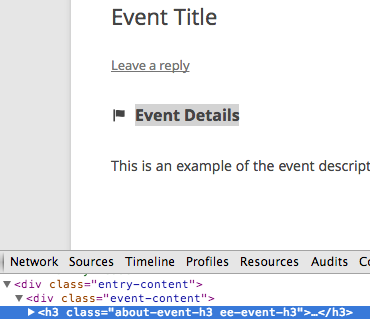
Now lets have another look at a specific area of the image above with Chrome Developer Tools.

From within Google Chrome, I’ve right-clicked on the Events Details heading and selected Inspect Element. Towards the bottom of the image, we see an h3 tag that has some CSS classes associated with it: about-event-h3 ee-event-h3. Both of these CSS classes provide the styling for this heading.
Lets take a look at another element from the screenshot at the beginning of the tutorial. The image below is for the maximum number of tickets messaging:

This element has the following CSS classes linked to it through a paragraph tag: smaller-text lt-grey-text.
Apply CSS to Specific Pages
Now we should have a basic understanding of how to inspect elements on a page using Chrome Developer Tools. The next step is to link these CSS ids and CSS classes to body classes so that we can create specific styles.
The following CSS is used for post meta data: entry-meta. An example of post meta data would be the author name or the date that a post was published on. The following CSS will hide this information on the entire site:
.entry-meta{display:none;}
The problem is that you may want to show the date and author name on your blog posts but not on your event page. Body classes can help with this. Here are two examples of body classes that you may see on a single event page: single-espresso_events postid-123.
There is a hierarchy which means that single-espresso_events will apply to all single event pages while postid-123 will only apply to the single event page for an event with an id of 123. This may seem confusing so here are some examples along with explanations:
Remove any element with a CSS class of entry-meta across the entire site
.entry-meta{display:none;}
Remove any element with a CSS class of entry-meta for all single event pages
.single-espresso_events .entry-meta{display:none;}
Remove any element with a CSS class of entry-meta for a single event page with a post id of 123
.postid-123 .entry-meta{display:none;}
A body class is also available for the event list page: post-type-archive-espresso_events
We can also apply this body class to elements so that the styles are only applied on the event list page.
Remove the Event Details heading from only the event list page
.post-type-archive-espresso_events .about-event-h3.ee-event-h3{display:none;}
Remove the leave reply link (comments) from only the event list page
.post-type-archive-espresso_events .leave-reply{display:none;}
Any of these CSS examples can be copied and pasted into your child theme’s stylesheet or into a plugin like Reaktiv CSS Builder or My Custom CSS.
Ready to Go CSS Styles
Here are some styles for specific themes. They should be applied in a similar manner as the examples shared earlier in the post and they will help your theme look less like a blog post by hiding information such as the published on date and author.
Also, see this additional resource for this tutorial: