The Volume Discount add-on harnesses the power of group discounting your events, allowing you to enable to people to bulk purchase and make great savings, whilst you reap the rewards of more attendees and sales.
The Volume Discount add-on requires that the Multiple Event Registration add-on is installed and activated. The volume discount add-on will not work without it.
Using the Volume Discount add-on is straightforward once you have understood the basics. As such I will quickly run through what the add-on does and how it works and then take you through 2 mini use cases outlining the processes.
What & How
What does it do? It discounts events based on a bulk setting, whether it is the number of registrants or the price or another factor. It does this when items are added to the shopping cart via the Multiple Event Registration add on.
How does it know what to discount? The discounts are based on different factors and the add on uses categories or meta information attached to the events to figure out when a discount needs applying.
Use Case 1 – Number of Registrants
Let’s say that you have events in place that allow group bookings, in other words a single person can buy multiple tickets for a single event. This could be for family groups, parties, etc. You can use the volume discount add-on to allow a discount after a set number of tickets have been purchased.
In this example we will set our target number at 3 tickets, and a discount of 10%.
Some preparation is needed to begin with, first we will create a new Event Category to mark events as eligible for the discount. Head over to the Categories section on the menu and create a new category, ours will be imaginatively called discounts.
Find the event’s that you want to discount and add the categories to them and update. Whilst you are in the event, make sure that the “Allow group registrations?” setting is set to yes and that the “Max Group Registrants” is set to the target number or higher, so in this case 3 or higher.
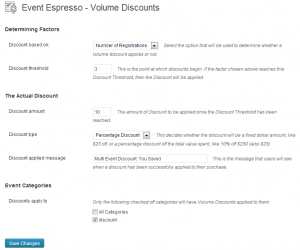
In the Volume Discounts menu we need to set up the actual discount thresholds. Head over there set up the options as follows:
- Discount based on: Number of Registrations – this equals the number of tickets that needs to be purchased before the discount kicks in.
- Discount threshold: 3 – the actual number of tickets.
- Discount amount: 10
- Discount type: Percentage Discount
- Discount applied message: Leave as default.
- Discounts apply to: tick the discounts category – this will make sure only the events with that category will be eligible for the discount.
After those have been entered hit the Save Changes button.
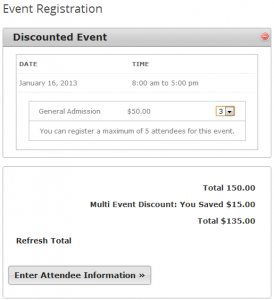
Now head over to the events registration page and pick an event that you added the discount category to, to cart. When you view your event select 3 or more tickets and you will see a message pop up showing the non discounted total, the discount and the discounted total.
Use Case 2 – Discount by Price
In this situation we want to offer the client a discount depending on how much he or she has spent. The process will be the same as above but with minor differences.
We will use the value of $200 and a discount of 10%.
With this you can either use the same category you did with the previous use case or create a new one just for this type of category. We will do the latter for this example.
Head over to the Categories section on the menu and create a new category, ours will be imaginatively called pricediscounts.
Find the events that you want to discount and add the categories to them and update. Whilst it doesn’t matter so much if the group registrations is set here, it might still be useful to set to enable the buyer to purchase more tickets.
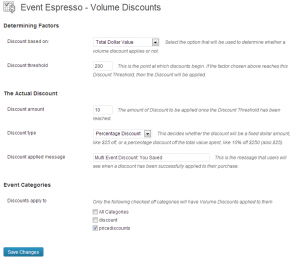
In the Volume Discounts menu we need to set up the actual discount thresholds. Head over there set up the options as follows:
- Discount based on: Total Dollar Amount – this equals the value of the total tickets that needs to be purchased before the discount kicks in. Though it says Dollar, it works for whatever currency you have set.
- Discount threshold: 200 – the actual amount needed to be hit before the discount kicks in.
- Discount amount: 10
- Discount type: Percentage Discount
- Discount applied message: Leave as default.
- Discounts apply to: tick the pricediscounts category – this will make sure only the events with that category will be eligible for the discount.
After those have been entered hit the Save Changes button.
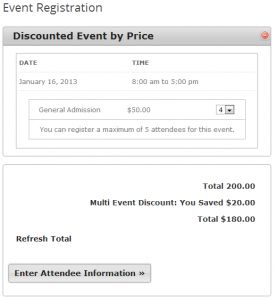
Now head over to the events registration page and pick an event that you added the discount category to, to cart. When you view your event select enough tickets to meet the $200 mark and you will see a message pop up showing the non discounted total, the discount and the discounted total.


