Create members-only events while keeping other events open to the public. Accounts for your attendees will be automatically created after they register, so they have access to past and upcoming events. Then the next time an attendee registers, they can log in, and their registration details will be pre-populated so they can check out quickly.
View quick links for this integration –>
Need documentation for Event Espresso 3? You can click here.
Purchase a support license for the WP User integration for Event Espresso
Installation for the Event Espresso 4 WP User Integration
 This add-on is a plugin for WordPress and can be installed through your WP dashboard (WP-admin).
Download the latest version of the WP User integration for Event Espresso 4 from your Event Espresso account.
Then login to your WordPress dashboard (WP-admin) and go to Plugins. Next, click on Add New –> Upload and browse to the plugin on your computer. Then select the zip file and begin the upload process. Wait for the plugin to upload and then click on Activate.
Setup and Configuration for the EE4 WP User Integration
Log in to your WordPress dashboard. Then go to Settings –> General. On the next screen, look for the Membership option and place a checkmark next to Anyone can register. Then save changes.
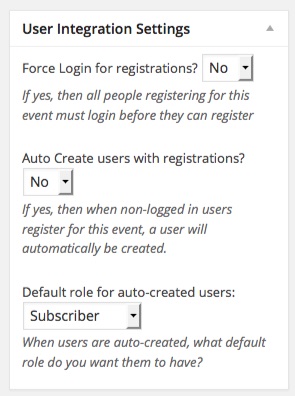
Next, go to Event Espresso –> Registration Form –> User Integration Settings. This page shows settings that affect the member functionality of this add-on.
Below are the available fields and explanations for each field.
- Default setting for Login Required on Registration – if set to Yes, then your attendees/registrants will only be able to register for an event if they are logged in to your site
- Default setting for User Creation on Registration – Specify if a new user should be created during registration checkout
- Default role for User Creation on Registration – Specify the WordPress user role that should be used when a new user is created
- Always sync contact information with WP user profile? – Specify whether changes to registration form answers on returning registrations will update the contact details and WordPress user profile information
Make changes as needed and then click on Save Settings. Note that these changes are optional and the first 3 can also be managed on a per-event basis via the event editor for Event Espresso:
Now you’ll need to give attendees/registrants a way navigate to the registration/log-in page. The default WordPress page for logging in is the same URL you use to log into your WordPress site: example.com/wp-login.php. The registration page URL is example.com/wp-login.php?action=register. You can post these links anywhere on your site. Some members use the built-in meta widget in widgetized areas of the theme. There are also plugins that allow for a little more control over what happens after logging in, and one example is the Simple login plugin.
You may want to “brand” the log-in page for your WordPress site. A nice and simple plugin that lets you do this is the Login Logo plugin developed by Mark Jaquith.
Usage for the Event Espresso 4 WP User Integration
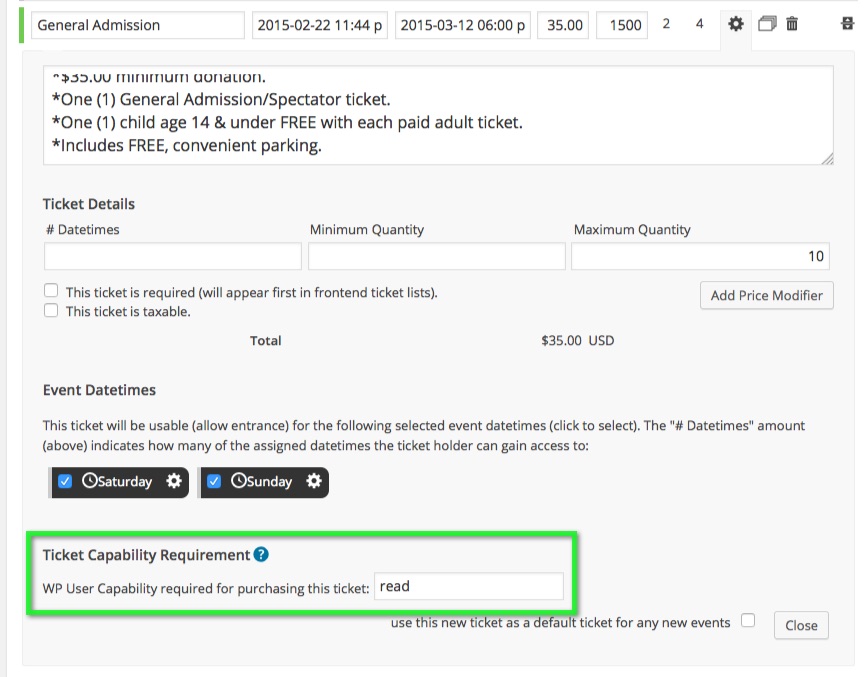
The add-on will allow you to specify tickets that are available to members and non-members. To do this, go to Event Espresso –> Events. Then click on an existing event or click on Add New if you are creating your first event in Event Espresso. You’ll now be viewing the event editor. Add an event name along with a description and scroll down. You should see the ticket (pricing) editor. Create your ticket options and then click on the gear (advanced options icon). Towards the end of the ticket, you’ll see a setting for Ticket Capability Requirement.
The Ticket Capability Requirement allows you to set the user capability required to purchase a ticket and uses the Roles and Capabilities feature of WordPress. To offer a simple members-only ticket, enter “read” in the field. You can use this field across multiple tickets to provide tickets for different types of members. Be sure to save changes to your event.
How do I use it?
Creating these type of restrictions utilizes the Roles and Capabilities feature of WordPress. In this field, you indicate the capability that a visitor must have as a part of their user profile when logged in and viewing the ticket options. For example, if you have the s2Member® plugin installed, and you input the “access_s2member_level1” into this field, then the visitor must be logged in and have the “s2member_level1” (or greater) role assigned to their user.
s2Member® Support
s2Member® is a great tool that can be used to extend the EE4 WP User Integration add-on, because of the additional features it makes available for websites that depend upon membership fees. s2Member® makes it easy to secure WordPress content and offer users/members a secure checkout solution that integrates seamlessly with WordPress Roles/Capabilities.
Supported s2Member® Roles
If you have s2Member® installed on your site, you can use any of the following capabilities to limit access to tickets based on a certain s2Member® role:
- access_s2member_level0
- access_s2member_level1
- access_s2member_level2
- access_s2member_level3
- access_s2member_level4
You can learn more about Roles & Access Capabilities from the s2Member Roles & Capabilities documentation.
Contacts & User Admin Screen
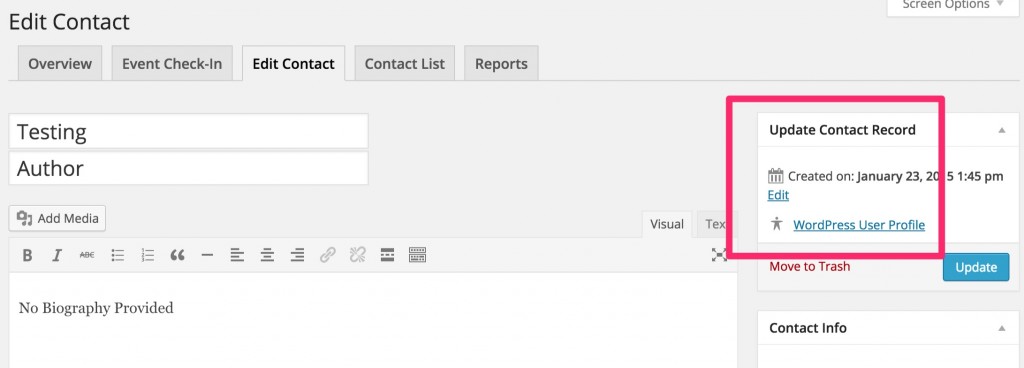
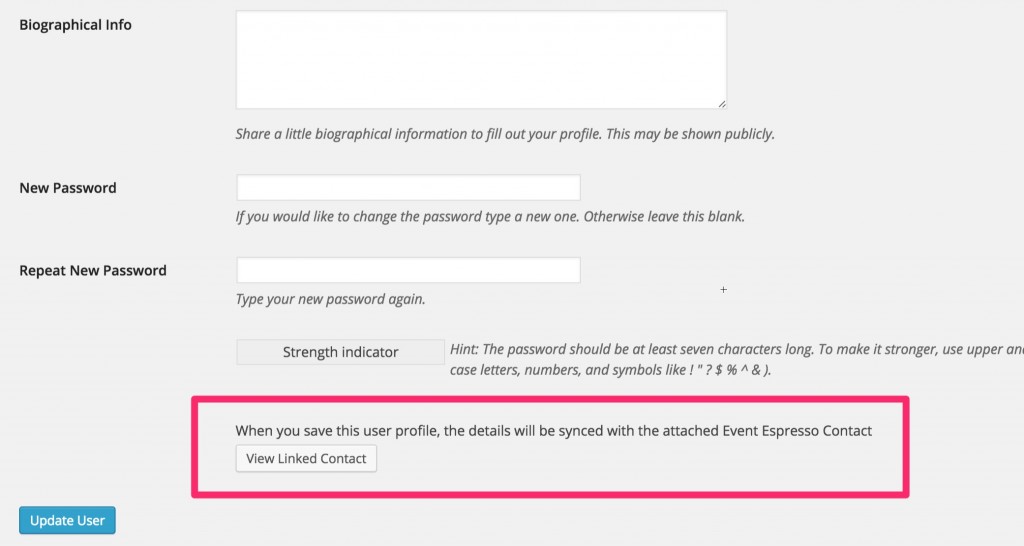
The EE4 WP User Integration allows event administrators to view linked contacts and WP users quickly.
Show what WP user an Event Espresso 4 contact record is linked to when viewing an EE4 contact.
Show what contact is linked to the user profile when viewing the /users.php page in the backend
How to link a contact to an existing WordPress User Account
If some Event Espresso contacts are not connected to existing WordPress user accounts you can link them by following the guide published here:
https://gist.github.com/joshfeck/2165ff295c968f861cef8775fc8b1dc9
Your Registrations Page Shortcode
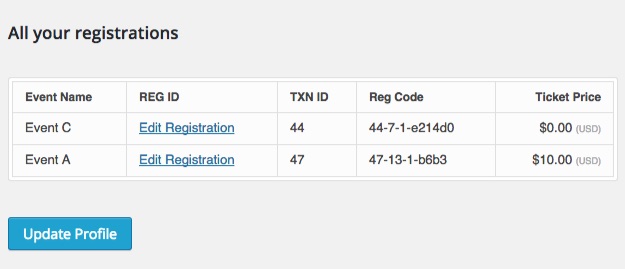
This shortcode allows you to create a front facing page for members to view their registration history. By logging into your site, and viewing a specific WordPress page on the front-end of your website, users can see events they’ve registered for in the past.
Just add the [ESPRESSO_MY_EVENTS] shortcode to any page, and your users will see a nice looking table of past registrations.
Available shortcode parameters
template: defaults toevent_section. Can be eithersimple_list_tableorevent_sectionas the template slug (see screenshots above for difference. This has been designed so developers can hook in their own templates down the road if they want (or we can add additional layouts at whim as well).per_page: defaults to10. This allows the user to set the limit of rows that are shown before pagination kicks in on the main table (the event_section template does no pagination of tickets listed for each event).your_events_title: defaults to localized “Your Events”. This allows for users to customize the label for the listing.your_tickets_title: defaults to localized “Your Tickets”. This allows for users to customize the label for the listing of your tickets. Note, the “Your Tickets” label is currently only used with theevent_sectiontemplate.
Behavior with logged in vs logged out.
- When a logged out user visits a singular view of a post/page/custom_post_type that has the shortcode in it, then they will be automatically redirected to the WordPress login form. When they log in, they will be redirected back to that page.
- When a logged out user visits an archive view of post/custom_post_type, any content that has this shortcode in it will display a link to the wp-login form as the parsed shortcode content. Clicking that link will take the user to the login form and once they log in they will be redirected back to the page they came to the login form from.
Other notes
- We intentionally did not do a lot of styling on the tables leaving the majority of it up to themes.
- Regarding responsiveness, if a theme is set up to have responsive tables then the layouts for these tables will work fairly well. Again, we intentionally was very minimal in terms of CSS applied so that the tables will inherit from themes.
- Developers can override the templates by copying the files from the template directory into your theme.
User Profile Admin Page: My Events Page
Logged in users can view events they’ve registered for in the past, just by logging into your website and viewing their profile from within the WordPress admin.
This snippet adds an icon to the ‘My Events’ section of the WP User integration add-on which allows the user to cancel their registrations: https://gist.github.com/Pebblo/9534d318347082e63fc01f5c9c413361

Troubleshooting the Event Espresso 4 WP User Integration
The plugin does not work as expected. Can you help?
Please ensure that you are running a current version of Event Espresso 4. This add-on requires Event Espresso 4.6 and is not compatible with older versions of Event Espresso.
What information is pre-populated?
At this time, the first name, last name, and email address are pre-populated. An enhancement is coming to a future version that will pre-populate additional fields (e.g., address fields).
I use S2 Member, and the login form on the registration page is broken. What gives?
This is caused by S2 Member hooking into wp_login and adding a redirect there. You can remove the S2 Redirect by adding the filter function shown in this gist to your functions plugin:
Customizations for the Event Espresso 4 WP User Integration
Customize the restricted message and include a link to log in
Completely hide restricted ticket message
You can add the code from the above to a functions plugin.
See more customizations for the WP User integration in the code snippet library for Event Espresso.
Purchase a support license for the WP User integration for Event Espresso
https://eventespresso.com/product/espresso-members/
Installation for the Event Espresso 3 WP User Integration
This add-on is a plugin for WordPress and can be installed through your WP dashboard (WP-admin).
Download the latest version of the WP User integration for Event Espresso 3 from your Event Espresso account.
Then login to your WordPress dashboard (WP-admin) and go to Plugins. Next, click on Add New –> Upload and browse to the plugin on your computer. Then select the zip file and begin the upload process. Wait for the plugin to upload and then click on Activate.
Setup and Configuration for EE3 WP User Integration
Login to your WordPress dashboard. Then go to Settings –> General. On the next screen, look for the Membership option and place a checkmark next to Anyone can register. Then save changes.
Next, go to Event Espresso –> Member Settings. This page shows settings that affect the member functionality of this add-on.
Below are the available fields and explanations for each field.
Login page (if different from default WordPress login page) – specify a custom login page for your attendees/registrants
Require login for all events? – your attendees/registrants will only be able to register for an event if they are logged in to your site
Make auto-filled fields editable – allow your registrants/attendees to update their information during registration checkout
Make changes as needed and then click on Save Settings. Note that these changes are optional.
Now you’ll need to give attendees/registrants a way navigate to the registration/log-in page. The default WordPress page for logging in is the same URL you use to log into your WordPress site: example.com/wp-login.php. The registration page URL is example.com/wp-login.php?action=register. You can post these links anywhere on your site. Some people use the built-in meta widget in widgetized areas of the theme. There are also plugins that allow for a little more control over what happens after logging in. An example of this, is the Simple login plugin.
You may want to “brand” the log-in page for your WordPress site. A nice and simple plugin that lets you do this is the Login Logo plugin developed by Mark Jaquith.
Usage for the Event Espresso 3 WP User Integration
The add-on will allow you to set member pricing and non-member pricing. To do this, go to Event Espresso –> Events Overview. Then click on an existing event or click on Add New if you are creating your first event in Event Espresso. You’ll now be viewing the event editor. Add an event name along with a description and scroll down. You should see a pricing area. Create your pricing options and enter a non-member pricing along with member pricing. Note that both will be required for each pricing option that is created. Then be sure to save changes to your event.
Member profiles
The Members add-on uses the WordPress Users –> Your Profile screen to allow members to store their personal information for quick event registration. A special section is added to this screen that has the additional form fields to store address information. After these are filled out and saved, the information will be auto-filled for returning logged in members.
My Events Screen
After a member registers for an event, a record of their registrations is available to view on the My Events screen. Here they can review the date and times of the events, and make payments for events they’ve signed up for. If the custom ticket add-on is installed, tickets can be downloaded for each of these events.
My Events Shortcode
[ESPRESSO_MY_EVENTS]
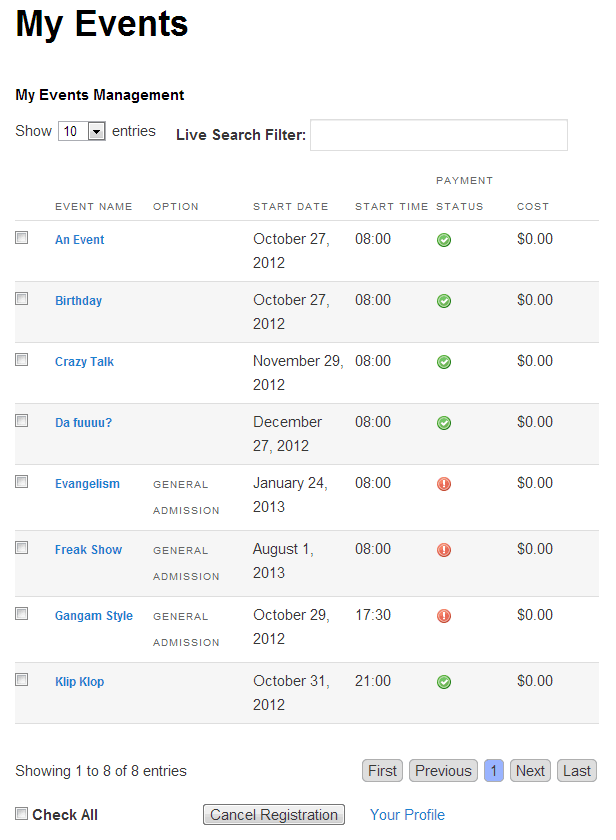
This shortcode allows you to create a front facing page for members to see their current and past events.
It has functionality for users to select events that still require payment and allows users to pay, cancel events, as well as perform the standard sort and search functions. Members can also access their profile via this page.
Usage: Create a new post or page in WordPress and add the shortcode and publish. Logged in members will see their details.
You can use a separate plugin such as S2Member, to hide the page content from non members.
Troubleshooting the Event Espresso 3 WP User Integration
The plugin does not work as expected. Can you help?
Is Event Espresso 3 up to date along with this add-on?
My attendees/registrants are logged out unexpectedly
Enable FORCE_SSL_LOGIN or force SSL across the site to be sure that your members do not get logged out when the site they enter the SSL-encrypted pages. See Administration over SSL for more information.
https://eventespresso.com/product/espresso-members/
