Today you’ll learn how to accept payments with Event Espresso. Event Espresso supports a handful of payment gateways and these can be setup by going to WordPress admin –> Event Espresso –> Payment Methods. Your screen will appear similar to the screenshot below:
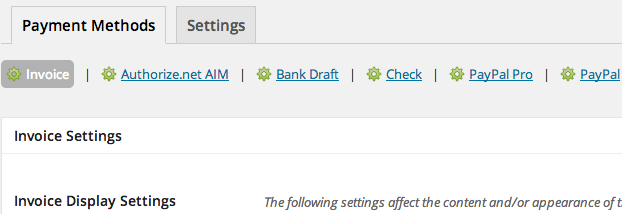
In the above image we see five core payment gateways for Event Espresso: Invoice, Authorize.net AIM, Bank Draft, Check, PayPal Pro, and PayPal. A green gear icon means that this payment gateway is currently activated for Event Espresso. If you see a white gear, this means that this payment gateway for Event Espresso is deactivated and you can activate it by clicking on the name of the payment gateway and then clicking on the green activate button.
When a payment gateway is activated, you’ll be presented with various options for configuring your payment gateway. You can refer to the help tab on the Payment Methods page in Event Espresso to view specific instructions for your payment gateway. After configuring your payment gateway, be sure to save changes by clicking on the blue Update Settings button. Listed below are some popular payment gateways that can be used with Event Espresso:
- Invoice
- Authorize.net AIM
- Bank Draft
- Check
- PayPal Pro
- PayPal
Offsite Payments vs. Onsite Payments
Event Espresso offers options to accept payments on your site and offsite. Lets begin by using twos examples to illustrate the primary difference between offsite payments and onsite payments.
Example A (offsite payments): Arrive at site –> Browse to events pages –> Click on event that you want to register for –> Select your ticket options –> Enter your attendee information and continue to payment options –> Select an offsite payment option and be transferred to payment processor to complete payment –> Return to website to finish registration.
Example B (onsite payments): Arrive at site –> Browse to events pages –> Click on event that you want to register for –> Select your ticket options –> Enter your attendee information and continue to payment options –> Select an onsite payment option and complete payment and finish registration.
The registration process for a website with onsite payments appears similar to Example A but take note of what happens towards the end of the steps for Example B. We see that an attendee remains onsite for the payment process which means a quicker registration.
PayPal Express is an example of an offsite payment gateway. When you select to pay with PayPal Express, you are temporarily brought to a secure PayPal.com page to complete payment. Afterwards you are brought back to the website to finish up registration.
Authorize.net AIM is an example of an onsite payment gateway because the entire payment process takes place directly on your site.
Requirements for Onsite Payments
Accepting payments onsite has some additional requirements.
Your website will need to have a dedicated SSL certificate and be in compliance with PCI Data Security Standard (PCI DSS). Specifically, this means that your business adheres to the PCI DSS requirements for security management, policies, procedures, network architecture, software design and other critical protective measures. This standards ensure that your customers’ financial information is secured. More information about PCI DSS requirements is available here.