The Multiple Event Registration add-on for Event Espresso 4 adds an event shopping cart feature on your website. It will allow your attendees/registrants to register for multiple events with only one checkout process needed!
Two Minute Overview
View quick links for this add-on –>
https://eventespresso.com/product/eea-multi-event-registration/
The Multiple Event Registration add-on is included in the EE4 Everything Support License.
Installation
This add-on is a plugin for WordPress and can be installed through your WP dashboard (WP-admin).
Download the latest version of the Multiple Event Registration add-on from your Event Espresso account.
Then login to your WordPress dashboard (WP-admin) and go to Plugins. Next, click on Add New –> Upload and browse to the plugin on your computer. Then select the zip file and begin the upload process. Wait for the plugin to upload and then click on Activate.
Setup and Configuration
You will NOT see any new WordPress administration menus for the add-on.
Usage
The Multiple Event Registration add-on will create a shopping cart experience on your site. Your registrants/attendees will be able to add several events to a shopping cart and then complete registration checkout once (instead of once per event).
Display the Ticket Selector on the Event List Page
To make it easier for attendees to select tickets from multiple events at the same time, you can Display the Ticket Selector on the event list page. Go to Events > Templates > Display Ticket Selector? Y
That way your audience can add more tickets to their cart from one page.
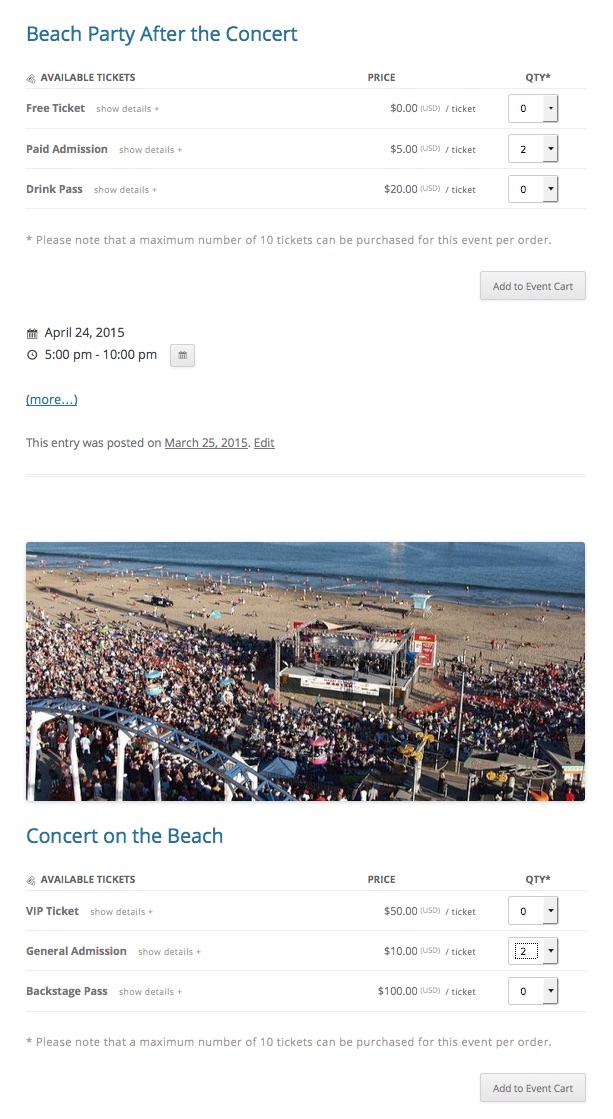
The events on the event listing page will receive an “Add to Event Cart” button as shown in the image above. Please note, users can only add tickets from each event individually. Selecting tickets from other events, on the same screen, does not automatically add all selected tickets to the cart. Clicking the Add to Cart button will only add the tickets for that event.
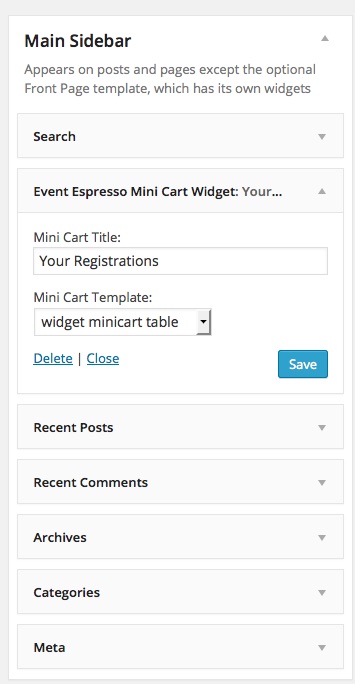
Event Cart Widget
The EE4 version of the Multiple Event Registration add-on comes with its own Event Mini Cart Widget. You can activate and configure the widget from within WordPress → Appearance → Widgets admin page the same as any other WordPress widget.
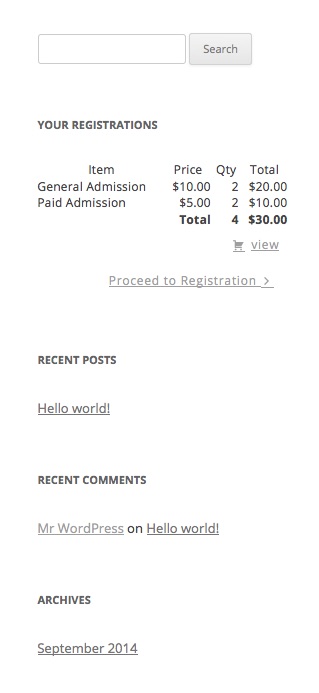
Once the Event Espresso Mini Cart Widget is activated, visitors will see it in the chosen location.
Registration Checkout Workflow
After adding an item to the cart, your attendees/registrants will be shown a “View Event Cart” button on any event, in the list, that they have added. Clicking the “View Event Cart” link link will then take the registrant to the cart confirmation page, where they can then select the number of tickets / pricing options they want, remove events they no longer want, and proceed to registration checkout.
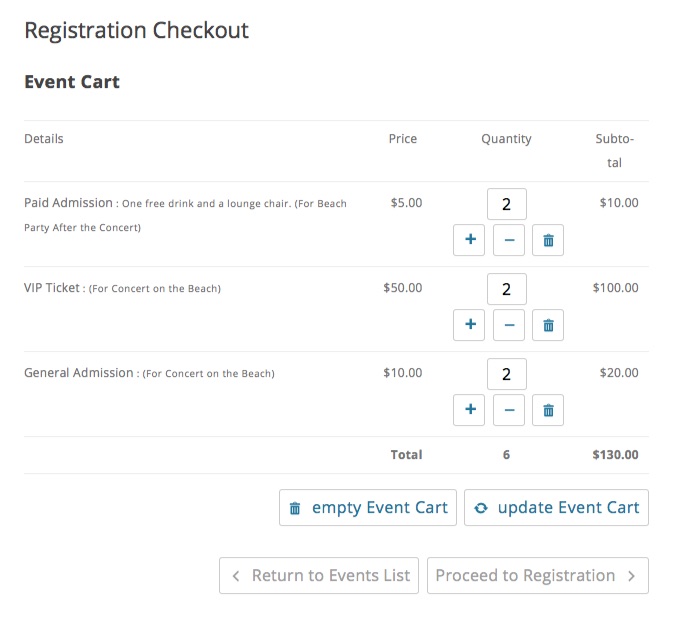
You may notice here that the customer can select multiple amounts of the same type of ticket! The available number of tickets a customer can register for at one time, is determined by the “Maximum number of tickets allowed per order for this event” setting in the individual events.
This can be used to your advantage – by setting numerous pricing options in an event, your customers can buy various ticket types in varying numbers, allowing a greater degree of flexibility for you.
Messaging Workflow
We made some improvements to the messages system in the EE4 core plugin that have benefits for when the Multiple Event Registration add-on is active. The following overview helps outline some expectations with how messages works with these improvements as they relate to the registration message types:
- Messages are generated for each unique registration status in a transaction matching the message type corresponding to that message type. This means if a transaction has two registrations in it with not approved status (because the Events in the cart for those registration has a default registration status of not approved), and three registrations in it with approved status, then there will be messages generated only for the not approved registrations using the registration not approved message templates, and another set of messages generated for the approved registrations using the registration approved message type.
- Custom Templates are only used when a message is generated that contains only information pertaining to a single event and that event has a custom message for that message type. So if a registration approved message is generated for the registrant recipient context and it contains information on three registrations across three events, then the global template for registration approved messages is used. However if that was only for one event (Event A) and that event had a custom message template for Event A, then the custom template for registration approved messages will be used.
- When resending messages from the registration list table using the bulk action. The system will automatically group messages into as few as possible for each context and registration represented in the bulk selection. Messages are first grouped by transaction, and then by registration status, and then the expectations listed in the previous points above apply. An important fix that occurred in Event Espresso 4 core as a result of the improvements made for MER, is that when resending messages in the admin, all active contexts have messages generated. Prior to this fix, only the registrant recipient received messages (or primary recipient if there is no registrant recipient).
Registration Multi-status Summary
This message type provides a summary notification to Primary Registrants and Admin recipients when there are multiple registrations in a transaction with different statuses.

If this setting is not on by default when activating the Multi Event Registration add-on, you can enable it in the Event Espresso > Messages > Settings page.
Manually Adding Payments to Registrations
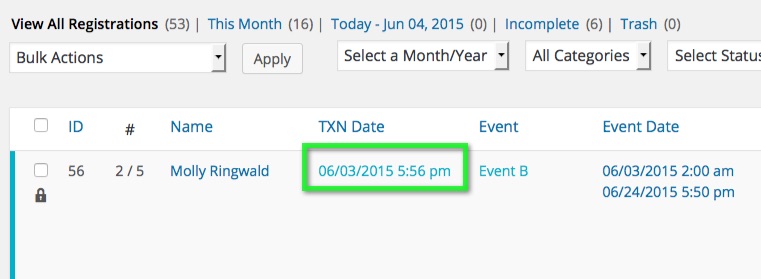
If you plan on allowing registrants to make payments at a later date, instead of using one of our many payment gateways, then you may find it necessary to apply a payment to specific registrants as opposed to all of the registrants for a transaction. For example, if a customer sends a check to ONLY pay for their registration but not others, then you will need to manually apply that payment to the transaction by visiting the Registrations Admin List table (WP admin > Event Espresso > Registrations) and find the registration for that person, then click on the TXN Date link to bring up the transaction details for that registration.
Then click the “Apply Payment” button and fill the out payment details. When the Apply Payment Modal window is open, you have two options for who the payment is applied to:
- All Registrations; or
- Just the following Registrations
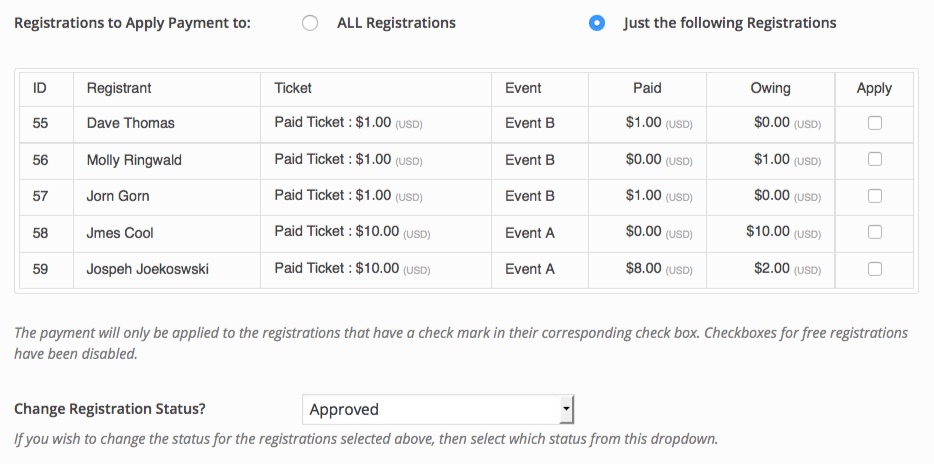
If you select the “Just the following Registrations” radio button, then you will be able to apply the payment to any of the available individual registrations in that list.
Applying Refunds
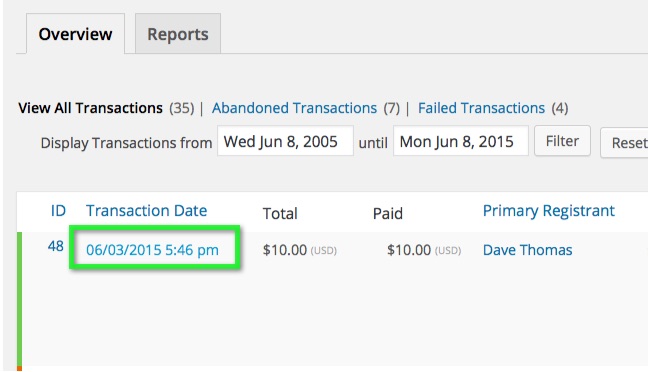
Applying refunds is very similar to manually adding a payment. You can apply a refund via the the transaction, by visiting the Registrations Admin List table (follow the steps above), or through the WP Admin > Event Espresso > Transactions List table:
Then click the “Apply Refund” button and fill the out refund details. When the Apply Refund Modal window is open, you have two options for who the refund is applied to:
- All Registrations; or
- Just the following Registrations
Just like applying payments to registrations, if you select the “Just the following Registrations” radio button, then you will be able to apply the refund to any of the available individual registrations in that list.
Troubleshooting
- The plugin will not activate. Can you help?
Are you running a current version of Event Espresso 4? - Where is the menu screen for this add-on?
This plugin does not create any new menus in the WordPress admin screen. It automatically changes the registration process to facilitate registering for multiple events at one time. - I’m seeing a warning above my event pages.
Ensure that your Event Espresso software including core plugin and all add-ons are up to date. Then turn off WordPress debugging by changing a macro in your wp-config.php file.
Frequently Asked Questions
- How do I change the color of the _____ button?
As with most style oriented customizations, button colors, fonts, and text styles are all controlled by your WordPress theme. - Can there be more than one primary registrant per order?
No, for the time being and the foreseeable future, attendee #1 is the ONLY primary registrant. There can only be one.
Customizations
Available Filters
Main Cart
- Cart? Event Cart? Ticket Basket?
FHEE__EED_Multi_Event_Registration__set_definitions__event_cart_name
Example:
- event cart heading (default: “Event Cart” or whatever was set above )
FHEE__EED_Multi_Event_Registration__view_event_cart__event_cart_heading - go to cart after adding tickets? or stay on event list (default)
FHEE__EED_Multi_Event_Registration__filter_ticket_selector_redirect_url__redirect_to_cart - button text
FHEE__EED_Multi_Event_Registration__view_event_cart_btn_txt
FHEE__EED_Multi_Event_Registration__empty_event_cart_btn_txt
FHEE__EED_Multi_Event_Registration__update_event_cart_btn_txt
FHEE__EED_Multi_Event_Registration__return_to_events_list_btn_txt
FHEE__EED_Multi_Event_Registration__proceed_to_registration_btn_txt - show all success messages? default: false
FHEE__EED_Multi_Event_Registration__display_success_messages - empty cart message
FHEE__EE_Event_Cart_Line_Item_Display_Strategy___empty_msg_row - where to go after emptying cart
FHEE__EED_Multi_Event_Registration__empty_event_cart__redirect_url - adding additional styles to buttons
FHEE__EED_Multi_Event_Registration__event_cart_template__btn_class - change URL to go back to event list
FHEE__EED_Multi_Event_Registration__set_definitions__events_list_url
example usage to change the event list button to redirect to a calendar page:
Mini Cart Widget
- change template
FHEE__EEW_Mini_Cart__form__minicart_templates - change display line item strategy
FHEE__EEW_Mini_Cart__widget__minicart_line_item_display_strategy - minicart css
FHEE__EEW_Mini_Cart__widget__minicart_css
Modal Popup Messages
- FHEE__EED_Multi_Event_Registration__get_cart_results_results_message
- FHEE__EED_Multi_Event_Registration__get_cart_results_current_cart_message
Template Customization
You can change the file path for Multi Event Registration’s templates to load from your WordPress child theme or a plugin by using the
FHEE__EEH_Template__display_template__template_path
filter hook. The following example shows how to load the event_cart.template.php from the active WordPress child theme:
https://eventespresso.com/product/eea-multi-event-registration/