🎉 Introducing Calendar+ a Powerful and Beautiful Events Calendar for WordPress
🎉 Introducing Calendar+ a Powerful and Beautiful Events Calendar for WordPress
Learn how to create a Zoom event with registration for your virtual events through this step-by-step guide with pictures.
Posted by Chinny Verana

People are constantly looking for connections whether in person or in online events. When it comes to organizing a virtual event, Zoom is the most common platform event organizers use. This article will teach you how to create a Zoom event with registration on the platform and through Event Espresso.
The first step is to create a Zoom account or log in to your already existing Zoom account. It’s important to note that there are two different kinds of Zoom accounts – one is for personal and one is for business.

In your Zoom account, head over to the navigation menu -> click “Meetings”.

Once you click that, you will be directed to a screen where you can copy the details of your personal meeting room. This contains the information you will be sending out to your attendees or your event site.

You can click on the Edit button to edit the details of your Zoom event like passcodes, waiting room features, and more. Then click Save.

If you just want to set up a simple, private Zoom event, then the process ends here. You can just copy the join link and send it to people who wish to attend. But if you want to set up a more open-to-public Zoom event with registration, you need the next steps below.
To host a virtual event with registration, you need an event ticketing platform like Event Espresso. It is a WordPress plugin with a premium and free version. It has powerful features like customizable event registration forms and ticket selling.
Let’s start.
First, set up a virtual venue for your event. A virtual venue is important because it provides a polished and professional setting for your online events, enhancing the overall perception of your event, community, and brand.
To set up a virtual venue, log in to your WordPress admin account. Click on Event Espresso –> Venues and click on Add New Venue. You’ll now be viewing the venue editor.

In the screen above, type in the title of your event and add the description of your event. The settings of the plug-in will ask for the name and email address of your participants by default.
As you scroll down your screen, fill up the portion where you will be asked about your virtual location. In the “URL of Event”, you can paste the Zoom meeting link you copied earlier.

After you fill up those details, you can scroll up again and click “Publish”.
This approach automates the registration process for you. Specifically, the details you set up on this venue will automatically update your event page.
Participants will be able to get the Zoom link once they register for this virtual venue. If it’s a free event, they can access the link once they’re registered. If it’s a paid event, participants can access the link once they’re paid.
Once you have those ready, it’s time to connect your Zoom event and your virtual venue to your event site. If you have a self-hosted WordPress site, these are the easy steps to follow.
If you don’t have a self-hosted WordPress site, check out the section below.
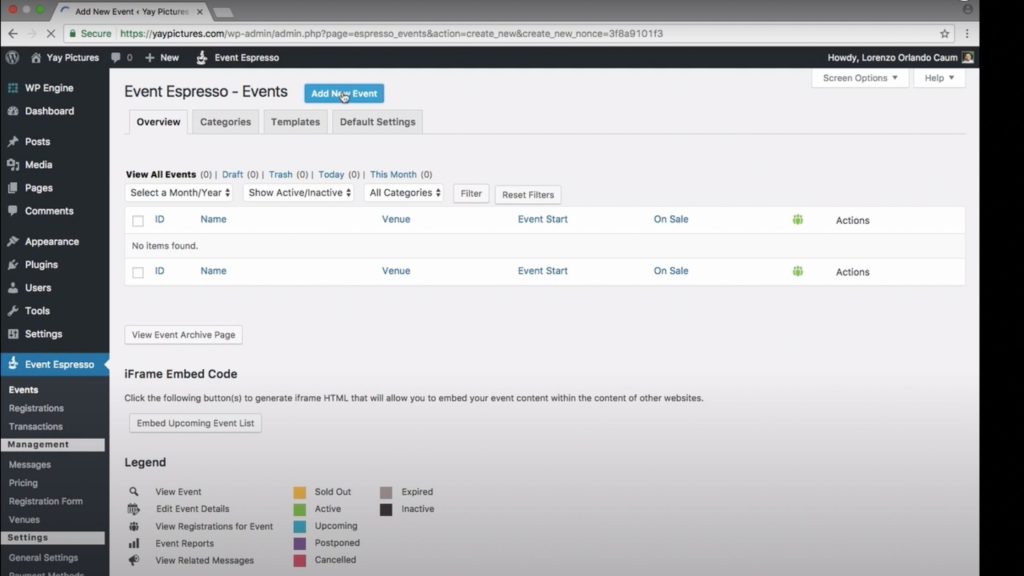
Log in to your admin account on WordPress and look for the Event Espresso plug-in.

Click on Events. After clicking this, you will be led to a new screen where you can click on “Add New Event”
You will be led to the Event Editor where you can fill in the details about your event. In this case, the event is a Life Skill Class on CPR.
Write a catchy event name in the title and provide all the details in your event description. In writing your event description, make sure you capture your attendees’ attention and keep them interested.

After that, scroll down and proceed to the next section. The Event Tickets & Datetimes portion. In this section, you can input the start and end date of your event.
The next line is for the price details of your event, the available quantity of the tickets, and the dates of selling of your ticket.


On Venue Details, choose the virtual venue you created earlier. Then scroll down to the Featured Image and add an attractive banner for your event site.

Scroll up, click on Save Draft, and view the Permalink to see what it looks like. It should look like this:

If you don’t have an event site on WordPress yet, Event Smart is the choice for you.
Event Smart is a SaaS event registration platform also hosted on WordPress and powered by Event Espresso. However, it is an easier way for event organizers to create their own fully functioning event site without learning to code.
To set up your event page, go to your Event Smart dashboard and click on Settings then General.

After that, you can update your organization details and payment method.
When you’re ready to set up your event site, here are the steps to follow:


Both platforms are fully customizable and offer secure payment collection systems. What’s special about Event Espresso and Event Smart compared to other platforms is that they offer unlimited ticket selling at $0 commission fees. Organizers can enjoy higher margins and profit in their virtual or in-person events.
A big reason why people attend events is to build connections and network with each other. Achieving genuine connection in a virtual event can be a challenge given the distraction and distance from each other. Utilize the breakout room feature of Zoom to encourage engagement and interaction with each other.
As mentioned, it’s hard to keep your participants engaged in a virtual event. Distraction is literally just at the tip of their fingertips. One way to keep them engaged throughout the duration of your event is to create activities that will require them to participate. Depending on your event, it can be responding to a poll, doing a quick exercise, or sharing your thoughts.
Last but not least is to offer real value in your virtual event. Word of mouth has become increasingly powerful in this digital age. When people get their problem solved through your event or they gain something useful, they will be more likely to share it with their circle of influence.
Now that you have an idea of how to set up your Zoom event with registration, you can easily start hosting your online event with confidence. Event Espresso and Event Smart are the perfect choice for you whether you plan to have a self-hosted site or not. You can also see video tutorials for other types of events with Event Espresso.
Check out our live demo for more information or check out our resources for more video tutorials. Alternatively, you can also take our 7-day free trial now.