Why We Don’t Have Phone Support

We limit our support to online communication because we can offer better supportmore innovation, and lower prices.

Better Support

We’ve found that providing support via online communication (email, chat, documentation, etc.) works best for an online application like Event Espresso. Our team is able to gather system details, website and event configuration information, and other facts so that they can troubleshoot effectively, and link to educational resources that help you get the most out of Event Espresso.

We are fast to reply too, our support team constantly monitors the forums throughout the day.

The support is outstanding. The support forum is a great resource for finding answers to many questions that are similar to others during the development process. Their responses are speedy and spot on.

KjGreen

Each request for information was answered rapidly – the fastest response I have ever received from a plugin developer! Thanks!

lumins

The team behind the plugin provides outstanding support and are clearly committed to improving the state of Event Management on WordPress.

ivycat

It works perfect and if you have any questions their support is great!

naredi

GREAT support both from official EE crew and also the community.

abmiller99

support has been very good and responsive.

amandaraoul

great product and support for so many years now!

mvincik

I’ve contacted their support a number of times and they’ve always been very responsive and helpful.

heathrunner

Getting started, support quickly answered all my questions and now I use the forums when I need help.

johnmacek

Amazing support. I can count on a response in very short order. I submitted a support ticket this morning and got a response within an hour. Of course, I have to pay for support and it isn’t cheap; but it isn’t expensive, either, given the level of response being provided.

rhj4

Their support people are awesome – as is their forum.

sock2me

More Innovation

It’s important for us to maintain an environment of constant innovation. Our support team works with the rest of our company, which makes it possible for our teams to collaborate and spur the innovation that we value so highly. Electronic communication can be documented, aggregated, and used as support for new features and development.

Lower Prices

It allows us to keep our overall pricing down while maintaining a feature-rich application and continuing to provide great support. We want Event Espresso to be accessible and affordable for all of our customers. Structuring things around these online channels makes it possible for us to scale our support using this philosophy.

We also provide access to a support token where, if necessary and effective, our support team can engage with you via a phone conversation. This makes it fair because those who need more expensive support are paying for it, while those who don’t need an expensive of support are not paying for it.

Posted in | Comments Off on Why We Don’t Have Phone Support

How to Fix Emails Sending from WordPress@

When emails send from your own server, do they look like they’re coming from WordPress? For example, the sender always says “WordPress”?

Email providers often reject email from email accounts that aren’t genuinely originated from the email provider’s servers. This helps secure their users’ email identities from being used by unauthorized senders. For example, sending email from your websites’ servers with a Yahoo email address such example@yahoo.com as the sender will likely be blocked from being delivered.

The reason you are seeing the emails being sent from wordpress@yourdomain.com is because your administrator email does not match your website domain that the form is being sent from. So, for example, if you have a @gmail.com address as your admin email, it will build a local wordpress@yourdomain.com email. This mirrors behavior from within WordPress itself to send certain emails. Again, because the email originates from your website’s server, this is an attempt to make sure your email is delivered by properly identifying it came from your server not your gmail or yahoo (etc.) email service.

To solve this, you can either:

  1. Set the admin email to one that matches your domain, e.g. info@yourdomain.com
  2. Use either the Send From or WP Mail SMTP plugin to override the internal wp_mail() settings.

We recommend using either Send From or WP Mail SMTP because it helps solve a lot of other issues in addition to you not having to change your admin email.

Event Espresso 3 Users:

In Event Espresso > General Settings, there is an option labeled: “Use fancy email headers?” under “Email Settings”. If you set this to yes, and your server supports the fancy email headers, it will use the Organization Name that’s entered in the “Contact Information” as the email from name.

Posted in | Comments Off on How to Fix Emails Sending from WordPress@

How to select a Timezone for your WordPress site

The time settings are very important to getting people together at the same time. So, it’s very important to make sure the timezone of your website is set to the correct location so that the events, ticket sales, and dates are correct and so that Event Espresso can function the way you expect. Plus, it’s important that attendees know when your event is scheduled.

event-espresso-select-a-timezone

Login to your WordPress dashboard (WP-admin) and then go to Settings. Then look for the Timezone setting and select a city/region near you using the dropdown menu and then click on Save Changes.

watch-a-video

Be sure to toggle full screen in the bottom corner of the video.

Posted in | Comments Off on How to select a Timezone for your WordPress site

Welcome to Event Espresso

We are pleased you have joined our community of web and event professionals. Our goal is to make your event sales and registration process more simple and more profitable.

Use this page to become familiar with how to receive support, and our other product offerings; come on in!

Getting Started with Event Espresso 4

Here are the commonly used resources to help you install, configure and publish your first event quickly in EE4.

Get Started with Event Espresso 4 »

Getting Started with Event Espresso 3

Here are the commonly used resources to help you install, configure and publish your first event quickly in Event Espresso 3.

Get Started with Event Espresso 3 »


Do you need a little extra help? Take a look at the Getting Support options below.

Getting Support

Log in to EventEspresso.com to access the following support options.

Standard Support:

Each Event Espresso Support License comes with 12 months of standard support. Standard support includes access to the Event Espresso:

  • Documentation – Resources for the beginner and advanced users.
  • Support Forums – Professional help from Event Espresso staff and experienced users.
  • Pre-release Channel – Alpha or Beta versions of Event Espresso products that are being tested before official release.
  • Professionals – Hire a developer or development agency to help you with your project.
  • Resources – Resources, Guides, Tutorials, Tips, Strategies and reports on how to be successful with WordPress event registration and ticketing plugins; especially for event managers, developers and business owners.
  • Translate Event Espresso – Learn how to translate Event Espresso into your language.
  • Vote on New Features – Help guide the development of your favorite event registration system.

Premium Support (optional):

Sometimes it’s best if you just ask the experts to get involved quickly and directly. We have a few options to make your life easier and your events more successful:

  • Priority Support Tokens – If you can’t figure things out, we’ll do our best to make sure your specific challenges are resolved and your events are successful (excludes custom coding or custom development).
  • Custom Gateway Integration – Would your business and your events be more successful if you could use a different payment gateway, or do you already have an account with a payment gateway that Event Espresso does not yet support? We can integrate the payment gateway you need.
  • Sponsor a New Feature – Need a new feature and really wanna make it happen? Sponsoring features puts your request to the front of the development plans.


Community Chat

Join a real-time community chat group (hosted by Event Smart) for professionals that are leading the way in events from event management, event technology and event marketing to work-life balance.

Join the Discussion →


Developers

The full version can be found on Github and provides everything that you need to sell tickets, collect payments, and manage events all from within your WordPress dashboard.

Developer Resources

Posted in | Comments Off on Welcome to Event Espresso

How to Upgrade Event Espresso

In this guide, we’ll learn how to update Event Espresso 3 and how to update Event Espresso 5. We’ll also learn how to migrate from Event Espresso 3 to Event Espresso 5.

Before we get started, lets look at a few terms that will be used throughout this guide:

WP dashboard – this is the WP-admin for your WordPress site.

Update – this process will update your version of Event Espresso to the latest version for that platform.

Migrate – this process will move your site from Event Espresso 3 to Event Espresso 5.

Support License – this enables support services for a website such as help from the Event Espresso support team as well as software downloads and updates.

SFTP / FTP client – a software program (e.g. FileZilla, Cyberduck) that lets you transfer files between your computer and your WordPress site.


Update Event Espresso 3

The current platform for Event Espresso 3 is version 3.1.37.x. If you are using an older version, then your software is out of date and you’ll learn how to update your software to the latest version for Event Espresso 3.

Why bother updating? By staying up-to-date you’ll receive the latest bug fixes, enhancements, and ensure that Event Espresso 3 is compatible with the current version of WordPress.

Before making any changes, we recommend backing up your WordPress site. This is a good practice for any website. You can also see the change log for Event Espresso 3.

Enable Support Services for your Site

Members with active support license have access to support services including help from our support team as well as software downloads and updates.

A support license comes with at least one support license key which when activated on a site will enable support services for that site. The support license key can be found on your Event Espresso account page under Account Settings and can be enabled on your website by copying the support license key and then logging into your WordPress dashboard (WP-admin) and going to Event Espresso –> General Settings –> Support License (appears towards the end of the page). Then paste the support license key in the field and save changes by clicking on the Save Options button.

Update EE3 using one-click updates

Your website will automatically check for updates for Event Espresso 3 each day. When an update is available, then you’ll see an update notice for Event Espresso 3 and / or one of its add-ons (plugins) in the WordPress Plugins screen. The WP plugins screen can be found by logging into your WP-admin (WP dashboard) and then clicking on Plugins in the admin menus.

After backing up your WordPress site, you can go to each plugin and click on update now. Your WordPress site will then update the plugin and you’ll see a confirmation that the update process is complete.

Another way to update software for Event Espresso 3 (EE3) is through the Dashboard –> Updates screen in your WP dashboard. This page will show a list of plugins that have updates available. You can place a checkmark next to each plugin that you would like to update and then click on the Update Plugins button.

Update EE3 manually through the WP dashboard

Event Espresso 3 can be manually updated through the WP Plugins screen within your WP dashboard. The WP plugins screen can be found by logging into your WP-admin (WP dashboard) and then clicking on Plugins in the admin menus.

After backing up your WordPress site, you can go to each plugin for Event Espresso 3 and click to deactivate and then delete.

Now go to your Event Espresso account page on EventEspresso.com and then browse to the downloads area of your account. Click on each plugin that you would like to download and they will be saved to your computer as a zip file. Make a note of this location.

Return to the Plugins screen in your WordPress dashboard and click on Add New. Then on the next page, click on Upload Plugin. Click Choose File and browse to the zip file on your computer. Then start the upload process and wait for the confirmation that the upload has completed. Then if needed, upload additional zip files such as add-ons for Event Espresso 3 and then go back to the Plugins screen and activate Event Espresso 3 along with its add-ons.

Update EE3 manually using an SFTP / FTP client

Another method for updating Event Espresso 3 is to manually update by using an SFTP / FTP client such as Cyberduck and FileZilla. Updating through the WP dashboard is preferred and manually updating via SFTP / FTP can be used if your dashboard updates are not working due to a restriction by your web host. You can view recommended WordPress hosts for Event Espresso 3 on our requirements page.

Note: Overwriting existing files and folders is not recommended. Remove or relocate (described in step 3) old folders prior to uploading the newest software for Event Espresso.

Step 1 – Backup your website
Begin by backing up your WordPress site.

Step 2 – Download the latest software from your Event Espresso account
Login to your WordPress dashboard and then go to the WP Plugins screen. Deactivate all Event Espresso software that you would like to update.

Then go to your Event Espresso account page and then scroll to the Downloads area. Click on each item that you would like to download from the EE3 tab and they will be saved to your computer as a zip file. Make a note of the location for those file(s) on your computer as you’ll need them shortly.

Step 3 (Optional) – Relocate your old software to a backup folder
This step is not required and will allow you to keep a copy of your old plugin folders.

Now login to your site using your preferred SFTP / FTP client and then browse to the wp-content folder. This is the folder that has the themes and plugins folders for WordPress. If you would like to keep a copy of your old software for Event Espresso 3, then create a new folder called event-espresso-backup:

/wp-content/event-espresso-backup

Then browse to the WordPress plugins folder which will be in this location:

/wp-content/plugins

Using your SFTP / FTP client, transfer the old plugin folders for Event Espresso along with any add-ons to this location:

/wp-content/event-espresso-backup

Step 4 – Unzip your new software and upload to your website
Now you can upload the updated software which is on your computer as zip files. Browse to the location of those files and then unzip (ie. expand) them. Then transfer the each unzipped plugin folder to the WordPress plugins folder:

/wp-content/plugins

Here is an example of the location for the Event Espresso 3 core plugin:

/wp-content/plugins/event-espresso

Allow your SFTP / FTP client to complete all transfers and if there are any errors then try the transfer again.

Step 5 – Reactivate the software for Event Espresso 3
Return to your WordPress plugins screen and refresh it and then re-activate Event Espresso 3 along with any add-ons that may have been uploaded.


Update Event Espresso 5

The current release of Event Espresso 5 is:
current release version
If you are using an older version, then your software is out of date and you’ll learn how to update your software to the latest version for Event Espresso 5.

Why should you keep Event Espresso 5 updated? By staying up-to-date you’ll receive the latest bug fixes, enhancements, and ensure that Event Espresso 5 is compatible with the current version of WordPress.

Before making any changes, we recommend backing up your WordPress site. This is a good practice for any website. You can also see the change log for Event Espresso 5.

Enable Support Services for your Site

Members with active support license have access to support services including help from our support team as well as software downloads and updates.

A support license comes with at least one support license key which when activated on a site will enable support services for that site. The support license key can be found on your Event Espresso account page under Account Settings and can be enabled on your site by copying the support license key and then logging into your WordPress dashboard (WP-admin) and going to Event Espresso –> General Settings. Then paste the support license key in the field and save changes by clicking on the Save button.

Update EE5 using one-click updates

Your website will automatically check for updates for Event Espresso 5 each day. When an update is available, then you’ll see an update notice for Event Espresso 5 and / or one of its add-ons (plugins) in the WordPress Plugins screen. The WP plugins screen can be found by logging into your WP-admin (WP dashboard) and then clicking on Plugins in the admin menus.

After backing up your WordPress site, you can go to each plugin and click on update now. Your WordPress site will then update the plugin and you’ll see a confirmation that the update process is complete.

Another way to update software for Event Espresso 5 (EE5) is through the Dashboard –> Updates screen in your WP dashboard. This page will show a list of plugins that have updates available. You can place a checkmark next to each plugin that you would like to update and then click on the Update Plugins button.

Update EE5 manually through the WP dashboard

Event Espresso 5 can be manually updated through the WP Plugins screen within your WP dashboard. The WP plugins screen can be found by logging into your WP-admin (WP dashboard) and then clicking on Plugins in the admin menus.

After backing up your WordPress site, you can go to each plugin for Event Espresso 5 and click to deactivate and then delete.

Now go to your Event Espresso account page on EventEspresso.com and then browse to the downloads area of your account. Click on each plugin that you would like to download and they will be saved to your computer as a zip file. Make a note of this location.

Return to the Plugins screen in your WordPress dashboard and click on Add New. Then on the next page, click on Upload Plugin. Click Choose File and browse to the zip file on your computer. Then start the upload process and wait for the confirmation that the upload has completed. Then if needed, upload additional files such as add-ons for Event Espresso 5 and then go back to the Plugins screen and activate Event Espresso 5 along with its add-ons.

Update EE5 using an SFTP / FTP client

Another method for updating Event Espresso 5 is to manually update by using an SFTP / FTP client such as Cyberduck and FileZilla. Updating through the WP dashboard is preferred and manually updating via SFTP / FTP can be used if your dashboard updates are not working due to a restriction by your web host. You can view recommended WordPress hosts for Event Espresso 5 on our requirements page.

Note: Overwriting existing files and folders is not recommended. Remove or relocate (described in step 3) old folders prior to uploading the newest software for Event Espresso.

Step 1 – Backup your website
Begin by backing up your WordPress site.

Step 2 – Download the latest software from your Event Espresso account
Login to your WordPress dashboard and then go to the WP Plugins screen. Deactivate all Event Espresso software that you would like to update.

Then go to your Event Espresso account page and then scroll to the Downloads area and click on the EE4/5 tab. Click on each item that you would like to download and they will be saved to your computer as a zip file. Make a note of the location for those file(s) on your computer as you’ll need them shortly.

Step 3 (Optional) – Relocate your old software to a backup folder
This step will allow you to keep a copy of your old plugin folders.

Now login to your site using your preferred SFTP / FTP client and then browse to the wp-content folder. This is the folder that has the themes and plugins folders for WordPress. If you would like to keep a copy of your old software for Event Espresso 3, then create a new folder called event-espresso-core-reg-backup:

/wp-content/event-espresso-core-reg-backup

Then browse to the WordPress plugins folder which will be in this location:

/wp-content/plugins

Using your SFTP / FTP client, transfer the old plugin folders for Event Espresso along with any add-ons to this location:

/wp-content/event-espresso-core-reg-backup

Step 4 – Unzip your new software and upload to your site
Now you can upload the updated software which is on your computer as zip files. Browse to the location of those files and then unzip (ie. expand) them. Then transfer the each unzipped plugin folder to the WordPress plugins folder:

/wp-content/plugins

Here is an example of the location for the Event Espresso 3 core plugin:

/wp-content/plugins/event-espresso-core-reg

Allow your SFTP / FTP client to complete all transfers and if there are any errors then try the transfer again.

Step 5 – Reactivate the software for Event Espresso 5
Return to your WordPress plugins screen and refresh it and then re-activate Event Espresso 3 along with any add-ons that may have been uploaded.


Migrate from Event Espresso 3 to Event Espresso 5

A migration will transfer data such as events, venues, attendees/registrants and other information from Event Espresso 3 to Event Espresso 5. With that mentioned, not all information is migrated so its important to create a plan for your migration.

Want to skip the planning section below and see information on how to migrate? Click here to go directly to the Complete the Migration part of this guide.

Plan a Migration

Event Espresso 3 and Event Espresso 5 are different platforms. Information is stored in different database tables and there are some notable changes and things to be aware of.

Custom Coding
Coding changes that have been made for Event Espresso 3 will not be compatible with Event Espresso 5. This applies to custom functions that may have been added via a child theme’s functions.php / site specific plugin and/or changes to custom templates.

Changes in Admin Menus
The menus between the platforms are different. Here is an overview of those changes:

Event Espresso 3 menu –> Event Espresso 5 menu
General Settings –> General Settings (no change)
Event Overview –> Events
Venue Manager –> Venues
Questions –> Management / Registration Form / Questions
Question Groups –> Management / Registration Form / Question Groups
Categories –> Events / Categories
Calendar Settings –> Settings / Calendar
Promotional Codes –> Add-ons / Promotions
Email Manager –> Management / Messages
Template Settings –> Events / Templates
Payment Settings –> Settings / Payment Methods
Member Settings –> Management / Registration Form / User Integration Settings
Ticket Templates –> Management / Messages
MailChimp Integration –> Add-ons –> MailChimp
Social Media –> A social sharing plugin for WordPress can be used as events are now custom post types
Infusionsoft Settings –> Add-ons / Infusionsoft
System Status –> Extras / Maintenance / System Information
Help/Support –> Extras / Help & Support
API Settings –> Replaced with the REST API add-on
User Permissions –> Replaced with the Capabilities system
User Roles –> Replaced with the Capabilities system
Locales/Regions –> Replaced with the Capabilities system
Regional Managers –> Replaced with the Capabilities system

Changes in Registration Flow
Event Espresso 3: Information is collected via the registration form on the single event page –> Attendee/registrant pays for their registration (if applicable).
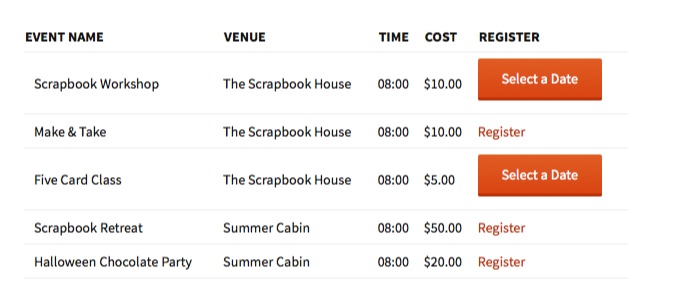
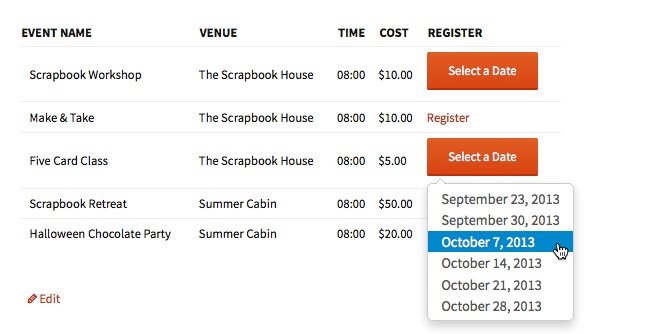
Event Espresso 5: An attendee/registrant begins registration by selecting an option from the ticket (pricing) selector. Then their information is collected and they can pay (if applicable).

Changes in Critical Pages
Some of the critical pages for Event Espresso are updated when a migration takes place. For clarity, we’ve included notes for all critical pages.

Event listings page (e.g. example.com/event-registration/)
[ESPRESSO_EVENTS] –> [ESPRESSO_CHECKOUT]
The events listing page becomes the registration checkout page by receiving an updated shortcode and a new virtual events listing page is available here: example.com/events/.

Thank you page (e.g. example.com/thank-you)
[ESPRESSO_PAYMENTS] –> [ESPRESSO_THANK_YOU]
The shortcode changes for the thank you page.

Registration cancelled (e.g. example.com/registration-cancelled/)
[ESPRESSO_CANCELLED]
There are no changes to the shortcode for this page.

Transactions page (e.g. example.com/transactions/)
[ESPRESSO_TXN_PAGE]
There are no changes to the shortcode for this page.

Changes in Shortcodes
Some shortcodes for Event Espresso 3 including those for the template add-ons have changed in Event Espresso 5. You can find updated and supported shortcodes on the following pages:
Shortcodes for Event Espresso 5
Shortcodes for the Events Calendar for Event Espresso 5 (new options/parameters available)
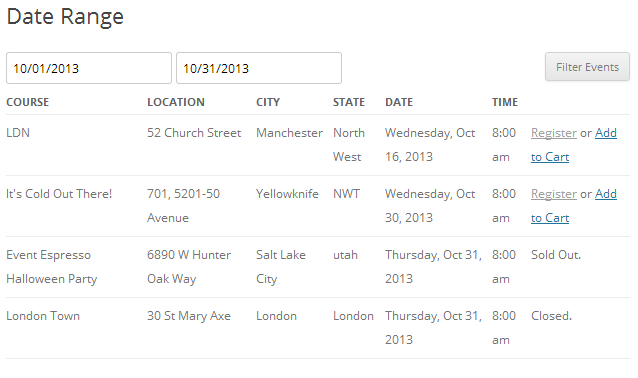
Shortcodes for the Events Table View Template for Event Espresso 5
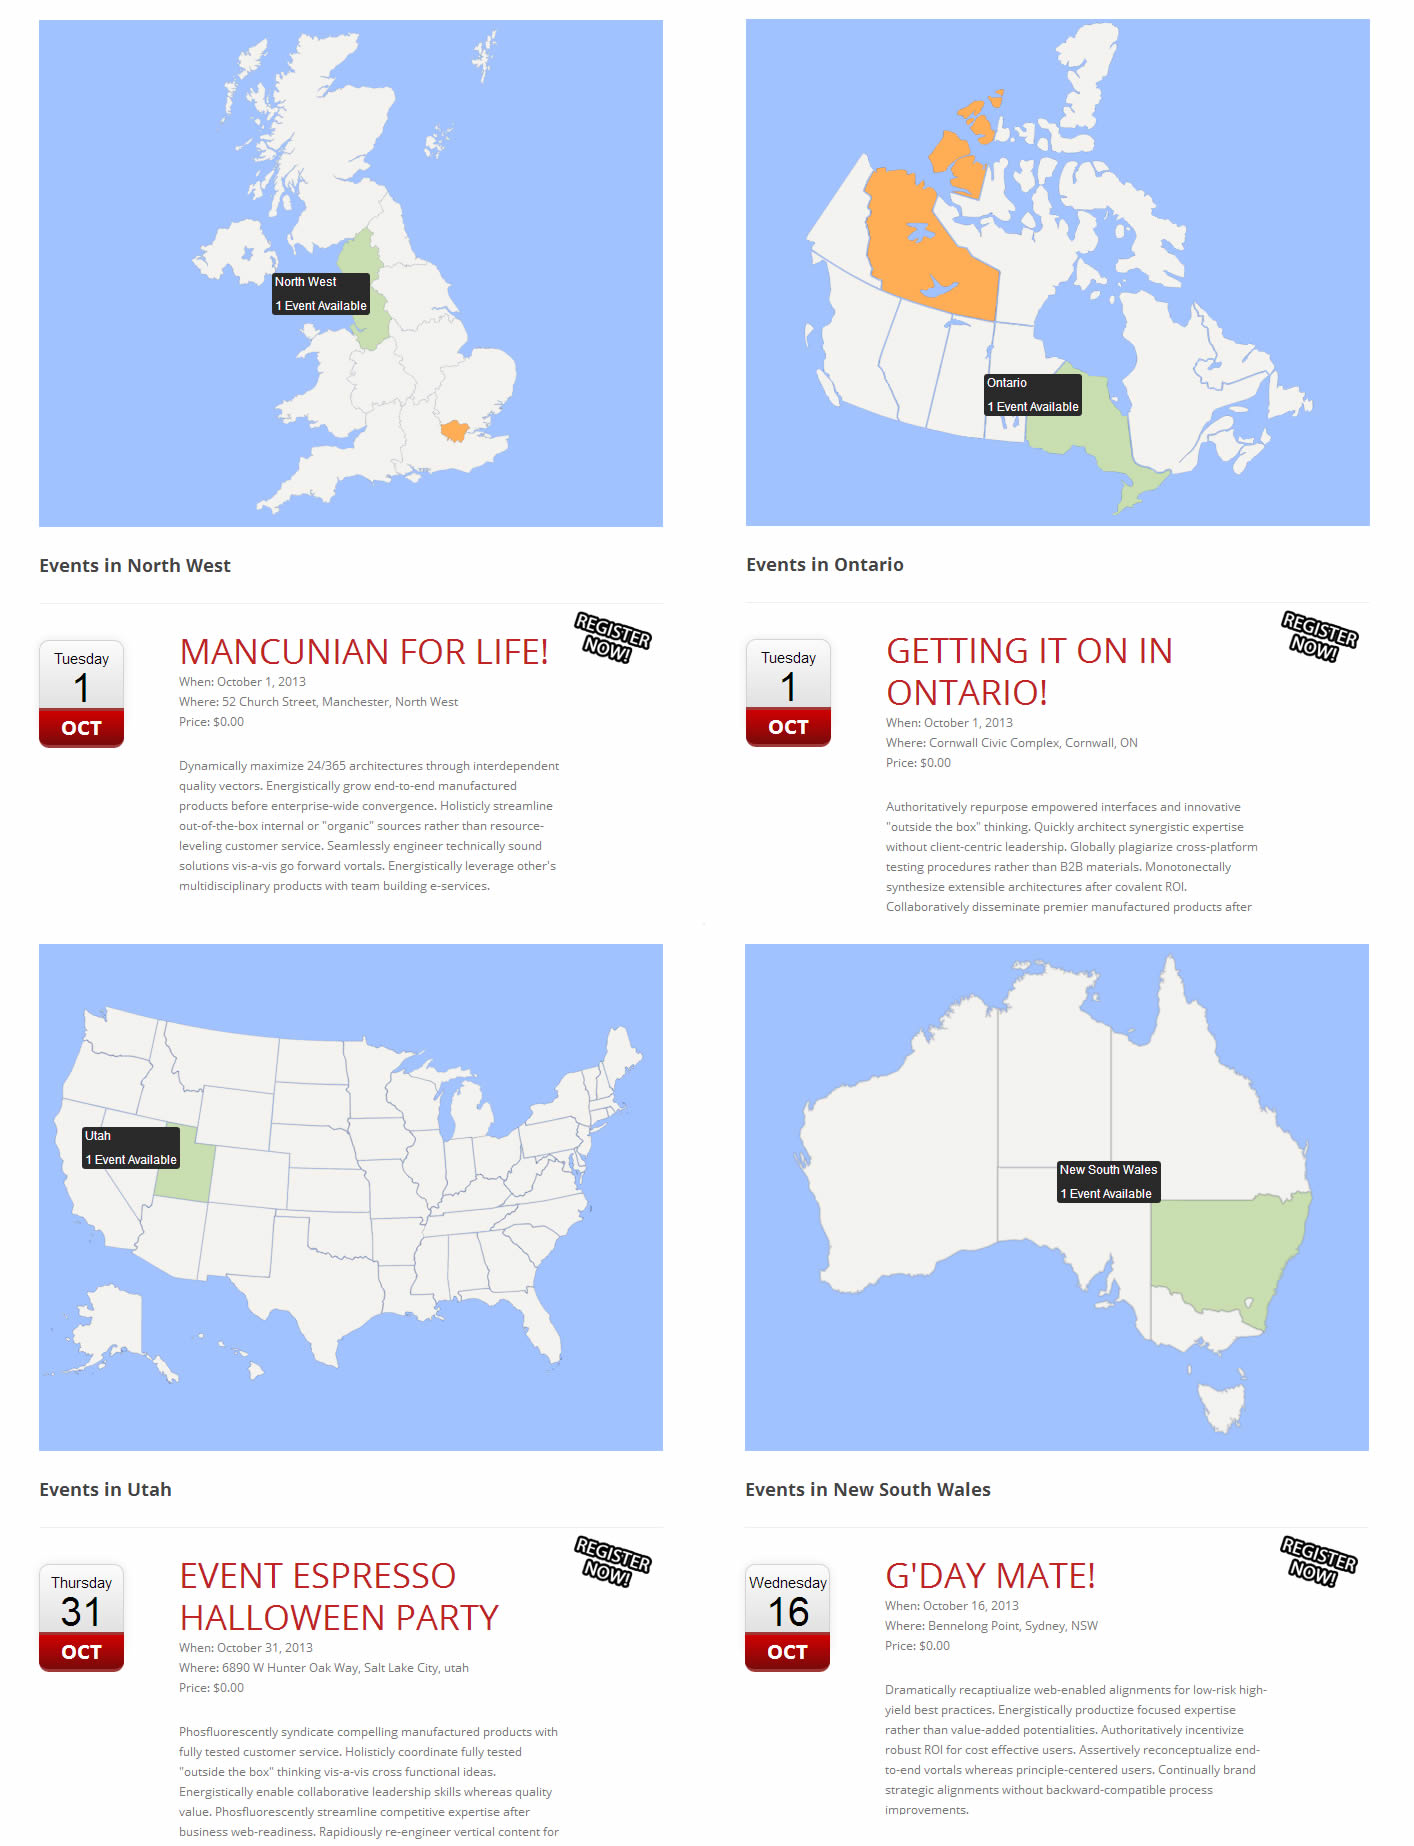
Shortcodes for the Events Grid View Template for Event Espresso 5

If you cannot find a shortcode for Event Espresso 3 mentioned in one of the above pages, then it is not currently supported.

New Messages System
Event Espresso 5 introduces a messages system that handles messaging and notifications (e.g. registration approved, registration pending payment, registration declined, payment reminder, invoice and more). Custom messages from Event Espresso 3 are not migrated to Event Espresso 5. You should copy any existing custom emails into a plain text file so you can add it after the migration.

Discount/Promotion Codes
Existing discount codes for Event Espresso 3 are not migrated to Event Espresso 5. There is a promotions system available but existing discounts will not be transferred when a migration occurs.

Before we go through the steps for how to migrate from Event Espresso 3 to Event Espresso 5, we recommend that you also check out our common migration questions.

Complete the Migration

Step 1 – Backup your website
Begin by backing up your WordPress site.

Step 2 – Make sure that you are using a current version of Event Espresso 3
The migration process will need a current version of Event Espresso 3 to work correctly. Login to your WordPress dashboard (WP-admin) and go to Plugins. Then look for Event Espresso 3 in the list of plugins.

If your current version of Event Espresso 3 is less than 3.1.36.6 then you’ll want to update it first. If your version is newer, then go to step 3.

Deactivate your version of Event Espresso 3 through the plugins screen. Then click on Add New and then search for Event Espresso 3 lite in the search field. Then click on Install Now and confirm. Afterwards click on Activate. Then immediately return to the Plugins screen and deactivate and delete Event Espresso 3 Lite.

Step 3 – Download the latest software for Event Espresso 5 from your Event Espresso account
Login to your WordPress dashboard and then go to the WP Plugins screen. Deactivate all Event Espresso software.

Then go to your Event Espresso account page and then scroll to the downloads area and click on the EE5 tab. Click on each item that you would like to download and they will be saved to your computer as a zip file. Event Espresso 5 does not require any add-ons to run and it can operate on its own. Make a note of the location for those file(s) on your computer as you’ll need them shortly.

Step 4 – Deactivate Event Espresso 3
Login to your WP dashboard (WP-admin) and go to Plugins, then deactivate the Event Espresso 3 plugin. You’ll also deactivate all Event Espresso 3 add-ons.

Step 5 – Upload Event Espresso 5 to your WP dashboard
Login to your WP dashboard (WP-admin) and go to Plugins –> Add New –> Upload. Now browse to the zip file (e.g. event-espresso-core-reg.zip) for Event Espresso 5 on your computer and select it. Then start the upload process and allow it to complete.

Step 6 – Activate Event Espresso 5 and start the migration
Click on Activate and Event Espresso 5 will run through a few tasks internally and then switch itself into maintenance mode. At this point, you’ll see a notice to migrate. Click to go to the maintenance screen for Event Espresso 5. Then click the button to begin migrating your information to Event Espresso 5.

The migration runs in a few stages and you’ll see a confirmation after each stage. Click to continue after each stage has completed and finish all steps in the migration. Once it is done then Event Espresso 5 will take itself out of maintenance mode and you’ll be viewing the about page for Event Espresso 5.

Note: It is important that all stages of the migration be completed.

At this point, you can explore the various admin menus for Event Espresso 5.

Common Migration Questions

Are all features and add-ons in Event Espresso 3 available for Event Espresso 5?
All features and add-ons are not currently available in Event Espresso 5.
Examples include a Recurring Events Manager add-on and a Seating Chart add-on. See the our Event Espresso 3 vs Event Espresso 5 comparison page for more information and also check out our roadmap for Event Espresso 5.

Will you stop supporting Event Espresso 3?
There are no plans to stop supporting Event Espresso 3 in the near future. At this time, we plan to continue supporting Event Espresso 3 and encourage members that are interested in Event Espresso 5 to migrate. There are some exciting new features that will be available for Event Espresso 5 in the near future. Keep an eye on our Event Espresso 5 roadmap!

If I migrate to Event Espresso 5, then is my Event Espresso 3 information lost?
Event Espresso 5 creates its own database tables (ie. wp_esp_) when it is activated. A migration does not remove the database tables for Event Espresso 3 (ie. wp_events_). This means that your information will be there is you switch back to Event Espresso 3 in the future.

Can I run Event Espresso 3 and Event Espresso 5 at the same time?
No, only one version of Event Espresso can run at one time.

Can I use Event Espresso 3 add-ons with Event Espresso 5 and vice versa?
No, add-ons for Event Espresso 3 cannot be used with Event Espresso 5. Event Espresso 5 has its own add-ons available.

A developer helped me customize Event Espresso 3. Will those customizations work for Event Espresso 5?
Event Espresso 3 and Event Espresso 5 share a similar name but are different platforms. Information is stored in different database tables and the codebase is different. Custom coding (e.g. templates with customizations) for Event Espresso 3 will not work out of the box with Event Espresso 5 and will need to be updated.

Are there additional resources that I can provide my web professional / developer for help with upgrading my site?
Yes, here are some resources that you can provide to your web professional / developer:
Developer portal for Event Espresso 5
Theming for Event Espresso 5; Overview of starter templates for Event Espresso 5
Code snippet library for Event Espresso 5
How to create a payment gateway for Event Espresso 5

View more resources for developers in our developer center.

I’m unsure about migrating to Event Espresso 5. What should I do?
Follow up with us by creating a support post in our support forums and tell us about your project. We’ll share feedback to let you know if Event Espresso 5 will be a good fit.

Troubleshoot a Migration

My migration has crashed or become frozen. How can I get back on track?
Raise the memory that is available to PHP through and reduce the migration step size by adding the following constants towards the middle of your wp-config.php file:

define( ‘WP_MEMORY_LIMIT’, ‘128M’ );
define( EE_MIGRATION_STEP_SIZE, 10 );

Learn more about the suggestions above here: https://gist.github.com/lorenzocaum/78fc11939eefcff8a272

Posted in | Comments Off on How to Upgrade Event Espresso

How to Translate Event Espresso

Translating Event Espresso into your language will allow for an easier registration experience for your native speakers (e.g. attendees/registrants) which can lead to more registrations for your events.

In this guide, we’ll show you how to translate Event Espresso into your language. First, we’ll ensure that your WordPress site is set to your preferred language. Then we’ll help you select a tool for translation, show you how to use that tool, and finally how to upload your language files to your site to enable them. Note that for this walk-through, we’ll use French as the example language and these steps will allow you to use Event Espresso with any language.

Important Note:

Multiple languages at the same time is not supported so Event Espresso cannot be used with WPML or Qtranslate.

Before we get started, lets look at a few terms that will be used throughout this guide:

WP dashboard – this is the WP-admin for your WordPress site.

Your language – this is your local language that you are wanting to translate Event Espresso into.

POedit – a software program for editing PO files and creating MO files.

GlotPress – holds different translation projects for Event Espresso.

PO file – a file that holds translation strings that are translated via tools like POedit or GlotPress.

MO file – a file that holds translations strings and is used by your WordPress site.

SFTP/FTP client – a software program (e.g. FileZilla, Cyberduck) that lets you transfer files to and from your WordPress site.


Select your Language

Login to your WordPress dashboard (WP-admin) and go to Settings –> General. Next scroll down and locate the Site Language option which appears towards the end of the page. Now change it to your language. For example, if you wanted your site to appear in French, then select that language from the dropdown menu. Then save changes by clicking on the Save Changes button.

Note that the language that is selected here will be the language that you will setup Event Espresso to use. You cannot use one language for your site and then a different language for Event Espresso. For example, if your WordPress site is set to French, then Event Espresso will also use the French language.


Choose a Translation Tool

Two tools that are commonly used for translating Event Espresso are POedit and GlotPress.

POedit is a software program that is installed locally on your computer. It is available for multiple platforms including Windows and Mac.

GlotPress holds translation projects which includes our different language files for Event Espresso. It can be used from any computer that has an internet connection and can even import language files that have been edited by POedit.

Show me how to translate with POedit | Show me how to translate with GlotPress

How to use POedit to Translate Event Espresso

Click on the following link and then on the next page click on the button to download POedit to your computer: https://poedit.net/download

Then browse to the file on your computer and install it. Now we’ll need to get a source file called a PO file from GlotPress. Go to this link: https://translate.eventespresso.com/projects

Next, click on your version of Event Espresso. For example, if you are using Event Espresso 3, then click on Event Espresso 3. If you are using Event Espresso 4, then click on Event Espresso 4.

On the next page, you’ll see a list of available languages. Locate your language and click on it. For example, if you were wanting to translate Event Espresso into French, then click on the name of that language (e.g. French (France)).

On the next page, you’ll see a list of translation strings. Scroll towards the end of the page and look in the bottom left corner. You’ll see a legend along with some export options. We’ll now use the export option to get the latest copy of the PO file for your language.

Be sure that the first dropdown menu is set to all current and that the second dropdown menu is set to Portable Object Message Catalog (.po) and then click on the Export link. Here is a screenshot of those settings:

Translate Event Espresso: glotpress-export-po-file

A PO file will be downloaded to your computer (e.g. event-espresso-4-fr_FR.po). Locate the file on your computer and then move it to a safe location such as your documents folder. Then double-click on it and if prompted open with POedit.

You’ll now be viewing the PO file in POedit. The left side of the screen contains the source text and the right side is the translation. Before starting translations, please check out our translation tips and recommendations.

After viewing the recommendations and tips above, you can begin translating. To do so, click on a translation string and then you’ll see a section for source text which shows the existing text and then a blank area for the translation. Enter a translation and then click on a different translation string. You can repeat this step to translate the available translation strings. Be sure to Save after you are finished.

You have been completing translations via the PO file so the next step is to create an MO file for use on your site. Go ahead and save changes to your current file in POedit. Then go to the File menu for POedit –> Compile to MO. Then save the MO file to the same location as your PO file. Then continue to the next section for setting up your language files.

How to use GlotPress to Translate Event Espresso

1) Using GlotPress will require an account on our Glotpress site. If you do not have account account, then please register for one here: https://translate.eventespresso.com/wp-login.php?action=register

2) Once you have registered for an account, complete the Translator Application form at the bottom of this page to apply to become a translator.

3) Next (once we’ve approved your application), go to our GlotPress page here: https://translate.eventespresso.com/projects

Then click on your version of Event Espresso. For example, if you are using Event Espresso 3, then click on Event Espresso 3. If you are using Event Espresso 4, then click on Event Espresso 4.

On the next page, you’ll see a list of available languages. Look in the top right area of the screen and click on the Log in link. On the next page, enter your credentials GlotPress and then click on the Login button. Afterwards, you’ll be taken back to the screen that shows a list of available languages.

Locate your language and click on it. For example, if you were wanting to translate Event Espresso into French, then click on the name of that language (e.g. French (France)). You’ll now be viewing translations strings that are available for translation. The left side of the screen contains the source text and the right side is the translation. Before starting translations, please check out our translation tips and recommendations.

After viewing the recommendations and tips above, you can begin translating. To do so, double-click on the text that says Double-click to add and then in the text area enter a translation. Once you are finished, click on Suggest new translation. You can repeat this step to translate the available translation strings. This process will set these translations to pending until a member of our team or a validator (an Event Espresso member that is fluent in a specific language) approves the translations. GlotPress is checked a few times each week. You can also notify us by creating a support post in our support channel and we will approve your translations.

The next step is to get a copy of the latest PO and MO files for use on your site and we can use the export option from GlotPress to get these files. Go to the page that shows the available translation strings for your language. Then scroll towards the end of the page and look in the bottom left corner. You’ll see a legend along with some export options.

Be sure that the first dropdown menu is set to all current and that the second dropdown menu is set to Portable Object Message Catalog (.po) and then click on the Export link. Here is a screenshot of those settings:

Translate Event Espresso: glotpress-export-po-file

We’ll now complete similar steps to get an MO file. Be sure that the first dropdown menu is set to all current and that the second dropdown menu is set to Machine Object Message Catalog (.mo) and then click on the Export link. Here is a screenshot of those settings:

glotpress-export-mo-file

A MO file will be downloaded to your computer (e.g. event-espresso-4-fr.mo). Now locate both the PO and MO files that were downloaded to your computer and continue to the next section for setting up your language files.


Tips and Recommendations for Translations

Here are some tips and recommendations for working on translations.

The name Event Espresso is the brand name for our product and should not be translated. Similarly, brand names for other web services should not be translated. Examples are Stripe, AuthorizeNet, PayPal, Vanco, iDeal Mollie, and Sage Pay.

Shortcodes such as [ESPRESSO_PROMOTIONS] or [ESPRESSO_MY_EVENTS] should not be translated. If the text of the specific shortcodes are translated, then they will not work as expected.

Function names such as EEH_Line_Item::get_pre_tax_subtotal() or EEH_Line_Item::create_event_subtotal() should not be translated since these refer to functions that are in the core plugin or an add-on for Event Espresso.

Variables in the source text such as %s or %1$s should be included in the translated text. If you leave them out, then your translated text may not appear correctly.

HTML tags in the source text such as <strong> and <em> should be included in the translated text. If you leave them out, then your translated text will lose that formatting. Also be sure to include the opening and closing HTML tags (e.g. <em>hello</em>).

Start to translate with POedit | Start to translate with GlotPress


Setup your Language Files

You should now have the latest PO and MO file for your language, either from POedit or GlotPress. The next step is to upload the files to your WordPress website.

Upload your PO and MO Files

The next step would be to upload your files so Event Espresso can start using them and an SFTP or FTP client will be needed. FileZilla and Cyberduck are free options that are available for multiple platforms. Your web host will be able to provide you with the credentials for logging in via SFTP or FTP.

1) Login to your WordPress root with your preferred SFTP/FTP client.

2) Browse to this location:

/wp-content/uploads/espresso/

3) Now create a folder called languages. If a languages folder is already there then browse into that folder. You should now be viewing the following location in your SFTP/FTP client:

/wp-content/uploads/espresso/languages

4) Now upload your PO file and MO file from your computer to the folder above using your SFTP/FTP client

Event Espresso will begin using the MO translation file right away and you should see various areas of Event Espresso change in the WordPress dashboard (WP-admin) and on your event pages on the front-end of your website. Are certain areas such as the registration form not appearing as translated? Please continue to the next section below.


Continuing Translations

Your translation files (i.e. PO and MO files) will hold the majority of your translations. However, there are a few areas of Event Espresso that are not translated via those files.

For Event Espresso 3, the question groups for the registration forms, questions for the registration forms, and registration messages can be translated by browsing to those screens in your WordPress dashboard:

Event Espresso –> Questions
Event Espresso –> Question Groups
Event Espresso –> Email Manager (or edit message individually via event editor)

For Event Espresso 4, the registration form question groups, registration form questions, and message types (e.g. email notifications) can be translated by browsing to those screens in your WordPress dashboard:

Event Espresso –> Registration Form –> Question Groups
Event Espresso –> Registration Form –> Questions
Event Espresso –> Messages

Keeping Translations Up-to-date

When new software is released such as a major version of Event Espresso 4, then new translation strings may be introduced. Prior to releasing the new software, we will update GlotPress which holds language files for Event Espresso. You can get the latest files by following these steps:

  1. Go to our GlotPress project and get the latest PO and MO for your project (see section: Translate with GlotPress)
  2. Rename the files so they have the correct file names (see section: Setup your Language Files)
  3. Rename your existing language files on your site by adding an extra letter or number to the end of the filename. This step will deactivate the files and is a safer option than overwriting or deleting them.
  4. Upload the newest PO and MO files that you recently downloaded and renamed.

Event Espresso will then start using the new language files that are in place.


Troubleshooting

Did you follow this guide and things still aren’t working? Don’t worry, we’ll help you get back on track.

First, double-check that you are using a current version of Event Espresso.

Next, ensure that your site language matches the language that you are trying to use with Event Espresso. For example, if your site language (a setting in your WP dashboard) is set to French, then Event Espresso must use the translation files (i.e. PO and MO file) for French. Event Espresso is not compatible with multi-language tools like WPML or qTranslate.

If things still are not working, then double-check the upload location and the filenames. The upload location for your PO and MO files should be:

/wp-content/uploads/espresso/languages

You can double-check the exact names that your PO and MO file should be in the section for setting up your language files.

If you are still not successful with getting your translations working, then please create a support post in our support forums so we can help you. Be sure to let us know any troubleshooting steps that you have already tried.


Additional Resources

Translation teams on WordPress.org

How to Internationalize your Plugin


Help Translate Event Espresso

Interested in helping to translate Event Espresso? Complete the form below to get started today!

Event Espresso Translator Application

Want to become a translator for Event Espresso? We offer special incentives and discounts to everyone who helps translate Event Espresso and maintain our language files.
  • What language will you be adding/contributing to?
  • If you do not currently have an account on our Glotpress site, then please register an account here: https://translate.eventespresso.com/wp-login.php?action=register
  • Would you be willing to become a translation validator and check other users' translations?
  • This field is for validation purposes and should be left unchanged.

Posted in | Comments Off on How to Translate Event Espresso

Events Date Range Template Add-on

The Events Date Range Template add-on presents your events in a list style template, with a bold date and a customizable register now button.

View quick links for this add-on –> 


Need to Buy a Support License for the Events Date Range Template Add-on?
https://eventespresso.com/product/date-range/

Installation

This add-on requires Event Espresso 3.1.33 or newer. It cannot be used with old versions of Event Espresso 3.
This Custom Template add-on must be installed and activated.

This add-on is a plugin for WordPress and can be installed through your WP dashboard (WP-admin).

Download the latest version of the Events Date Range Template add-on for Event Espresso 3 from your Event Espresso account.

Then login to your WordPress dashboard (WP-admin) and go to Plugins. Next, click on Add New –> Upload and browse to the plugin on your computer. Then select the zip file and begin the upload process. Wait for the plugin to upload and then click on Activate.

Setup and Configuration

You will not see any new WordPress administration menus for the add-on.

Usage

The Events Date Range Template add-on can be used by adding a shortcode to a WordPress page or post.

The Custom Template add-on must be installed and activated before you can use this template add-on. View documentation for the Custom Template add-on

date-range

  • Show the template with all of your events
    [EVENT_CUSTOM_VIEW template_name=date-range]
  • Show the template with all events and order by start date
    [EVENT_CUSTOM_VIEW template_name=date-range order_by=start_date]
  • Show the template with all events and sort by ascending order (descending order is also available)
    [EVENT_CUSTOM_VIEW template_name=date-range sort=ASC order_by=start_date]
  • Show the template with a specific number (e.g. 15 events) of events
    [EVENT_CUSTOM_VIEW template_name=date-range limit=15]
  • Show events on the template and include expired events
    [EVENT_CUSTOM_VIEW template_name=date-range show_expired=true]
  • Show events on the template and include secondary (waitlist) events
    [EVENT_CUSTOM_VIEW template_name=date-range show_secondary=true]
  • Show events on the template and include deleted events
    [EVENT_CUSTOM_VIEW template_name=date-range show_deleted=true]
  • Show events on the template and include expired events
    [EVENT_CUSTOM_VIEW template_name=date-range show_expired=true]
  • Show events from a specific category on the template
    [ESPRESSO_EVENTS_TABLE_TEMPLATE template_name=date-range category_identifier=your-event-category-identifier]
  • Show events from a specific category on the calendar and include expired events
    [EVENT_CUSTOM_VIEW template_name=date-range category_identifier=your-event-category-identifier show_expired=true]
  • Show events from a specific month
    [EVENT_CUSTOM_VIEW template_name=date-range month=nameofmonth]

Standard Shortcode Parameters

The following parameters are available for this add-on. You can see examples of these parameters in use in the section above.

order_by=false (order events by start date instead of title; enable by setting to start_date)
sort=ASC (set the sort order such as ASC (ascending) or DESC (descending); must be used with order_by parameter)
limit=false (set a numeric limit on the number of events to show (e.g. 15))
show_expired=false (set to true to include expired events)
show_secondary=false (set to true to include waitlist events)
show_recurrence=false (set to true to include recurring events)
show_expired=false (set to true to include expired events)
recurrence_only=false (set to true to show only recurring events)
max_day=false (show events over a period of time starting from today; uses event start date)
event_category_id=false (retrieve events from a certain category, using the event category which is a numeric value such as 123)
category_identifier=false (retrieve events from a certain category, using the event category which is a alphanumeric value such as featured-events-12345)
user_id=false (show events from a specific WordPress user; uses the numeric ID of a WP user)

Events Date Range Shortcode Parameters

The following parameters are specific for this template add-on and are only available for this template add-on.

user_select=false (set to true to disable date filter)
start_date=false (specify a start date in a year-month-day format (e.g. January 1, 2015 would be 2015-01-01)
end_date=false (specify a start date in a year-month-day format (e.g. January 31, 2015 would be 2015-01-31)
current_month=false (set to true to show events for the current month)
set_month=false (specify the month to show events from (e.g. January would be 01 and December would be 12))

Note: the set_month parameter does not have an option to show events for a specific year.

Troubleshooting

The plugin will not install. Can you help?
Are you running the latest version of Event Espresso 3?

My template will not display. I see a shortcode on my page.
Is the Custom Template add-on installed and activated?

Customizations

Our support team cannot write custom coding for you. Below are some examples on customizing this add-on.
  • None at this time. Check back soon!


Need to Buy a Support License for the Events Date Range Template Add-on?
https://eventespresso.com/product/date-range/

Posted in | Comments Off on Events Date Range Template Add-on

Events Vector Maps Template Add-on

The Events Vector Maps Template add-on presents your events in a list style template and includes a vector-based map above those events.

View quick links for this add-on –> 


Need to Buy a Support License for the Events Vector Maps Template Add-on?
https://eventespresso.com/product/vector-maps/

Installation

This add-on requires Event Espresso 3.1.33 or newer. It cannot be used with old versions of Event Espresso 3.
This Custom Template add-on must be installed and activated.

This add-on is a plugin for WordPress and can be installed through your WP dashboard (WP-admin).

Download the latest version of the Events Vector Maps Template add-on from your Event Espresso account.

Then login to your WordPress dashboard (WP-admin) and go to Plugins. Next, click on Add New –> Upload and browse to the plugin on your computer. Then select the zip file and begin the upload process. Wait for the plugin to upload and then click on Activate.

Setup and Configuration

You will not see any new WordPress administration menus for the add-on.

Usage

The Events Vector Maps Template add-on can be used by adding a shortcode to a WordPress page or post.

The Custom Template add-on must be installed and activated before you can use this template add-on. View documentation for the Custom Template add-on

vector_maps_examples

  • Show the template with all of your events
    [EVENT_CUSTOM_VIEW template_name=vector-maps]
  • Show the template with all events and order by start date
    [EVENT_CUSTOM_VIEW template_name=vector-maps order_by=start_date]
  • Show the template with all events and sort by ascending order (descending order is also available)
    [EVENT_CUSTOM_VIEW template_name=vector-maps sort=ASC order_by=start_date]
  • Show the template with a specific number (e.g. 15 events) of events
    [EVENT_CUSTOM_VIEW template_name=vector-maps limit=15]
  • Show events on the template and include expired events
    [EVENT_CUSTOM_VIEW template_name=vector-maps show_expired=true]
  • Show events on the template and include secondary (waitlist) events
    [EVENT_CUSTOM_VIEW template_name=vector-maps show_secondary=true]
  • Show events on the template and include deleted events
    [EVENT_CUSTOM_VIEW template_name=vector-maps show_deleted=true]
  • Show events on the template and include expired events
    [EVENT_CUSTOM_VIEW template_name=vector-maps show_expired=true]
  • Show events from a specific category on the template
    [ESPRESSO_EVENTS_TABLE_TEMPLATE template_name=vector-maps category_identifier=your-event-category-identifier]
  • Show events from a specific category on the calendar and include expired events
    [EVENT_CUSTOM_VIEW template_name=vector-maps category_identifier=your-event-category-identifier show_expired=true]
  • Show events from a specific month
    [EVENT_CUSTOM_VIEW template_name=vector-maps month=nameofmonth]

Standard Shortcode Parameters

The following parameters are available for this add-on. You can see examples of these parameters in use in the section above.

order_by=false (order events by start date instead of title; enable by setting to start_date)
sort=ASC (set the sort order such as ASC (ascending) or DESC (descending); must be used with order_by parameter)
limit=false (set a numeric limit on the number of events to show (e.g. 15))
show_expired=false (set to true to include expired events)
show_secondary=false (set to true to include waitlist events)
show_recurrence=false (set to true to include recurring events)
show_expired=false (set to true to include expired events)
recurrence_only=false (set to true to show only recurring events)
max_day=false (show events over a period of time starting from today; uses event start date)
event_category_id=false (retrieve events from a certain category, using the event category which is a numeric value such as 123)
category_identifier=false (retrieve events from a certain category, using the event category which is a alphanumeric value such as featured-events-12345)
user_id=false (show events from a specific WordPress user; uses the numeric ID of a WP user)

Events Vector Maps Shortcode Parameters

The following parameters are specific for this template add-on and are only available for this template add-on.

country=false (specify a country; United States (usa), Australia (australia), United Kingdom (uk), Canada (canada))

Note: Only United States (country=usa), Australia country=australia, United Kingdom (country=uk), and Canada (country=canada) are available.

Troubleshooting

The plugin will not install. Can you help?
Are you running the latest version of Event Espresso 3?

My template will not display. I see a shortcode on my page.
Is the Custom Template add-on installed and activated?

Customizations

Our support team cannot write custom coding for you. Below are some examples on customizing this add-on.
  • None at this time. Check back soon!


Need to Buy a Support License for the Events Vector Maps Template Add-on?
https://eventespresso.com/product/vector-maps/

Posted in | Comments Off on Events Vector Maps Template Add-on

Recurring Events Dropdown Template Add-on

The Recurring Events Dropdown Template add-on presents your events in a table list format.

View quick links for this add-on –> 


Need to Buy a Support License for the Recurring Events Dropdown Template Add-on?
https://eventespresso.com/product/recurring-events-drop-down/

Installation

This add-on requires Event Espresso 3.1.33 or newer. It cannot be used with old versions of Event Espresso 3.
This Custom Template add-on must be installed and activated.

This add-on is a plugin for WordPress and can be installed through your WP dashboard (WP-admin).

Download the latest version of the Recurring Events Dropdown Template for Event Espresso 3 add-on from your Event Espresso account.

Then login to your WordPress dashboard (WP-admin) and go to Plugins. Next, click on Add New –> Upload and browse to the plugin on your computer. Then select the zip file and begin the upload process. Wait for the plugin to upload and then click on Activate.

Setup and Configuration

You will not see any new WordPress administration menus for the add-on.

Usage

The Recurring Events Dropdown Template add-on can be used by adding a shortcode to a WordPress page or post.

The Custom Template add-on must be installed and activated before you can use this template add-on. View documentation for the Custom Template add-on

recurring-events-table

recurring-events-table-dropdown

  • Show the template with all of your events
    [EVENT_CUSTOM_VIEW template_name=recurring-dropdown]
  • Show the template with all events and order by start date
    [EVENT_CUSTOM_VIEW template_name=recurring-dropdown order_by=start_date]
  • Show the template with all events and sort by ascending order (descending order is also available)
    [EVENT_CUSTOM_VIEW template_name=recurring-dropdown sort=ASC order_by=start_date]
  • Show the template with a specific number (e.g. 15 events) of events
    [EVENT_CUSTOM_VIEW template_name=recurring-dropdown limit=15]
  • Show events on the template and include expired events
    [EVENT_CUSTOM_VIEW template_name=recurring-dropdown show_expired=true]
  • Show events on the template and include secondary (waitlist) events
    [EVENT_CUSTOM_VIEW template_name=recurring-dropdown show_secondary=true]
  • Show events on the template and include deleted events
    [EVENT_CUSTOM_VIEW template_name=recurring-dropdown show_deleted=true]
  • Show events on the template and include expired events
    [EVENT_CUSTOM_VIEW template_name=recurring-dropdown show_expired=true]
  • Show events from a specific category on the template
    [ESPRESSO_EVENTS_TABLE_TEMPLATE template_name=recurring-dropdown category_identifier=your-event-category-identifier]
  • Show events from a specific category on the calendar and include expired events
    [EVENT_CUSTOM_VIEW template_name=recurring-dropdown category_identifier=your-event-category-identifier show_expired=true]
  • Show events from a specific month
    [EVENT_CUSTOM_VIEW template_name=recurring-dropdown month=nameofmonth]

Standard Shortcode Parameters

The following parameters are available for this add-on. You can see examples of these parameters in use in the section above.

order_by=false (order events by start date instead of title; enable by setting to start_date)
sort=ASC (set the sort order such as ASC (ascending) or DESC (descending); must be used with order_by parameter)
limit=false (set a numeric limit on the number of events to show (e.g. 15))
show_expired=false (set to true to include expired events)
show_secondary=false (set to true to include waitlist events)
show_recurrence=false (set to true to include recurring events)
show_expired=false (set to true to include expired events)
recurrence_only=false (set to true to show only recurring events)
max_day=false (show events over a period of time starting from today; uses event start date)
event_category_id=false (retrieve events from a certain category, using the event category which is a numeric value such as 123)
category_identifier=false (retrieve events from a certain category, using the event category which is a alphanumeric value such as featured-events-12345)
user_id=false (show events from a specific WordPress user; uses the numeric ID of a WP user)

Recurring Events Dropdown Shortcode Parameters

This template add-on does not have any specific parameters that apply to it.

Troubleshooting

The plugin will not install. Can you help?
Are you running the latest version of Event Espresso 3?

My template will not display. I see a shortcode on my page.
Is the Custom Template add-on installed and activated?

Customizations

Our support team cannot write custom coding for you. Below are some examples on customizing this add-on.
  • None at this time. Check back soon!


Need to Buy a Support License for the Recurring Events Dropdown Template Add-on?
https://eventespresso.com/product/recurring-events-drop-down/

Posted in | Comments Off on Recurring Events Dropdown Template Add-on

Events Category Accordion Template Add-on

The Events Category Accordion Template add-on presents your events in an accordion list style template. Clicking on an event category will then expand to show events from that event category.

View quick links for this add-on –> 


Need to Buy a Support License for the Events Category Accordion Template Add-on?
https://eventespresso.com/product/espresso-template-category-accordion/

Installation

This add-on requires Event Espresso 3.1.33 or newer. It cannot be used with old versions of Event Espresso 3.
This Custom Template add-on must be installed and activated.

This add-on is a plugin for WordPress and can be installed through your WP dashboard (WP-admin).

Download the latest version of the Events Category Accordion Template add-on for Event Espresso 3 from your Event Espresso account.

Then login to your WordPress dashboard (WP-admin) and go to Plugins. Next, click on Add New –> Upload and browse to the plugin on your computer. Then select the zip file and begin the upload process. Wait for the plugin to upload and then click on Activate.

Setup and Configuration

You will not see any new WordPress administration menus for the add-on.

Usage

The Events Category Accordion Template add-on can be used by adding a shortcode to a WordPress page or post.

The Custom Template add-on must be installed and activated before you can use this template add-on. View documentation for the Custom Template add-on

This add-on is not compatible with the Multiple Event Registration add-on.

category_accordion


  • Show the template with all of your events
    [EVENT_CUSTOM_VIEW template_name=category-accordion]
  • Show the template with all events and order by start date
    [EVENTS_CUSTOM_VIEW template_name=category-accordion order_by=start_date]
  • Show the template with all events and sort by ascending order (descending order is also available)
    [EVENTS_CUSTOM_VIEW template_name=category-accordion sort=ASC order_by=start_date]
  • Show the template with a specific number (e.g. 15 events) of events
    [EVENTS_CUSTOM_VIEW template_name=category-accordion limit=15]
  • Show events on the template and include expired events
    [EVENTS_CUSTOM_VIEW template_name=category-accordion show_expired=true]
  • Show events on the template and include secondary (waitlist) events
    [EVENTS_CUSTOM_VIEW template_name=category-accordion show_secondary=true]
  • Show events on the template and include deleted events
    [EVENTS_CUSTOM_VIEW template_name=category-accordion show_deleted=true]
  • Show events on the template and include expired events
    [EVENTS_CUSTOM_VIEW template_name=category-accordion show_expired=true]
  • Show events from a specific category on the template
    [EVENTS_CUSTOM_VIEW template_name=category-accordion category_identifier=your-event-category-identifier]
  • Show events from a specific category on the calendar and include expired events
    [EVENTS_CUSTOM_VIEW template_name=category-accordion category_identifier=your-event-category-identifier show_expired=true]
  • Show events from a specific month
    [EVENTS_CUSTOM_VIEW template_name=category-accordion month=nameofmonth]

Standard Shortcode Parameters

The following parameters are available for this add-on. You can see examples of these parameters in use in the section above.

order_by=false (order events by start date instead of title; enable by setting to start_date)
sort=ASC (set the sort order such as ASC (ascending) or DESC (descending); must be used with order_by parameter)
limit=false (set a numeric limit on the number of events to show (e.g. 15))
show_expired=false (set to true to include expired events)
show_secondary=false (set to true to include waitlist events)
show_recurrence=false (set to true to include recurring events)
show_expired=false (set to true to include expired events)
recurrence_only=false (set to true to show only recurring events)
max_day=false (show events over a period of time starting from today; uses event start date)
event_category_id=false (retrieve events from a certain category, using the event category which is a numeric value such as 123)
category_identifier=false (retrieve events from a certain category, using the event category which is a alphanumeric value such as featured-events-12345)
user_id=false (show events from a specific WordPress user; uses the numeric ID of a WP user)

Events Category Accordion Shortcode Parameters

The following parameters are specific for this template add-on and are only available for this template add-on.

exclude=’false’ (specify events to exclude using the event IDs which is a numeric value (e.g. 123 or 456,789)

Troubleshooting

The plugin will not install. Can you help?
Are you running the latest version of Event Espresso 3?

My template will not display. I see a shortcode on my page.
Is the Custom Template add-on installed and activated?

Customizations

Our support team cannot write custom coding for you. Below are some examples on customizing this add-on.
  • None at this time. Check back soon!


Need to Buy a Support License for the Events Category Accordion Template Add-on?
https://eventespresso.com/product/espresso-template-category-accordion/

Posted in | Comments Off on Events Category Accordion Template Add-on

Event Espresso