Posted: April 14, 2020 at 7:55 am
|
Hi Guys – Setting up virtual events with Zoom and went through your walkthrough. Very helpful thanks! My question is with the notifications. You have a virtual event URL called by a shortcode – this is fine. However, I was provided with a URL, MEETING IDs, and PASSWORDS for all 4 virtual events. So obviously the question is how do I handle integrating the MEETING IDS and PASSWORDS into the automated notification process? Or are we setting up something wrong in Zoom and we shouldn’t need to use that information? Thanks for the assistance! |
|
|
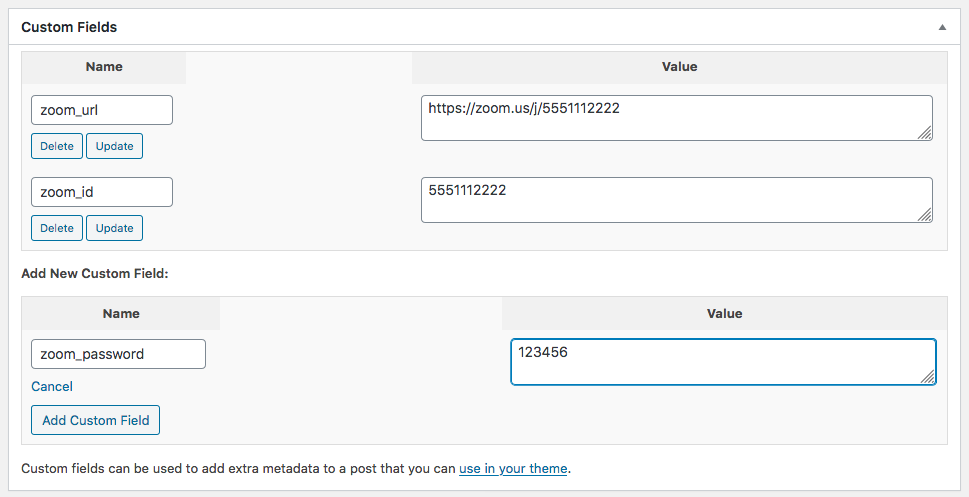
Hi, You can use custom fields within the event to input each provided item from Zoom. Then, you can use a special shortcode for each item within your message template to include the meeting information in the email. Here’s a screenshot that shows an example of setting up custom fields within the event editor:
Here’s another screenshot that shows an example of how to display the custom field values in the email message template:
|
|
|
Thanks Josh. So a couple things. I was able to modify the notification. Instead of editing the Registration Approval Master I created a custom template from the Registration Approval -> Registrant and assigned it in the event as the Registration Approved template to be sent. The testing of the template is just OK. Basically you can test that its being sent but the custom field areas all show blank which is as expected because sending a test from the template – it isn’t attached to an actual event to pull those fields so I am just trusting. We are using Paypal so not processing payments onsite so it isn’t simple to just throw it in Sandbox mode to send a test payment through and an approved Registration. Anyway 2 quick things: 1) On the notification – at the bottom footer area there are twitter and Facebook links with an email pull. Where can we modify this. We would like to pull instagram instead of twitter and the email pulled should be the event author email. But I dont see where to pull this. 2) On the event Registration Page itself under Registration Details it shows the number of spots available and number of spots left. Can we just leave out this entire area. Its not really relevant to show how many spots are in the class and how many spots are left when its a virtual class. Space is unlimited. Thanks so much for your help. Matt |
|
Using a custom template is fine. The ‘Default Message Templates’ are the templates used on all events by default, ‘Custom Message Templates’ allow you to select specific templates for specific events. So if all of your events would be using Zoom, you can edit the default template so you don’t need to manually set it on each event, if it’s mixed, the default template should be set up for your most common events and then use custom templates for other event types.
The easiest way to do a ‘live’ test without adding a payment is to manually add a registration through the admin onto the event itself. Event Espresso -> Events -> {hover over event} -> Registrations -> Add new registration (top of page). Work through the steps to add a registration on the event, then view the registration list again (Event Espresso -> Events -> {hover over event} -> Registrations), now you can click the checkbox next to registration and then in the ‘Bulk options’ dropdown select ‘Approve and Notify Registrations’. Or if already approved, click on the for that registration to retrigger the email again. That reg approved email will be the same email your registrants receive, anything missing there would be missing on ‘real’ registrations.
Pretty much every payment method has different credentials for Production and Sandbox accounts so this is the same for most. You need a PayPal Sandbox and you swap out the credentials to use the sandbox account, then enable debug mode on the payment method. However, as you, the admin, can set any status you want on any registrations you can do the above process for any registration based messages you need to test (note it won’t work with payment related messages like ‘Payment received’).
Just to confirm, you are referring to the ‘Connect with us’ section and NOT the ‘Connect with this event’ section, right? That section is in the ‘Main content’ of the registration approved message template (Registrant context), like this – https://monosnap.com/file/ZVA7QoK0X6RXi4440sG0DqPF0q2fNT If you can’t see that when in visual mode, then it likely means you are editing the wrong ‘context’ for that message type. Each message type can have multiple ‘contexts’ in which its used, for example the Reg Approved message sent to the event admin will likely be different than the Reg Approved message sent to the registrant, right? Same message type, different context and each context can be editing independently, see here: https://eventespresso.com/wiki/messages-system-working-with-message-contexts/ It’s possible that the changes you made to the template previously were also made on the event admin context. |
|

The support post ‘Virtual Event Notifications W Zoom – Meeting IDs and Passwords’ is closed to new replies.
Have a question about this support post? Create a new support post in our support forums and include a link to this existing support post so we can help you.