The Event Espresso Events Calendar add-on is an easy way to display and register for events.
View quick links for this add-on –>
Documentation for Event Espresso 3 is located at the bottom of this wiki page.
https://eventespresso.com/product/ee4-events-calendar/
Installation for the Event Espresso 4 Events Calendar add-on
This add-on is a plugin for WordPress and can be installed through your WP dashboard (WP-admin).
Download the latest version of the Events Calendar add-on for Event Espresso 4 from your Event Espresso account.
Then login to your WordPress dashboard (WP-admin) and go to Plugins. Next, click on Add New –> Upload and browse to the plugin on your computer. Then select the zip file and begin the upload process. Wait for the plugin to upload and then click on Activate.
Setup and Configuration for EE4 Events Calendar add-on
Login to your WP dashboard and go to Event Espresso –> Settings –> Calendar. This will take you to the settings screen for the add-on. Below are explanations of the various settings.
Basic Settings
Time/Date Settings
Show Event Time in Calendar: Allows you to specify if the event time should be shown in the calendar?
Time Format: Select the format that the time should appear in. Learn how to customize the time format
First Day of the Week: Select the first day of the week. This day will appear in the first column of the calendar.
Show Weekends: Specify if weekends should appear in your calendar
Page Settings
Week mode: Determines the number of weeks displayed in a month view. Also determines each week’s height.
“fixed” – The calendar will always be 6 weeks tall. The height will always be the same, as determined by the calendar height setting or the aspect ratio.
“liquid” – The calendar will have either 4, 5, or 6 weeks, depending on the month. The height of the weeks will stretch to fill the available height, as determined by the calendar height setting or the aspect ratio.
“variable” – The calendar will have either 4, 5, or 6 weeks, depending on the month. Each week will have the same constant height, meaning the calendar’s height will change month-to-month.
Height: Enter a specific height for the calendar in pixels. This is optional
Link to Post or Registration Page: Select where the registration button on the calendar should take an attendee/registrant.
Theme Settings
Enable Images in the Calendar: This option can be used to show features images in the calendar. For best styling, use uniformly-sized images for featured images in your calendar. Recommended filetype: jpeg.
Enable Filters in Calendar: Specify if filters should be made available. Filters will let a registrant/attendee view a specific group of events either by event category or event venue.
Show category legend: Specify if the event category should appear above the calendar. It allows an attendee/registrant to quickly browse to a category of events on the calendar.
Use Color Pickers: This lets you customize the default event background color and text color.
Event Background Color: This is a color picker option for the event background.
Event Text Color: This is a color picker option for the event text.
Show Tooltips: Tooltips are a short description of your event. They will appear when you hover over a calendar event. This option will let you enable or disable them.
Tooltip Position: Specify where the tooltip should appear (when you hover over an event on the calendar).
Tooltip Style: Select a color for the tooltip.
Advanced Settings
Formatting
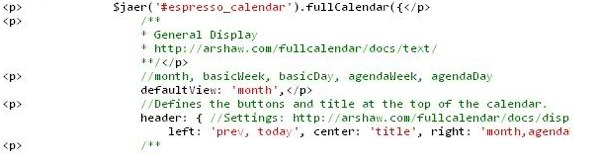
Header Style: Enter the buttons and title that should appear at the top of the calendar. View all available options here: http://fullcalendar.io/docs/display/header/
Button Text: Enter the text that will be shown on the buttons in the header. View all available options here: http://fullcalendar.io/docs/text/buttonText/
Title Format: Enter the text that will be shown in the header’s title. View all available options here: http://fullcalendar.io/docs1/utilities/formatDate/
Column Format: Enter the text that will be displayed in the calendar’s column headings. View all available options here: http://fullcalendar.io/docs1/utilities/formatDate/
Memory Management
Display Attendee Limits: This option will show attendee limits in the calendar. This will increase the queries on the database and may use a lot of resources on your site.
Disable Categories: This option can help speed up your calendar but will break any event category option on the calendar such as the event category legend.
Reset Calendar Settings: This setting will reset the calendar back to its default settings. Any exist settings will be lost!
Add the Calendar shortcode to a post or page
The calendar shortcodes allow you to display the calendar on a WordPress page or post. Unless otherwise specified, the calendar will show all events by month and exclude expired events. Here are some examples of shortcodes that you can place on a WordPress post or page to display a calendar:
- Show a calendar with all of your events
[ESPRESSO_CALENDAR] - Show events on the calendar and include expired events
[ESPRESSO_CALENDAR show_expired=true] - Show events from a specific category on the calendar
[ESPRESSO_CALENDAR event_category_id=your_category_id] - Show events from a specific category on the calendar and include expired events
[ESPRESSO_CALENDAR event_category_id=your_category_id show_expired=true] - Show events from a specific event venue on the calendar
[ESPRESSO_CALENDAR event_venue_id=your_venue_id] - Show events on the calendar by specific month (numeric value) and year (numeric value)
[ESPRESSO_CALENDAR month=01 year=2016] - Show events on the calendar by month
[ESPRESSO_CALENDAR cal_view=month] - Show events on the calendar by a regular week
[ESPRESSO_CALENDAR cal_view=basicWeek] - Show events on the calendar by a regular day
[ESPRESSO_CALENDAR cal_view=basicDay] - Show events on the calendar by an agenda week
[ESPRESSO_CALENDAR cal_view=agendaWeek] - Show events on the calendar by an agenda day
[ESPRESSO_CALENDAR cal_view=agendaDay]
Shortcode Parameters
The following parameters are available for this add-on. You can see examples of these parameters in use in the section above.
show_expired=false (set to true to show expired events)
event_category_id=456 (show events from a certain event category (e.g. an event category with an event category ID of 456))
event_venue_id=123 (show events from a specific venue (e.g. an event venue with a post ID of 123))
cal_view=month (set a default view for the calendar: month, basicWeek, basicDay, agendaWeek, agendaDay)
month=01 (set the starting month using a number (e.g. 01 for January or 12 for December)
year=2020 (set the starting year using a number as the year (e.g. 2020))
max_events_per_day=1 (limit the number of date times displayed per date to 1 in the month view)
How to start the calendar display on a specific month
You can add the month parameter to the calendar shortcode to start the calendar on a specific month. For example, if the events are planned to start on the month of September, you can use this shortcode: [ESPRESSO_CALENDAR month=9]
How to display a list of events instead of a calendar on small screens
You can use this excellent Mobile Detect Plugin to serve a list of events, week view, or other format, while still displaying the Calendar’s month view for larger displays. Some usage examples follow:
Use these shortcodes to show calendar on larger displays, list of events on mobile
[wonderplugin_cond deviceinclude="iPhone,iPod,Android"]
[ESPRESSO_EVENTS]
[/wonderplugin_cond]

[wonderplugin_cond deviceexclude="iPhone,iPod,Android"]
[ESPRESSO_CALENDAR]
[/wonderplugin_cond]
Use these shortcodes to show calendar on larger displays, grid of events on mobile (requires Events grid template add-on)
[wonderplugin_cond deviceinclude="iPhone,iPod,Android"]
[ESPRESSO_GRID_TEMPLATE]
[/wonderplugin_cond]

[wonderplugin_cond deviceexclude="iPhone,iPod,Android"]
[ESPRESSO_CALENDAR]
[/wonderplugin_cond]
Use these shortcodes to show month view calendar on larger displays, toggle table view on mobile (requires Events table template add-on)
[wonderplugin_cond deviceinclude="iPhone,iPod,Android"]
[ESPRESSO_EVENTS_TABLE_TEMPLATE template_file=espresso-events-table-template-toggle.template.php]
[/wonderplugin_cond]

[wonderplugin_cond deviceexclude="iPhone,iPod,Android"]
[ESPRESSO_CALENDAR]
[/wonderplugin_cond]
Troubleshooting the Event Espresso 4 Events Calendar add-on
The plugin does not work as expected. Can you help?
Please double-check your calendar is up-to-date and that the calendar shortcode is published on a WordPress Page.
Calendar featured images are cropped or not rendered to the correct sizes
For best results use uniformly sized and oriented featured images for the events. Use only jpeg files for best results.
jQuery conflicts
The registration forms and events calendar depend upon jQuery. If another theme or plugin loads jQuery after WordPress loads its version of jQuery, the calendar or form validation may break and therefore allow blank registration forms to be submitted and/or the calendar to disappear. This usually happens because a theme or plugin may be loading the scripts directly in the header of your site. The proper way of loading scripts is by using the WordPress function wp_enqueue_script.
This can also occur if a theme or plugin loads the jQuery Google api (as seen in the video below.) The jQuery loaded by Google is not compatible with the jQuery.noConflict function that is loaded automatically in the WordPress jQuery library.
For a fix, please adjust the jQuery scripts that are loaded in the header.php file of the theme or plugin to use the wp_enqueue_script method.
Below is a video tutorial on troubleshooting a broken events calendar. You can use this same method to troubleshoot other plugins and themes.
To run this test you will need the Web Developer Tools add-on installed in your Firefox web browser, or alternatively use the Inspect Element in Chrome.
wp_footer() is needed
The WordPress theme needs to call the wp_footer function in order for the calendar (and many other plugins) to work correctly. Look in footer.php theme template file and add this right before the closing body tag like this:
wp_footer();
Customizations for the Event Espresso 4 Events Calendar add-on
Need to load the calendar via a theme template file? You can use a do_shortcode function to display the calendar from a custom template. Here is an example:
echo do_shortcode('[ESPRESSO_CALENDAR show_expired=false]');
You’ll need to set a variable and make a call to wp_enqueue_scripts() in your template. This will ensure that the calendar’s scripts and styles will load on that page. Example code to include at the top of the custom template, before the call to get_header() or wp_head(), follows:
if ( class_exists( 'EED_Espresso_Calendar' ) ) {
	global $is_espresso_calendar;
	$is_espresso_calendar = TRUE;
	add_action( 'wp_enqueue_scripts', array( EED_Espresso_Calendar::instance(), 'calendar_scripts' ) );
	if ( EED_Espresso_Calendar::instance()->config()->tooltip->show ) {
		add_filter('FHEE_load_qtip', '__return_true' );
	}
}
Exclude events with certain statuses (e.g. cancelled, sold out) from events calendar
Custom ‘Register Now’ buttons
The button HTML is filtered within the calendar so you hook in and change the output if needed, for example, the calendar will remove the ‘Register now’ button for sold out events but it is possible to hook in and output a button for those events using this snippet:
https://eventespresso.com/product/ee4-events-calendar/
https://eventespresso.com/product/espresso-calendar/
Installation for the Event Espresso 3 Events Calendar add-on
This add-on is a plugin for WordPress and can be installed through your WP dashboard (WP-admin).
Download the latest version of the Events Calendar add-on for Event Espresso 3 from your Event Espresso account.
Then login to your WordPress dashboard (WP-admin) and go to Plugins. Next, click on Add New –> Upload and browse to the plugin on your computer. Then select the zip file and begin the upload process. Wait for the plugin to upload and then click on Activate.
Setup and Configuration for EE3 Events Calendar add-on
Login to your WP dashboard and go to Event Espresso –> Calendar settings. This will take you to the settings screen for the add-on. Below are explanations of the various settings.
Basic Settings
Time/Date Settings
Show Event Time in Calendar: Allows you to specify if the event time should be shown in the calendar?
Time Format: Select the format that the time should appear in. Learn how to customize the time format
First Day of the Week: Select the first day of the week. This day will appear in the first column of the calendar.
Show Weekends: Specify if weekends should appear in your calendar
Layout Settings
Week mode: Determines the number of weeks displayed in a month view. Also determines each week’s height.
“fixed” – The calendar will always be 6 weeks tall. The height will always be the same, as determined by the calendar height setting or the aspect ratio.
“liquid” – The calendar will have either 4, 5, or 6 weeks, depending on the month. The height of the weeks will stretch to fill the available height, as determined by the calendar height setting or the aspect ratio.
“variable” – The calendar will have either 4, 5, or 6 weeks, depending on the month. Each week will have the same constant height, meaning the calendar’s height will change month-to-month.
Height: Enter a specific height for the calendar in pixels. This is optional
Link to Post or Registration Page: Select where the registration button on the calendar should take an attendee/registrant.
Display Settings
Enable Images in the Calendar: This option can be used to show features images in the calendar. For best styling, use uniform images for featured images in your calendar.
Enable Filters in Calendar: Specify if filters should be made available. Filters will let a registrant/attendee view a specific group of events either by event category or event venue.
Show category legend: Specify if the event category should appear above the calendar. It allows an attendee/registrant to quickly browse to a category of events on the calendar.
Use Color Pickers: This lets you customize the default event background color and text color.
Event Background Color: This is a color picker option for the event background.
Event Text Color: This is a color picker option for the event text.
Show Tooltips: Tooltips are a short description of your event. They will appear when you hover over a calendar event. This option will let you enable or disable them.
Tooltip Position: Specify where the tooltip should appear (when you hover over an event on the calendar).
Tooltip Style: Select a color for the tooltip.
Advanced Settings
Formatting
Header Style: Enter the buttons and title that should appear at the top of the calendar. View all available options here: http://fullcalendar.io/docs/display/header/
This can also be used to include the various styles of calendar, an example:
month, agendaWeek, agendaDay, basicWeek, basicDay, next
The above would include buttons for all the different styles, plus the next button.
Button Text: Enter the text that will be shown on the buttons in the header. View all available options here: http://fullcalendar.io/docs/text/buttonText/
Title Format: Enter the text that will be shown in the header’s title. View all available options here: http://fullcalendar.io/docs1/utilities/formatDate/
Column Format: Enter the text that will be displayed in the calendar’s column headings. View all available options here: http://fullcalendar.io/docs1/utilities/formatDate/
Memory Management
Display Attendee Limits: This option will show attendee limits in the calendar. This will increase the queries on the database and may use a lot of resources on your site.
Disable Categories: This option can help speed up your calendar but will break any event category option on the calendar such as the event category legend.
Reset Calendar Settings: This setting will reset the calendar back to its default settings. Any exist settings will be lost!
Usage for the Event Espresso 3 Events Calendar add-on
The calendar shortcodes allow you to display the calendar on a WordPress page or post. Unless otherwise specified, the calendar will show all events by month and exclude expired events.
- Show a calendar with all of your events
[ESPRESSO_CALENDAR] - Show events on the calendar and include expired events
[ESPRESSO_CALENDAR show_expired=true] - Show events from a specific category on the calendar
[ESPRESSO_CALENDAR event_category_id=your_category_id] - Show events from a specific category on the calendar and include expired events
[ESPRESSO_CALENDAR event_category_id=your_category_id show_expired=true] - Show events on the calendar by month
[ESPRESSO_CALENDAR cal_view=month] - Show events on the calendar by a regular week
[ESPRESSO_CALENDAR cal_view=basicWeek] - Show events on the calendar by a regular day
[ESPRESSO_CALENDAR cal_view=basicDay] - Show events on the calendar by an agenda week
[ESPRESSO_CALENDAR cal_view=agendaWeek] - Show events on the calendar by an agenda day
[ESPRESSO_CALENDAR cal_view=agendaDay]
Shortcode Parameters
The following parameters are available for the Calendar add-on. You can see examples of these parameters in use in the section above.
show_expired=false (set to true to show expired events)
event_category_id=featured-12345 (show events from a certain event category (e.g. an event category with an event category ID of featured-12345))
cal_view=”month” (set a default view for the calendar: month, basicWeek, basicDay, agendaWeek, agendaDay)
Troubleshooting the Event Espresso 3 Events Calendar add-on
The plugin does not work as expected. Can you help?
Please double-check your calendar is up-to-date and that the calendar shortcode is published on a WordPress Page.
jQuery conflicts
The registration forms and events calendar depend upon jQuery. If another theme or plugin loads jQuery after WordPress loads its version of jQuery, the calendar or form validation may break and therefore allow blank registration forms to be submitted and/or the calendar to disappear. This usually happens because a theme or plugin may be loading the scripts directly in the header of your site. The proper way of loading scripts is by using the WordPress function wp_enqueue_script.
This can also occur if a theme or plugin loads the jQuery Google api (as seen in the video below.) The jQuery loaded by Google is not compatible with the jQuery.noConflict function that is loaded automatically in the WordPress jQuery library.
For a fix, please adjust the jQuery scripts that are loaded in the header.php file of the theme or plugin to use the wp_enqueue_script method.
Below is a video tutorial on troubleshooting a broken events calendar. You can use this same method to troubleshoot other plugins and themes.
To run this test you will need the Web Developer Tools add-on installed in your Firefox web browser, or alternatively use the Inspect Element in Chrome.
wp_footer() is needed
The WordPress theme needs to call the wp_footer function in order for the calendar (and many other plugins) to work correctly. Look in footer.php theme template file and add this right before the closing body tag like this:
wp_footer();
Auto <p>
If you view source and see much of the calendar content wrapped in <p> tags, try wrapping the calendar shortcode like so:
[raw][ESPRESSO_CALENDAR][/raw]
Customizations for the Event Espresso 3 Events Calendar add-on
Need to load the calendar via a theme template file? You can use a do_shortcode function to display the calendar from a custom template. Here is an example:
echo do_shortcode('[ESPRESSO_CALENDAR show_expired=false]');
You’ll need to set a variable in your template. This will ensure that the calendar’s scripts will load on that page. Example code to include in the custom template follows:
global $is_espresso_calendar;
$is_espresso_calendar = TRUE;
https://eventespresso.com/product/espresso-calendar/