You can access this section from the Event Overview page, either by clicking the links next to the Attendees filter or by hovering your mouse over an event name and clicking the Attendees link that appears.
Attendee Report Page
Once you are on the Attendee Reports page you will be shown a list of the attendees. Depending on which filter you chose, this may be all the attendees in the database or just those specific to an event or time period.

Add New Attendee: This is only available if you have gone to the Attendee Reports page via the Attendee link in an Event (hover over the event name). This option will add an attendee manually. We have a guide to show you how to add an attendee manually.
Filters:
Events: This will take you back to the Event Overview page – you can filter by all events or those that are occurring today or this month.
Attendees: This will filter the events by all attendees, attendees registered today or attendees registered this month. You can also View Report which will show a graphical representation of the registrations.
There are also options to filter the currently listed attendees by Month, Category and Status. Along with a Reset Filters button to clear the filters back to default.
The Live Search Filter can be used to filter the attendee list by any content within the tables: i.e. name, date, event title, time, etc. etc.
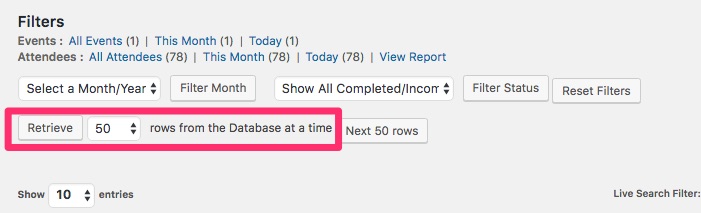
How to retrieve more than 50 attendees
If there are more than 50 attendees registered for the event, Event Espresso 3 does not load all of them at once by default. You can set the number of rows to more than 50 by using the selector next to the Retrieve button. Then you click on the Retrieve button to load more attendee records.
The Attendee Table
This table shows the attendees that you have filtered.
Attendee Name: The name the attendee registered under. This links to their individual Attendee Record.
Registered: The date and time the registration took place.
Event Title: The name of event they registered for. If they registered for multiple events, they will appear in each event attendee list, or multiple times in the “All Attendees” list.
Event Time: The time the event starts.
Option: The ticket/s they purchased.
Payment: Visually shows the status of the payment: ![]() = complete,
= complete, ![]() = incomplete or declined,
= incomplete or declined, ![]() = pending.
= pending.
Type: This shows which payment type the attendee used to pay for the ticket(s) (e.g. PayPal, Invoice, etc)
Action: There are four additional actions you can do here:
Edit Payment: Send you directly to the payment details for that particular attendee
Edit Attendee: Takes you to the individual Attendee Record
Resend Registration Details: Resends the registration email to the attendee
Download Invoice: Downloads a copy of the invoice
Edit Attendee Data
When you click an attendees name in the Attendee Reports page, you are taken to the Edit Attendee Data page where you can modify the details of an individual attendee from their personal information, custom question answers, through to payment details.

Edit Attendee Payment Record
Clicking the View/Edit Payment link within the Edit Attendee Data Page will take you to the actual payment details of that specific attendee. It is broken up into two sections, Payment Details on the left and Invoice/Payment Reminder on the right.

Payment Details
Registration ID: Provides the registration ID for that attendee. There is also a link back to the attendee’s data page.
Payment Status: Provides the current status of the payment (e.g. completed) and this can be modified by the admin.
Transaction Type: The payment type the attendee paid with (e.g. PayPal, credit card, etc). This can be modified by the admin.
Transaction ID: A transaction ID for the payment.
Amount: The total monetary amount of tickets purchased. There is a link to the Edit Attendee Data page to edit this.
Coupon Code: If a coupon has been used it will display here. One can also be added here to record any manual discounts. Note that entering a discount code here will not automatically provide the discount.
Date Paid: The date payment was received.
Do you want to send a payment received notice to the registrant?: If you have manually updated the payment, you can select yes here and then press Update Payment. The system will generate and email the attendee with a payment received email.
Invoice/Payment Reminder
If you wish to send a manual payment reminder to this attendee, you can do so from here. You can either select an email from one you have previously created in the Email Manager or create an email only for that specific attendee.