If you are planning paid events, one of the key aspects to it, is getting paid for your ticket sales!
About Payment Gateways & Merchant Accounts
Payment gateways create the connection between your website and your customer’s bank account or card issuer. When someone tries to make a purchase on your website, the payment gateway is responsible fo sending and receiving the electronic payment requests from your website to the issuing bank. Event Espresso’s payment gateway connections keep track of the payments that are attempted, and whether those payment attempts were successful or approved, declined or failed.
Merchant accounts are different, than payment gateways. Merchant accounts hold the funds for the transaction between both parties before the money is deposited into your bank account.
Payment gateways also have a different levels of security requirements and fees.
You can set activate a payment method by navigating to Event Espresso > Payment Settings. Event Espresso offers a wide range of Payment Gateways for WordPress, from the PayPal to gateways that are country specific.
Selecting and Activating a Gateway in Event Espresso 4
1. Inactive gateways will be gray, Active gateways will be green. You can get started by clicking on your preferred payment gateway. Then click on the green Activate button to activate the payment gateway.
2. After activation, you’ll see some settings that will need to be completed. These settings vary between payment gateways. Be sure to save changes by clicking on the Update Settings button at the bottom of the page.
If necessary, you can also deactivate a payment gateway in the same way by clicking the “Deactivate” button at the bottom of the page.
Event Espresso logs the payment gateway requests and responses in log files located in Event Espresso > Payment Methods > Logs. These payment gateway log files can help with troubleshooting payments.
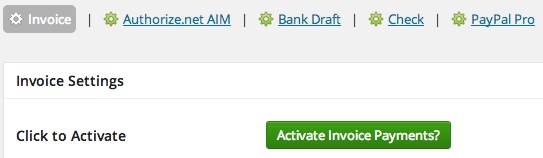
Selecting a Gateway in Event Espresso 3
1. You can get started by clicking on your preferred payment gateway. Then click on the green Activation Box to activate your payment gateway.

2. After clicking on the activation box, you will be given some fields that you will need to complete in order to process transactions by this method. These are different for every gateway.

You can negotiate rates with payment gateway and merchant accounts. Once you have a consistent volume of business, contact your payment gateway and/or merchant account (Stripe and PayPal are both a combined gateway and merchant account) to discuss what processing volume you need to have to get reduced rates. They will look at your risk profile, processing history, transaction size, refund and chargeback ratio, etc.