Event Espresso version 4 Documentation for Adding a New Event
Add New Event
In order to add a new event you need to click the Add New Event button in the Events menu.

This will take you to the Add New Event page.
This page contains 4 tabs: Add Event, Overview, Import and Default settings.
Please note that if you click anything other than the Add Event tab, you will be taken away from that page and any data entered will be lost.
Event Title – add a title for the event, this is visible on the front end.
Permalink – add a custom permalink for the event. If nothing is entered, then it will use the event title.
Event Description – this is a standard WordPress editor and you can add a description and format it as well as add images etc.
Event Datetimes – add in the start date, end date, times, and limit for each Event Datetime. An event can have more than one Datetime. Click the “Add Datetime” button to add more Datetimes. Click the ticket icon to assign tickets to a datetime. Click the the copy icon to duplicate a Datetime. Click the garbage can icon to trash the icon.
Available Tickets – enter the price and quantity for each ticket type; click the “Create Ticket” button to add more tickets. Click the gear icon to toggle the advanced options where you can assign a ticket to a date time, set minimum/maximum purchase limits, and set price modifiers.
You can click on the Help tab on the upper right corner of the event editor page, then click on Event Tickets for more detailed information about how to use the Ticket editor.

Venue Details
Here you can select a venue from your list of venues. Venues can be managed in Event Espresso > Venues. The venue information can be displayed on the event information page.
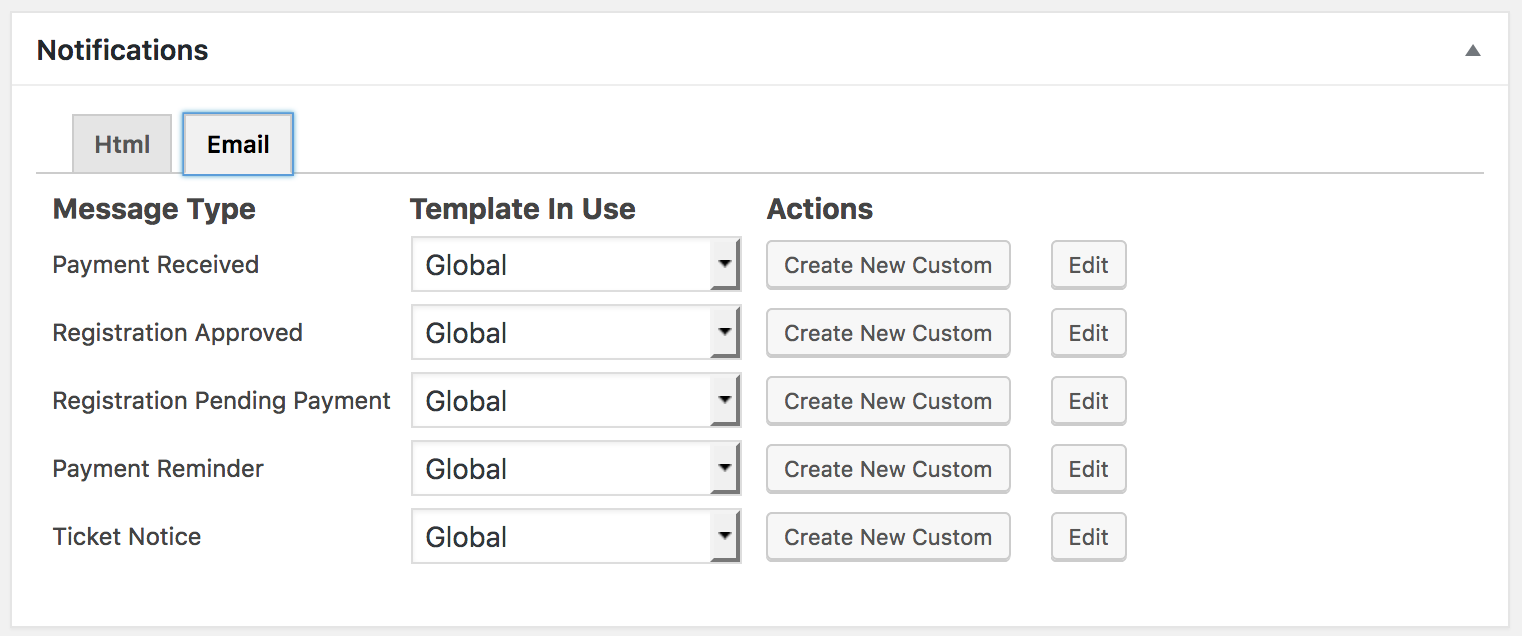
Notifications
This area controls which emails are sent on a per-event basis. If you don’t need to control the individual events emails, and are happy to use the same ones across all your events, you can happily ignore this section.
By default the event will use the Global emails created in the Messages area, but you can select a pre-built custom email or start a new custom email by clicking the Create New Custom button. When you click the button, a modal will appear and you can create the custom email.
Event Registration Options
These control important aspects of the event.

Active Status
Shows the current status for an event. A status will appear as Active, Upcoming, Postponed, Inactive, Sold Out, Expired, or Cancelled. Please see the help tab in the for a list with definitions of the event statuses.
Maximum number of tickets allowed per order for this event
Control how many tickets can be purchased in a single order. If the ticket limit allows, the ticket quantity selector will allow a quantity selection up to what’s set here.
Display Ticket Selector
Show the ticket selector or don’t. This can be useful to set to no when registration isn’t required to attend an event.
Alternative Registration Page
Takes a URL to a different event page. If this is set when the user clicks the link to go to this event’s registration page, they will be redirected to the alternative URL.
Event Phone Number
Enter a phone number for this event. This field is optional.
Default Registration Status
Select the default registration status for this event only. This will override the global setting that’s set in the Default settings tab. The options are Approved, Not Approved, and Pending Payment. An explanation of each setting can be found in the Default Settings help tab.
Featured Image
Set featured image
If the WordPress theme adds support for featured images, you can set a featured image for the event. This is primarily used in the Calendar display if the option to display Calendar images feature is enabled. Your theme may also display the featured image in the archives template (for the event list) and the single post template (for the event page). Please see the notes in the calendar documentation for tips on getting the best results for displaying images in the calendar.
Questions for Primary Registrant
Here you can select which question groups are shown to the Primary Attendee during registration. The default Personal Information question group is always selected.
If you have any other question groups created they will show here, and you can select them as necessary.
Questions for Additional Registrants
Just like the questions for the Primary Attendee, here you can select question groups to be shown to the Additional Attendees. This will allow you to ask for information from attendees if more than two tickets are being purchased.

Event Category
Event categories help you to split up your events into manageable groups. If you have any event categories created you can select them here.
Event Espresso version 3 Documentation for Adding a New Event
This guide covers all the options within the Add New Event options page.
It is split into three main segments: Basic Details, Sidebar Options, and Advanced Options. Only the core plugin options are covered here, please see the individual add on documentation to view what additional functionality they provide.
Basic Options
This segment consists of the of the basic event data: description, times, and prices.
Event Title: Add a title or name for your event.
Unique Event Identifier: This is system generated but is used in other places such as shortcodes.
Event Description: Add a description of your event. You can use the edit box’s tools to format the text and add images, just like a normal WordPress post.
Event Date/Times
Registration Dates: Add the start and end date for registration. Normally registration ends before the event starts but it can carry over until the event ends. You can set events to Expired when the registration date has gone, in General Settings.
Registration Times: Not a requirement. If set registration is limited to those times.
Event Dates: When your event starts and ends, can be the same day. Required.
Event Times: What times the event starts and finishes.
Qty: (Quantity) This option will only appear if you have turned on the “Use registration limits on time slots?” option in General Settings. It allows you to allocate a number of tickets to a time slot. Experimental feature.
Add Additional Time: Want to add multiple time slots to day? Click the Add Additional Time button and more fields will appear, this can be done multiple times.
Current Time: Shows you the current time/date format as per WordPress.
Event Pricing
Standard Pricing
Without the WP User Integration (Members) add on, you will just see the Standard pricing system. You can still create multiple prices for each event.
Name 1: The Prices name – this is visible on your website.
Price: The actual price (please include the trailing zeros, e.g. 10.00)
Surcharge: If you need to add an additional cost to the event price, such as a tax, VAT, fuel costs, etc, then you can add it here.
Surcharge Type: Determines if the above figure is a percentage of the event price or a figure to add on top of the standard event price.
Add A Price: Add additional price levels.

Member Pricing
Very similar to the standard pricing you can add multiple member prices.
Sidebar Options
The options in the sidebar allow you to tweak your events even more, allowing more flexibility for you and your customers.
New Event/Quick Overview
If this is just a new event, this box will only contain the Submit New Event button, which saves and publishes the event.
If you are editing an existing event, you will see the Quick Overview information, which consist of the Event start date, the current status of the event, how many attendees are signed up, the attendee limit, and a quick link to email all the attendees of the event.
Event Options
Attendee limit: cap how many people can attend, leave blank for unlimited.
Allow group registrations?: This means that one person can buy tickets for a group.
Max group registrations: You can cap how many tickets someone can buy in one go.
Additional Attendee Registration Info?: Do you need to collect question information from everyone in a group or just the buyer? If you need everyone’s information then select one of the options available here.
Is this an active event?: The default is yes. If set to no, the event becomes unavailable to users and an expiry message is displayed.
Event Status: Public: live and accessible; Waitlist: used as an overflow for limited capacity events; Ongoing:live and accessible; Draft:live and accessible but has a draft warning; Deleted:removed from the site and the event list. It can still be accessed by filtering the dashboard event list for deleted events, it also remains in the database.
Display Description?: Default is yes, if set to no the event description is hidden when viewed from the site.
Display Registration Form?: Default is yes, if set to no the registration form is hidden when viewed from the site. Useful when using the Multiple Event Registration add-on.
Default Payment Status for Event: If set to anything other than No Change the payments will be set to the appropriate status no matter whether payment has been received or not. Settings are – No Change, Incomplete, Pending, Completed.
Alternative Registration Page (optional): Allows you to set an alternative page that the user is directed to when they click on the event, or visit the event registration page directly.
Alternative Email Address (optional): Add an alternative email to send admin notifications to. This can be a comma separated list and include the admin email.
Featured Image
Add a featured image to your event. This is primarily used in the Calendar display if the option to allow images has been turned on. Event Espresso 3 will display featured images in the event listings page and on the event registration page (individual event page) so long as it is turned on in the Template Settings options.

Featured image
Event Category
If you have created Event Categories, you can select which ones the event belongs to. This allows you to list events by category, like you would with normal WordPress posts. The Manage Categories link takes you to the Event Categories setting page.
Event Promotions
Here you can set basic discounts for your event
Early Registration Discount: This is an Early Bird discount, so if a customer registers before a certain date they get a discount applied to their purchase. Only one Early Bird discount can be set per event.
End Date: This is the date when the promotion ends. So if you set this as 1st October, then a customer visiting the site at the start of 1st October (00:00) would not get the discount.
Amount: The discount amount.
Percentage: Is the above figure a percentage or full figure?
Allow Discount Codes?: If you have created discount codes via the Promotional Codes options page, you can allow this event to make use of them. Simply tick the boxes next to the promotional codes listed.
Manage Promotional Codes: A link to the Promotional Codes options page.
Event Questions for Primary Attendee
Choose which question groups need to be shown to the Primary Attendee (the person making the purchase). Note that Personal Information is always required so cannot be de-selected.
Event Questions for Additional Attendees
Choose which question groups are shown for Additional Attendees (group bookings). Note that Personal Information is always required. However, the Additional Attendee question groups do not have to be the same as the Primary Attendees question groups.
Event Staff/Speakers
If you have set this up, simply tick the box next to the relevant staff members names and it will show the information in the Event description.
Advanced Options
Additional Event/Venue Information
This section allows you to attach a venue to the event, the details of which can be displayed on both the event registration page, and ticket.
Select from Venue Manager list: Choose from a pre created venue, see the Venue Manager documentation for details.
Virtual Location
This information can be used to add non physical locations, such as for webinars, live chat discussions, online gaming, etc.
Phone: Phone number of a contact.
URL of Event: The web address of the event.
Call in Number: Used for virtual events.
Event Meta
Exactly like standard WordPress meta fields, these boxes allow you to add custom information to your events and used in templates and custom pages.
This extra information can also be displayed in your event listings or registration pages via shortcodes.
The Shortcodes take the form of:
<code>[EE_META type="event_meta" name="my_meta_key"]</code>
The name parameter is the the first box labeled ‘Key‘ and allows the shortcode to identify which meta box is to be displayed; the ‘Value‘ is the actual content you wish to be shown.
If you are using custom templates (moved to the uploads folder) you can add the shortcode directly to the template, this would take the form of:
<?php echo do_shortcode('[EE_META type="event_meta" name="my_meta_key"]'); ?>
Email Confirmation
This section allows you to over rule the default confirmation email on a per event basis.
Send custom confirmation emails for this event?: This must be changed to Yes if you want to override the default confirmation email for this event.
Use a pre-existing email?: If you have defined an email in the Email Manager screen you can choose one of those pre-defined emails here. If the option states “No Results” then you have not created any emails yet.
Create a custom email: If you have not already defined an email you can create a custom email directly in the event.
Create a Post
This section allows you to create (or remove) an additional Post or Custom post related to the event. Creating a Post for the event can be very useful, as the events are outside of the normal WordPress loop, so they will not show up in your blog or other feed. By creating a Post, which is in effect a duplicate of the event, you can insert this information into your blog or feed.
Add/Update post for this event?: If changed to Yes, a post will be created when the event is saved or updated.
If no, delete current post?: Once a Post has been created, you can delete it by changing the above option to No and selecting the tick box for this option and updating the event.
Author: Select an author for the post if the site has more than one author. Default is admin.
Tags: Add tags to the post, these are the same as the standard WordPress tags and will add to that list. Comma separated.
Post Categories: Select or add a new category for the Post. These are standard WordPress categories and are separate from Event Categories.